Table of Contents >> Show >> Hide
- Quick Reality Check: What “Replanting” Usually Means
- What You’ll Need
- Step 1: Prep the Pit (So It Doesn’t Turn Into a Funky Science Project)
- Step 2: Sprout the Pit (Pick Your Method)
- Step 3: Replanting a Sprouted Pit (Water → Soil)
- Step 4: Replanting Again (Repotting as It Grows)
- Step 5: Avocado Plant Care That Actually Matters (Light, Water, Feeding)
- Step 6: Pruning and Pinching for a Bushier Plant
- Can You Plant It Outside?
- Will It Ever Grow Actual Avocados?
- Troubleshooting: Common Problems (and Fixes)
- Safety Notes for Homes With Pets
- Conclusion
- Real-World Experiences: What People Notice When Replanting an Avocado Pit
You ate an avocado. You saved the pit. You stared at it like it stared back. Now you’re thinking,
“What if I turned this snack souvenir into an actual plant?” Welcomethis is how to replant your
avocado pit the right way, with fewer mysteries, less mold, and a much better chance of ending up
with a cute green houseplant instead of a sad brown science experiment.
Quick Reality Check: What “Replanting” Usually Means
People use “replanting an avocado pit” to describe a few different moments. This guide covers all
of them:
- Transplanting a sprouted pit from water into soil (the most common scenario).
- Repotting a young avocado plant into a bigger container as it grows.
- Planting outdoors (only if your climate is warm enough and you harden it off correctly).
Either way, the goal is the same: keep the roots healthy, avoid rot, and help your seedling settle
into a stable, well-draining home.
What You’ll Need
- 1 avocado pit (fresh is best)
- A glass/jar of water or a small pot with drainage holes
- Toothpicks (if you’re doing the water method)
- Well-draining potting mix (a standard indoor mix works; cactus mix also helps drainage)
- A pot (start around 8–10 inches wide for transplanting; go smaller for tiny seedlings)
- A sunny window or grow light
- Optional but helpful: perlite, a small stake, scissors/pruners
Step 1: Prep the Pit (So It Doesn’t Turn Into a Funky Science Project)
1) Remove and clean it gently
Pop the pit out carefully so you don’t nick it with a knife. Rinse off all fruit residue. Leftover
avocado flesh is basically an all-you-can-eat buffet for mold.
2) Identify top vs. bottom
The broad, flatter end is the bottom (roots usually emerge here). The pointier end is the top
(shoot/leaves emerge there). If your pit looks suspiciously round, look for the slightly flatter side
and treat that as the “down” end.
3) Optional: peel the thin brown skin
Some gardeners gently peel the pit’s thin outer skin to speed water absorption and reduce mold.
If it comes off easily, fine. If it fights back like it pays rent, don’t force itdamaging the seed
can slow or stop sprouting.
Step 2: Sprout the Pit (Pick Your Method)
You can start your pit in water (classic “toothpick in a jar” method) or directly in soil. Both can work.
Water lets you watch roots grow (very satisfying). Soil skips the water-to-soil transition (often simpler).
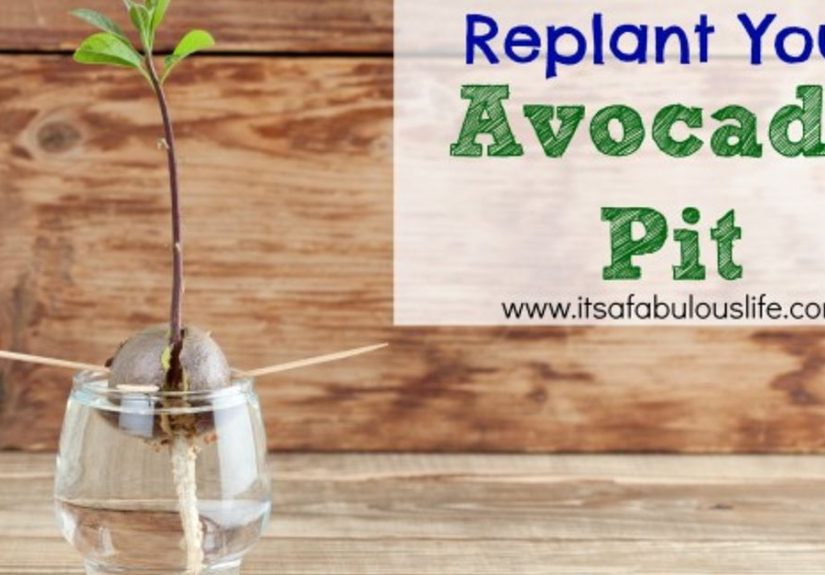
Option A: The Water Method (Toothpicks + Jar)
- Insert 3–4 toothpicks around the middle of the pit (about halfway down), spaced evenly so the pit can “sit” on a glass.
-
Fill a glass with water and suspend the pit with the broad end down.
Aim to keep roughly the bottom 1/4 to 1/3 of the pit in water. - Put it in a warm, bright spot with bright indirect light (think: near a sunny window, not baking on a scorching sill).
- Keep the water level steady. Change the water every few days to weeklyespecially if it gets cloudy.
- Wait. The pit will often crack (normal). Roots usually appear first, then a shoot.
Patience is part of the deal. Some pits sprout in a few weeks; others take longer. If nothing happens
after a couple of months, that pit may be a dudno shame in trying again.
Option B: The Soil Method (Plant It and Forget It… Mostly)
- Choose a pot with drainage holes (non-negotiable).
- Fill with a well-draining mix. If your mix is heavy, lighten it with perlite.
- Plant the pit with the pointy end up. Bury about half the pit and leave the top half exposed.
- Water thoroughly once, then keep the soil lightly moist (not soaked). Put it in bright light.
The soil method can feel less “exciting” because you’re not watching the roots do gymnastics in a glass.
But it’s also less likely to cause transplant shock later.
Step 3: Replanting a Sprouted Pit (Water → Soil)
This is the moment most people mean by “replant your avocado pit”: you started it in water, it sprouted,
and now it needs a real home.
When it’s ready to transplant
Don’t rush this. A tiny nub of root is not a full root system. A good transplant window is when:
- Roots are several inches long (or clearly well-established), and
- You have a visible shoot and some leaves starting, and
- The pit looks stableno mushy rot spots.
How to transplant without snapping the taproot
-
Pick the right pot size. For a sprouted pit, an 8–10 inch pot is a comfortable starting point
(big enough for roots, not so huge it stays soggy forever). -
Use well-draining soil. Avocado seedlings hate “wet feet.” If your soil holds water like a sponge,
mix in perlite. -
Make a deep enough hole. You want roots to go downward naturally, not bent into a circle like they’re
trying to audition for a bracelet commercial. - Remove toothpicks gently. If they’re stuck, wiggledon’t yank. You’re trying to raise a plant, not start a pit-vs-toothpick war.
-
Plant with the top half exposed. Set the pit so the upper half stays above the soil line. This reduces the risk of rot
around the stem base and keeps things aerated. - Water in. Water thoroughly until excess drains out. Then let the top inch of soil dry slightly before the next watering.
The first 10–14 days after transplant
Think of this as the “settling-in” phase. Your job is to keep stress low:
- Light: bright light, mostly indirect at first. Avoid sudden full-blast midday sun.
- Water: damp, not drenched. Overwatering right after transplant is the fastest path to root problems.
- No fertilizer yet: give it time to adjust first.
Step 4: Replanting Again (Repotting as It Grows)
Avocado plants can grow surprisingly fast once they’re happy. Repotting (moving to a slightly larger pot)
keeps growth steady and prevents the plant from becoming root-bound.
Signs it needs a bigger pot
- Roots poking out of the drainage holes
- Soil drying out extremely fast (like, hoursnot days)
- Plant looks top-heavy or wilts quickly after watering
- Growth slows even though light and watering are consistent
How to repot (without drama)
- Choose a pot 1–2 inches wider than the current one (going huge can keep soil wet too long).
- Water the plant the day before repotting (slightly moist roots handle better).
- Slide the root ball out, support the stem, and loosen circling roots gently.
- Set it at the same soil height as before. Don’t bury the stem deeper.
- Backfill with fresh mix, press lightly, and water until it drains.
Step 5: Avocado Plant Care That Actually Matters (Light, Water, Feeding)
Light
Avocados love bright light. Indoors, a bright window is your best friend. If your plant gets leggy
(long stem, sparse leaves), it’s usually begging for more light. Rotate the pot weekly so it grows evenly
instead of leaning like it’s trying to eavesdrop on your neighbors.
If you move it outdoors in warm months, do it gradually. Sudden full sun can scorch tender indoor leaves.
Water
The goal is consistent moisture without soggy soil. A simple rule:
water when the top inch of soil feels dry. Then water deeply until it drains.
Never let the pot sit in a saucer of water for long.
If leaves turn yellow and drop, overwatering is a prime suspect. If leaf tips brown and soil dries too fast,
you may be underwatering (or dealing with low humidity or saltsmore on that in troubleshooting).
Fertilizer
Once your plant is established (usually after it’s settled in and actively growing), you can feed it lightly.
A balanced houseplant fertilizer or a citrus/avocado-style fertilizer works well. Don’t overdo itmore fertilizer
doesn’t mean more avocados. It often means crispy roots.
Step 6: Pruning and Pinching for a Bushier Plant
Left alone, avocado seedlings can grow tall and a bit lanky. If you want a fuller, bushier plant, you’ll need
to encourage branching.
- Pinch the tip (the newest growth) once the plant is well-established. This nudges it to branch.
-
If your seedling gets a long stem early, some growers cut it back to encourage branching once it’s sturdy.
Do this only if the plant is healthy and actively growing.
Pruning is optionalyour avocado plant won’t file a complaint if you skip it. But if you want “cute tabletop tree”
instead of “dramatic green spear,” it helps.
Can You Plant It Outside?
If you live in a warm climate (generally the warmest USDA zones), avocado can live outdoors. If you don’t,
treat it as a houseplant and bring it outside only seasonally.
Hardening off (the outdoor transition)
Before moving your plant outdoors for the season:
- Start with 1–2 hours outside in bright shade.
- Increase outdoor time over 7–10 days.
- Gradually introduce morning sun before afternoon sun.
- Bring it in if nights get chilly.
The big enemies are frost, cold wind, and waterlogged soil. Young avocado plants are not built for surprise winter drama.
Will It Ever Grow Actual Avocados?
Here’s the honest answer: maybe, but don’t plan your guacamole budget around it.
Seed-grown avocados often don’t come “true” to the parent fruit, and they can take many years to fruitif they fruit at all,
especially indoors. If your goal is fruit, a grafted nursery tree is the reliable route. If your goal is a fun,
good-looking plant with a cool origin story, growing from a pit is perfect.
Troubleshooting: Common Problems (and Fixes)
Mold on the pit
- Cause: old fruit residue, stagnant water, poor airflow
- Fix: rinse gently, change water more often, keep only the bottom portion submerged, and avoid overly warm, stuffy spots
Pit turns mushy or smells bad
- Cause: rot (too much water exposure, damaged seed, poor drainage)
- Fix: discard and restartrot rarely reverses once the seed tissue breaks down
No sprout after weeks
- Cause: seed not viable, too cool, inconsistent moisture
- Fix: keep it warm and bright; if nothing happens after a long stretch, try a fresh pit
Leggy stem, few leaves
- Cause: not enough light
- Fix: brighter window, rotate the pot, or add a grow light; pinch/prune once healthy to encourage branching
Brown leaf tips
- Cause: inconsistent watering, low humidity, salt buildup, or too much fertilizer
- Fix: water more consistently, flush soil occasionally (water until it drains well), and fertilize lightly
Yellow leaves and leaf drop
- Cause: overwatering or poor drainage (sometimes shock from moving environments)
- Fix: let soil dry slightly, ensure drainage holes, and avoid leaving water in the saucer
Safety Notes for Homes With Pets
Avocado plants contain compounds that can be problematic for some animals, especially certain birds and livestock.
If you have pets that chew plants, keep your avocado plant out of reach and consider choosing pet-safe greenery instead.
(Your avocado plant will also appreciate not being used as a salad bar.)
Conclusion
Replanting an avocado pit is one of those rare projects that’s cheap, oddly calming, and genuinely rewarding.
The keys are simple: start clean, keep moisture consistent (not excessive), give it bright light, and transplant gently
once the roots are ready. Your pit doesn’t need fancy gadgetsit needs patience and a pot that drains.
And if your avocado plant never produces fruit? That’s okay. Not every plant has to pay rent with guacamole.
A healthy, glossy-leaved avocado houseplant is still a winand a great conversation starter that begins with,
“So this used to be my lunch…”
Real-World Experiences: What People Notice When Replanting an Avocado Pit
If you’ve ever looked up avocado pit projects online, you’ve probably seen two extremes: “It sprouted in 10 days!”
and “It’s been six months and my pit is just… vibing.” In real life, most experiences fall in the middle, and the biggest
lesson is that avocado pits don’t run on your schedulethey run on warmth, moisture, and luck (with a side of patience).
One common experience: the pit cracks and looks “broken,” which makes people panic. But that crack is often the first sign
of progress. The seed coat splitting can be completely normal, especially in the water method. What tends to surprise people
is that the root usually shows up first, and it can get impressively long before the shoot does anything visible. If you’re
staring at the top like it’s supposed to pop open like a jack-in-the-box, you’re not aloneroots are quietly doing the work below.
Another thing many growers notice is how different the “water plant” behaves once it hits soil. A seedling that looked unstoppable
in a jar can sulk for a week or two after transplanting. That’s typically not failureit’s adjustment. The roots are switching from a
constantly wet environment to a cycle of wet-and-drying soil, and that transition can be stressful. People who have the smoothest
transitions usually do three things: they transplant only after the root system is clearly developed, they use a fast-draining mix,
and they avoid the temptation to “comfort-water” the plant every day.
Light is the next big “ohhhh” moment. Many people start their pit on a windowsill, then realize their plant is stretching like it’s
trying to reach the sun from the basement. That long, skinny growth is the plant’s way of saying, “I like you, but I need brighter light.”
When growers move the plant to stronger light (or add a grow light), leaves often become fuller and growth sturdier. Rotating the pot
also becomes a surprisingly real habitwithout rotation, avocado seedlings love to lean dramatically in one direction, like they’re posing.
Then there’s pruning. Some folks swear by early pruning to encourage branching, while others refuse to cut anything because it feels
like snipping a tiny green achievement. Both reactions are valid. The shared experience is this: once you pinch or prune and the plant
responds with side shoots, it feels like leveling up. It changes the plant from “single stalk” to “mini tree,” and that’s when people start
getting attached. Like, “I can’t go out of town; my avocado is going through something.”
Finally, the most realistic long-term experience: growing from a pit is usually about the plant journey, not the fruit. People often keep
their pit-grown avocado as a decorative houseplant, sometimes moving it outdoors in warm months and bringing it back inside before cold
weather hits. If you approach it that wayan ongoing, low-stakes project with a high “look what I grew” payoffreplanting an avocado pit
stays fun instead of turning into an annual disappointment calendar.