Table of Contents >> Show >> Hide
- Why Sealing Windows Saves Real Money (and Not Just “Feels Nice” Money)
- First, Confirm the Problem: How to Find Window Air Leaks
- Pick the Right Sealing Strategy (Because Not All Gaps Are the Same)
- Your Shopping List: Tools and Materials That Actually Work
- Step-by-Step: Seal Windows Like a Pro (Without Becoming One)
- 1) Prep the surface (this is where savings begin)
- 2) Caulk the non-moving gaps (interior first, then exterior)
- 3) Weatherstrip the moving parts (the sash and tracks)
- 4) Seal behind the trim (the hidden leak that makes big drafts)
- 5) Fix the “it closes, but not really” problem
- 6) Add interior shrink film for a seasonal boost
- 7) Consider storm windows (especially low-e) if you want bigger gains
- 8) Don’t forget window treatments (your “daily driver” efficiency tool)
- Mistakes to Avoid (So Your Fix Doesn’t Create a New Problem)
- Indoor Air Quality and Safety: “Build Tight, Ventilate Right”
- How Much Can You Save? A Realistic Example
- When Sealing Isn’t Enough: Signs You May Need Repair or Replacement
- Mini Case Studies: What “Good Sealing” Looks Like in the Real World
- Conclusion: Seal the Leaks, Keep the Comfort, Lower the Bill
- Experiences From the Field: What Homeowners Commonly Notice After Sealing Windows
- Experience 1: “My heater finally stopped acting like it was paid by the hour.”
- Experience 2: “The room stopped being ‘the cold room.’”
- Experience 3: “It got quieter. Like… surprisingly quieter.”
- Experience 4: “Condensation got better… after I fixed the draft the right way.”
- Experience 5: “The DIY part was easy. The prep part was the boss fight.”
If your home feels like it’s trying to “share” your heated (or cooled) air with the entire neighborhood,
congratulations: you’ve discovered the draft economy. Drafty windows don’t just make your couch feel like a wind tunnel
they make your HVAC system work overtime, which is basically the energy-bill version of ordering guacamole on everything.
The good news: you don’t need to replace every window to feel a difference. In many homes, smart air-sealing work
(caulk, weatherstripping, and a few strategic upgrades) can noticeably improve comfort and reduce heating and cooling costs.
The trick is matching the right fix to the right gap, so you’re not “sealing” the part of the window that’s supposed to move
(or breathe, or drain). Let’s do this the right waycleanly, safely, and with minimal swearing.
Why Sealing Windows Saves Real Money (and Not Just “Feels Nice” Money)
Windows are a prime spot for air leakage because they’re full of seams: between the sash and the frame, around trim,
where the frame meets the siding, and sometimes behind the trim where you can’t see the gap at all.
When outdoor air sneaks in (or your conditioned air leaks out), your HVAC system has to re-heat or re-cool replacement air.
That shows up on your bill, especially during peak summer and winter.
Here’s the practical takeaway: sealing air leaks around windows typically gives you a double winlower energy use and fewer
uncomfortable drafts. And unlike “upgrade your whole system” projects, the supplies are inexpensive and the results are fast.
First, Confirm the Problem: How to Find Window Air Leaks
Before you buy a cart full of foam tape like you’re building a pillow fort, locate where the air is actually moving.
Your goal is to seal air pathways, not just “make it look sealed.”
- The hand test: On a cold or windy day, slowly move your hand around the window edges and trim. You’re feeling for moving air, not just cold glass.
- The tissue test: Hold a thin tissue near seams. If it flutters, you’ve found airflow.
- Incense/candle (carefully): A faint smoke trail that bends or pulls toward a gap can reveal leaks. Use common senseavoid curtains, kids, pets, and open solvents.
- Nighttime flashlight check: If you can see daylight around a closed sash, air is almost certainly moving there too.
- Infrared thermometer/camera: Not required, but helpful. Temperature “streaks” near edges can hint at leakage paths.
Pro tip: test when there’s a decent indoor/outdoor temperature difference and a little wind. Calm, mild weather is great for picnics,
not great for finding drafts.
Pick the Right Sealing Strategy (Because Not All Gaps Are the Same)
Most window sealing comes down to two categories:
- Stationary gaps (trim-to-wall, frame-to-sidings, siding-to-frame): seal with caulk or backer rod + caulk.
- Moving gaps (sash-to-frame, tracks, meeting rails): seal with weatherstripping.
A quick rule that keeps DIY projects from going off the rails:
Caulk is for parts that don’t move. Weatherstripping is for parts that do.
Put caulk on a moving joint and you’ll “seal” it shut… right before you need to open it.
Cheat Sheet: Common Window Leaks and the Best Fix
| Where you feel the draft | Likely cause | Best fix |
|---|---|---|
| Between interior trim and wall | Cracked/failed caulk | Remove old caulk, re-caulk neatly |
| Along the sash edges (where window slides) | Worn or missing weatherstripping | Replace weatherstripping (foam, V-strip, brush, bulb) |
| Bottom of a double-hung window | Loose meeting rail, weak latch, worn seal | Adjust latch, add/replace meeting-rail weatherstrip |
| Around exterior window frame | Cracked exterior sealant | Exterior-grade caulk at frame-to-siding joints |
| Draft “through” the window area even when closed | Single-pane/poor insulation + leakage | Air seal + interior shrink film or storm window |
| Cold air seems to come from behind trim | Gap between window frame and rough opening | Low-expansion foam or backer rod + caulk (behind trim) |
Your Shopping List: Tools and Materials That Actually Work
You don’t need a contractor-grade arsenal, but you do need the right supplies. Buy fewer thingsbuy the right things.
Tools
- Caulk gun
- Utility knife + spare blades
- Putty knife or caulk remover tool
- Rags/paper towels and a small bucket of soapy water
- Painter’s tape (for crisp caulk lines)
- Measuring tape and scissors
- Vacuum (tracks are basically crumb museums)
Materials
- Interior caulk: paintable acrylic latex/siliconized acrylic (good for trim and drywall edges)
- Exterior caulk: exterior-rated silicone or polyurethane (good for weather exposure)
- Backer rod: foam rope for larger gaps before caulking (makes a cleaner, stronger seal)
- Weatherstripping: V-strip, foam tape, bulb seals, brush seals (choose based on window type)
- Interior window insulation film kit: plastic shrink film + double-sided tape (seasonal boost)
- Optional: low-expansion spray foam (the “window and door” kind), storm window panels, thermal curtains/cellular shades
Step-by-Step: Seal Windows Like a Pro (Without Becoming One)
1) Prep the surface (this is where savings begin)
Caulk and weatherstripping only work if they can stick. Dirt, dust, peeling paint, and old crumbly sealant ruin adhesion.
Take a few minutes to:
- Vacuum window tracks and wipe down frames.
- Remove loose or cracked caulk completely (don’t “caulk over sadness”).
- Let surfaces dry fully before applying anything new.
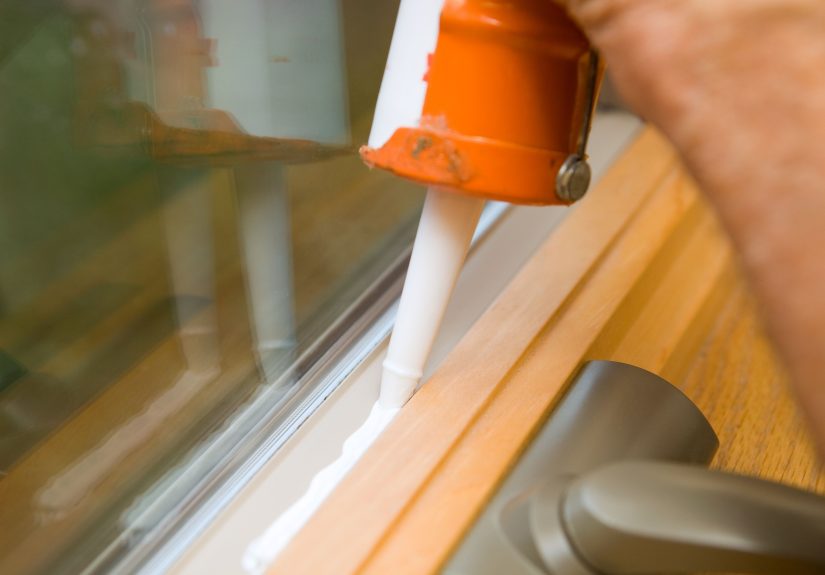
2) Caulk the non-moving gaps (interior first, then exterior)
Indoors, focus on where the trim meets the wall and where trim meets the window frame.
Outdoors, focus on where the window frame meets siding or exterior trim.
- Cut the caulk nozzle at a small angle (start smallyou can always cut more).
- Apply a steady bead into the joint, keeping consistent pressure.
- Smooth the bead with a damp finger or caulk tool for a tight seal and clean finish.
- Remove painter’s tape immediately if you used it (peel before the caulk skins over).
Gap size matters: For very small cracks, caulk works great. For bigger gaps, insert backer rod first, then caulk.
This prevents you from pumping half a tube into a canyon and getting a seal that cracks later.
3) Weatherstrip the moving parts (the sash and tracks)
This is where most “mystery drafts” come from. Different windows need different seals:
- Double-hung windows: V-strip along the sides can reduce leakage while still letting the sash move. Check the meeting rail (where the sashes meet) for worn seals.
- Sliding windows: Brush/fin seals or foam tape can help in the tracks (choose thickness carefully so the window still slides).
- Casement/awning windows: These often use compression seals (bulb or foam) that work well when the window cranks shut.
Install a small section, test the window, then continue. If you weatherstrip the whole thing and it won’t close,
you’ve just invented a “permanently ventilated” window.
4) Seal behind the trim (the hidden leak that makes big drafts)
Sometimes the biggest air leak isn’t visible at allit’s between the window frame and the rough opening in the wall.
If you feel drafts near the casing even after re-caulking the trim, consider carefully removing interior trim and sealing the gap.
- Best approach: Use backer rod + caulk for narrow-to-moderate gaps.
- For larger gaps: Use low-expansion “window and door” spray foam sparingly. Too much expansion can bow the frame and cause sticking.
Reinstall trim, then finish with a neat interior caulk line. This step is a bit more work, but it can pay off because it targets a high-volume leakage path.
5) Fix the “it closes, but not really” problem
A window can look shut and still leak if the sash doesn’t pull tight. Quick checks:
- Tighten loose hardware and latches.
- Make sure the latch actually pulls the meeting rails together.
- Replace worn sash locks if the window never feels snug.
- On older windows, consider adding or upgrading sash weatherstrips at the meeting rail.
6) Add interior shrink film for a seasonal boost
If you have older windows (especially single-pane) or rooms that feel chronically chilly in winter, interior window insulation film can help.
It creates a sealed air space that reduces drafts and improves comfort.
- Clean the frame where tape will stick (seriouslyclean it).
- Apply double-sided tape around the perimeter.
- Stick the film to the tape, keeping it smooth.
- Use a hair dryer to gently shrink the film until it’s tight and clear.
Two notes from the real world: (1) take your time at corners, and (2) keep the hair dryer movingyour goal is taut film, not modern art.
7) Consider storm windows (especially low-e) if you want bigger gains
Storm windowsinterior or exteriorreduce air movement and add insulation value to existing windows.
They’re often a sweet spot for older homes: less expensive than full replacement, more durable than seasonal film,
and noticeably better at cutting drafts and improving comfort.
Low-e storm windows can be especially effective over single-pane windows or older double-pane windows without low-e glass.
If you’re trying to improve comfort room-by-room without a full remodel, storms are worth a look.
8) Don’t forget window treatments (your “daily driver” efficiency tool)
Sealing stops air leaks, but you can also reduce heat loss and heat gain with smart window coverings.
Cellular shades and thermal curtains can help, and the best part is they’re “adjustable insulation”:
- Open coverings on sunny winter days to let solar heat in.
- Close them at night to reduce heat loss.
- In summer, close them during peak sun to reduce heat gain and AC load.
Mistakes to Avoid (So Your Fix Doesn’t Create a New Problem)
- Sealing weep holes: Many windows have drainage paths. Blocking them can trap water and cause damage.
- Caulking a moving joint: If it moves, weatherstrip it.
- Using the wrong caulk outdoors: Exterior joints need exterior-rated products that can handle UV and weather.
- Overfilling with expanding foam: Too much can warp frames and create sticking windows.
- Skipping prep: Dirt and old caulk sabotage adhesion, which sabotages savings.
Indoor Air Quality and Safety: “Build Tight, Ventilate Right”
A tighter home is more efficient, but it can also change how your home “breathes.”
If you significantly reduce air leakage, make sure you still have healthy ventilationespecially if you have combustion appliances
(like gas furnaces, water heaters, or fireplaces).
- Use kitchen and bath exhaust fans as intended (and make sure they vent outdoors).
- Keep up with HVAC filter changes.
- Maintain carbon monoxide alarms and smoke detectors.
- If you suspect backdrafting or lingering odors from combustion appliances, consult a qualified professional.
You don’t have to be scared of air sealingjust be smart about it. Comfort and efficiency should never come at the expense of safety.
How Much Can You Save? A Realistic Example
Savings vary based on your climate, the condition of your windows, and how leaky your home is.
But air sealing and basic insulation improvements are widely considered among the most cost-effective home efficiency upgrades.
Here’s a simple way to estimate impact:
- If your annual heating and cooling costs are $1,800 and you reduce losses by 10%, that’s about $180/year.
- If a caulk + weatherstripping weekend costs $60–$150 in materials, payback can be surprisingly quick.
Bigger upgrades (like low-e storm windows) cost more upfront, but they can provide larger comfort gains and longer-lasting performance
especially in older homes with single-pane windows.
When Sealing Isn’t Enough: Signs You May Need Repair or Replacement
Sealing is powerful, but it can’t fix structural problems. Consider deeper repairs or replacement if you see:
- Rotten frames, soft wood, or recurring water intrusion
- Condensation between panes in double-pane windows (seal failure)
- Windows that won’t open safely (egress matters)
- Major warping that prevents the sash from seating
Even then, many homeowners still start with air sealing first, because it’s cheaper, faster, and improves comfort immediately
and it can help you make a calmer, more informed decision about bigger investments later.
Mini Case Studies: What “Good Sealing” Looks Like in the Real World
Case Study 1: The “Cold Bedroom That Everyone Avoids”
A common scenario: one bedroom feels 4–6°F colder in winter. The culprit is often a combo of leakage at the sash edges
and a gap behind trim. A typical fix might include:
- Replacing worn V-strip along sash channels
- Re-caulking interior trim lines
- Adding a seasonal shrink film kit during the coldest months
Result: the room feels less drafty, the thermostat runs less aggressively to compensate, and the “cold bedroom” stops being the family joke.
Case Study 2: The Older Living Room With Single-Pane Windows
For older windows, sealing alone helps, but adding a storm panel can take comfort up another notch.
After basic air sealing, homeowners often notice fewer drafts, and storms can further reduce air movement and improve insulation value.
Conclusion: Seal the Leaks, Keep the Comfort, Lower the Bill
Sealing windows is one of those rare home projects where a little effort goes a long way. Start by finding the leaks, then match the fix:
caulk for stationary gaps, weatherstripping for moving parts, and consider seasonal film or storm windows for extra performance.
Do it neatly, avoid the common mistakes, and keep indoor air quality in mind as your home gets tighter.
Your HVAC system will thank you by doing less work. Your energy bill will thank you by being less dramatic.
And you’ll thank you when you can sit next to a window without feeling like you’re camping.
Experiences From the Field: What Homeowners Commonly Notice After Sealing Windows
The most interesting thing about sealing windows isn’t just the mathit’s how quickly people feel the difference.
Below are a few common “this is what actually happened” experiences homeowners report after tackling drafts.
These are composite examples (because every home is its own weird little ecosystem), but if you’ve ever lived with a whistling window,
you’ll recognize the vibe immediately.
Experience 1: “My heater finally stopped acting like it was paid by the hour.”
One of the first changes people notice is HVAC cycling. Before sealing, the system kicks on, warms/cools the air, and then immediately has to do it again
because the house is quietly trading conditioned air for outdoor air like it’s a hobby. After caulking trim gaps and replacing worn weatherstripping,
homeowners often describe the thermostat behavior as “calmer.” Rooms hold temperature longer, and the system runs in more normal bursts instead of
nonstop hero mode. Even if the utility bill takes a full billing cycle to reflect the change, the comfort shift shows up fasterespecially on windy days.
Experience 2: “The room stopped being ‘the cold room.’”
Many houses have one problem child: a bedroom over the garage, a corner office, or a living room with big, older windows. People usually assume the issue is
“bad insulation,” but drafts are often the louder villain. The moment you seal leakage paths, the room stops feeling like the outdoors is sneaking in through
invisible doors. Homeowners frequently say the floor feels warmer near the window toonot because the floor changed, but because cold air isn’t spilling
down and spreading across the room. Add a thermal curtain or a cellular shade and the room often goes from “avoid at all costs” to “actually usable.”
Experience 3: “It got quieter. Like… surprisingly quieter.”
Air leaks carry sound. When you tighten up gaps around sashes and trim, the home often sounds less “hollow,” especially near street-facing windows.
Homeowners commonly report fewer little whistles and rattles during storms, and less high-frequency noise leakage (think: traffic hiss).
It’s not the same as installing acoustical glazing, but it can be a noticeable perkone of those accidental bonuses that makes you feel like you got a free upgrade.
Experience 4: “Condensation got better… after I fixed the draft the right way.”
Condensation is tricky. Some homeowners see less window condensation after sealing because warm, moist indoor air isn’t being pulled into cold gaps where it condenses.
Others see condensation shift slightly because the air movement pattern changed. The “good” outcome tends to happen when people seal drafts while also staying mindful
about ventilation: using bath fans, running kitchen exhaust, and controlling indoor humidity. A common lesson is that sealing works best as part of a whole-home approach:
stop uncontrolled leaks, then manage moisture intentionally. That’s when comfort and indoor air quality improve together.
Experience 5: “The DIY part was easy. The prep part was the boss fight.”
If you ask people what surprised them, many will say it wasn’t the caulkingit was the prep. Old caulk removal, cleaning dusty tracks, and getting a surface dry enough
for tape and sealant to adhere is the unglamorous part, but it’s what makes the work last. Homeowners who rushed prep often end up redoing sections within a season.
The folks who took an extra hour to scrape, wipe, and dry usually report the opposite: the seals hold, the drafts stay gone, and they forget they ever had the problem.
Which is the highest compliment a home improvement project can get: it disappears into normal life.
If you want a simple takeaway from these experiences, it’s this: sealing windows isn’t just about saving dollarsit’s about reclaiming comfort.
The energy savings are real, but the day-to-day win is walking past a window in January without feeling personally offended by the weather.