Table of Contents >> Show >> Hide
- What a Mandoline Slicer Does (and Why It’s Worth the Respect)
- Choose Your Mandoline “Style”
- Mandoline Safety Rules (Non-Negotiable, Like Wearing Pants Outside)
- Set Up Your Mandoline Station (A 60-Second Checklist)
- How to Slice with a Mandoline: Step-by-Step
- How to Juliennne on a Mandoline (Matchsticks Without Meltdowns)
- Best Foods to Practice With (Low Drama, High Reward)
- Mandoline Mistakes to Avoid
- How to Clean a Mandoline (Safely)
- How to Store a Mandoline So It Doesn’t Bite You Later
- What to Buy for Safer Mandoline Use (Small Add-Ons, Big Payoff)
- Quick “Use It Tonight” Examples
- Frequently Asked Questions
- Conclusion
- Extra: Real-World Experiences & Lessons (So You Don’t Learn Them the Hard Way)
A mandoline slicer is basically the kitchen equivalent of a cheat code: perfectly even slices in seconds, like you’ve got a tiny, invisible line cook living in your drawer.
The only catch? That “line cook” is very serious about blade sharpness. Treat a mandoline with respect, use the right safety tools, and it becomes one of the
most useful gadgets you’ll ownespecially for potatoes, cucumbers, onions, apples, and anything you want thin, uniform, and pretty.
This guide walks you through how to use a mandoline slicer safely, step-by-step, with practical tips for slicing, julienning, cleaning, and storingwithout turning dinner
prep into a “guess I’ll learn the ER waiting-room playlist” moment.
What a Mandoline Slicer Does (and Why It’s Worth the Respect)
A mandoline is designed to produce consistent slices and cutsthin potato coins for gratin, paper-thin onions for burgers, matchstick carrots for slawfaster and more
evenly than most of us can manage with a knife on a weekday. Uniform thickness isn’t just aesthetic: it helps food cook evenly, crisp consistently, and pickle at the same rate.
Common mandoline cuts
- Slices: thin to thick rounds or planks (cucumber salad, chips, gratin, stir-fry prep)
- Julienne: matchsticks (fries, carrot salad, quick stir-fry veg)
- Crinkle/waffle cuts: depending on the blade set (fun fries, snack platters)
Choose Your Mandoline “Style”
Not all mandolines are built the same. Knowing what you’ve got helps you use it safely.
Handheld mandolines
Compact, affordable, and great for quick slicing over a bowl. They often have a few thickness settings and a small footprintperfect if you don’t want another countertop roommate.
V-blade or flat-blade stand mandolines
Larger, often sturdier, and easier to use for bigger batches. Many include interchangeable blades and more thickness options.
“Safety-forward” chute-style mandolines
These designs keep hands farther from the blade using a feeding chute and a press mechanism. They’re often bulkier but can feel more beginner-friendlyespecially if you’re
slicing lots of cucumbers, potatoes, or onions and want extra peace of mind.
Mandoline Safety Rules (Non-Negotiable, Like Wearing Pants Outside)
Here’s the truth: the mandoline’s superpower is also its hazardan exposed, razor-sharp blade that does not care about your dinner plans. You don’t have to be afraid of it,
but you do need a system.
Rule #1: Use the hand guardor a cut-resistant glove (ideally both)
Most mandolines come with a food holder/hand guard. Use it. If you dislike how clunky it feels, a cut-resistant glove can make the grip feel more natural while adding protection.
(Important: cut-resistant gloves are not heat-proof. They are not oven mitts. Please don’t test that theory.)
Rule #2: Stabilize the mandoline like it owes you money
- Work on a flat surface with a damp towel or non-slip mat underneath the mandoline.
- If your mandoline has a rubber foot, make sure it’s actually contacting the counter/cutting board.
- If you’re slicing into a bowl, choose a heavy bowl that won’t skate away mid-slice.
Rule #3: Slow is smooth, smooth is fast
Speed comes after comfort. The goal is steady pressure, consistent motion, and attention. If you’re distracted, rushed, or trying to multitask, that’s your cue to pause.
Rule #4: Stop before the “tiny nub of doom”
When the ingredient gets too small to safely holdstop. Finish the last bit with a knife. The last inch of a potato is not worth your weekend plans.
Set Up Your Mandoline Station (A 60-Second Checklist)
- Clear space: You want elbow room and zero clutter.
- Pick a landing zone: bowl or tray for slices; sheet pan for big batches.
- Add traction: damp towel/non-slip mat under the mandoline.
- Gear up: hand guard + cut-resistant glove + a small cleaning brush nearby.
- Inspect: blade seated correctly; thickness dial locked; no wobble.
How to Slice with a Mandoline: Step-by-Step
Step 1: Choose thickness
Start thicker than you think you need. Thin slices are greatuntil they’re accidentally translucent when you wanted “sandwich onion,” not “onion contact lens.”
Many handheld models offer a few set thicknesses; larger mandolines may have a dial with multiple increments.
Step 2: Prep the food for stability
- Trim a flat side: For round vegetables (potatoes, beets), slice off a thin strip so it won’t roll.
- Peel if needed: Especially for waxy skins if you want ultra-smooth slices.
- Cut to fit: If using a chute-style mandoline, halve wide produce so it slides easily.
Step 3: Attach the food to the hand guard
Press the produce firmly into the prongs/holder so it doesn’t slip. If your guard has spikes, use them. If your produce is soft (like ripe tomato), chill it briefly for firmer slicing.
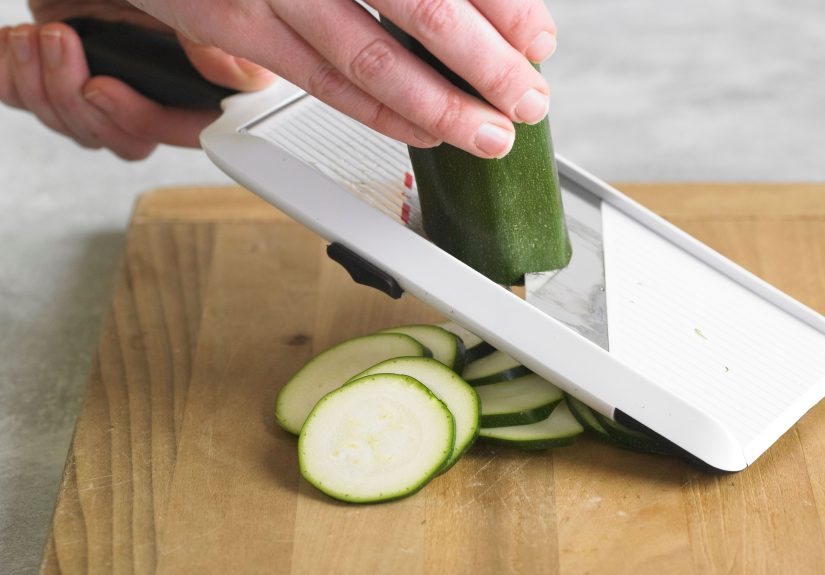
Step 4: Slice with a controlled glide
Hold the mandoline steady with your non-dominant hand (away from the blade path). With the other hand, slide the food holder down the runway in smooth strokes.
Use gentle, even pressurelet the blade do the work.
Step 5: Finish safely
As soon as the produce becomes short or awkward, stop. Take the remaining piece to a cutting board and finish with a knife.
How to Juliennne on a Mandoline (Matchsticks Without Meltdowns)
Julienne cuts are amazing for slaws, stir-fries, and homemade fries. They’re also where people get overconfident. Don’t.
Julienne best practices
- Install the julienne blade correctly (if your mandoline uses inserts, make sure it’s fully seated).
- Start with a flat surface: trim one side of the vegetable so it rides stable.
- Use the guard/glove combo: especially for carrots, potatoes, zucchini.
- Don’t force it: if it catches, stop and reset rather than pushing harder.
Best Foods to Practice With (Low Drama, High Reward)
- Cucumbers: forgiving texture and instant salad gratification
- Potatoes: great for learning consistent thickness (chips, gratin, fries)
- Onions: excellent practice for even slices (and a reason to wear goggles if you’re emotional)
- Apples: firm, stable, and perfect for tarts or quick snacks
Mandoline Mistakes to Avoid
1) Slicing “freehand”
Freehand slicing is how people learn regret. If the guard feels awkward, switch to a cut-resistant glove, but don’t go bare-handed.
2) Using a dull or dirty blade
A blade that’s clogged with starch or residue can snag food and encourage slips. Clean and dry it promptly after use.
3) Slicing on an unstable surface
If the mandoline slides, your hands will compensateand compensation is where mistakes live. Stabilize first, slice second.
4) Trying to “save” the last little piece
The final nub is not a moral victory. It’s a trap. Finish with a knife, toss it in stock scraps, or snack on it proudlyaway from the blade.
How to Clean a Mandoline (Safely)
Cleaning is where many people get careless because “the slicing part is over.” The blade does not agree.
Cleaning steps
- Stabilize the tool: place it flat in the sink or on a towel.
- Use a brush: scrub food residue away from the blade with a dish brush, not your fingers or a sponge you’re gripping tightly.
- Wash with warm soapy water: focus on the underside where bits hide.
- Rinse carefully and dry: dry thoroughly to prevent rust (especially on carbon-steel blades).
- Dishwasher? Follow your model’s instructionssome parts are top-rack safe, but hand-washing often preserves sharpness longer.
How to Store a Mandoline So It Doesn’t Bite You Later
- Engage the safety lock if your mandoline has one.
- Use a blade cover or case so the blade isn’t exposed in a drawer.
- Store flat or upright securely where it won’t slide out when you open the cabinet.
- Keep accessories together (guard, blades, brush) so you’re not rummaging around sharp parts later.
What to Buy for Safer Mandoline Use (Small Add-Ons, Big Payoff)
Cut-resistant glove
A snug-fitting cut-resistant glove adds protection and improves confidence. Look for one with good grip so wet produce doesn’t slip.
Non-slip mat
This is the unsung hero. A stable base reduces the urge to white-knuckle the tool.
Cleaning brush
A stiff brush helps remove residue while keeping your hands away from the blade edge during cleanup.
Quick “Use It Tonight” Examples
Example 1: Viral-style cucumber salad (safer edition)
- Set thickness thin-to-medium.
- Slice cucumber with hand guard + glove.
- Stop early, finish the last chunk with a knife.
- Toss with soy sauce, vinegar, chili crisp, sesame oil, garlicdone.
Example 2: Potato gratin that looks restaurant-level
- Set thickness medium-thin for even cooking.
- Slice potatoes into a bowl of cold water to reduce browning.
- Drain, pat dry, layer with cream/cheese/garlic.
- Uniform slices = uniform tenderness. Magic.
Example 3: Fast slaw for tacos
- Julienne cabbage (or thin-slice, then knife-shred).
- Matchstick carrots with julienne blade.
- Dress with lime, salt, a touch of honey, and hot sauce.
Frequently Asked Questions
Do I really need the hand guard?
Yes. If it feels awkward, add a cut-resistant glove so you can keep control without risking your fingertips.
Are cut-resistant gloves “cut-proof”?
Think “more resistant,” not “invincible.” They reduce risk, but you still need careful technique and attention.
Why does my produce get stuck or jump?
Usually it’s a stability issue (tool sliding), a blade issue (residue), or a technique issue (uneven pressure). Reset your base, clean the blade, slow down.
What’s the safest mandoline for nervous beginners?
Many people prefer chute-style, safety-forward designs that keep hands away from the blade. They’re often bulkier, but they can be a confidence booster.
Conclusion
A mandoline slicer can upgrade your cooking fast: better texture, more even cooking, prettier salads, and less prep time. The key is using it like a pro:
stabilize the tool, pick the right thickness, use the hand guard (and ideally a cut-resistant glove), slice with steady control, stop before the food becomes too small,
and clean it with a brushnot bravado.
Master those habits, and your mandoline becomes what it’s meant to be: a brilliant, reliable kitchen shortcutone that keeps your fingers exactly where they belong.
Extra: Real-World Experiences & Lessons (So You Don’t Learn Them the Hard Way)
If you ask a room full of home cooks about mandolines, you’ll notice a funny pattern: half the room lights up and says, “I use mine constantly,” and the other half makes
a face that says, “I respect that tool from a safe distance.” That split is usually about confidence vs. control. People love mandolines because they deliver uniform
slices instantlybut the first time you realize how quickly the blade works, you also realize the mandoline isn’t interested in your personal growth journey. It’s interested
in slicing. Efficiently.
One of the most common “aha” moments cooks describe is discovering that the hand guard feels clumsy… until you adjust your workflow. The guard isn’t designed for speed-run
slicing with a death grip. It works best when you set up a stable station, choose a sensible thickness, and use smooth, repeatable strokes. Once the station is stable and the
slices are landing neatly in a bowl or on a tray, the guard stops feeling like an annoying accessory and starts feeling like what it is: a tiny safety manager that never takes a day off.
Another frequent experience: people start out trying to slice everything paper-thin because that’s what they see in videos. Then reality hits. Ultra-thin slices are amazing,
but they’re also less forgiving. Beginners often do better starting with medium thicknessthick enough that the food glides smoothly and doesn’t flex or catch. After a few
rounds (cucumbers are perfect practice), you can dial thinner and still stay in control.
Many cooks also report that a cut-resistant glove changes everythingnot because it makes you reckless, but because it reduces the fear factor that causes jerky movements.
When people are nervous, they tend to tense up, rush, or over-correct if the food slips. A glove plus a stable base encourages calm, steady motion. The glove doesn’t give you
permission to ignore safetyif anything, it supports better technique. You still stop early, you still finish with a knife, and you still clean with a brush. But you feel more
in control, which is the whole point.
Cleaning stories are where the wisdom really shows up. Experienced mandoline users don’t “just wipe it down.” They treat cleanup like part of the process. A stiff dish brush,
warm soapy water, and a deliberate approachno fingers near the blade edgeare the difference between a quick rinse and an annoying accident. People who love their mandolines
often mention keeping a dedicated brush nearby so they never have to improvise with a sponge or paper towel wrapped around their hand (which sounds clever until you remember
there’s a blade involved).
Finally, there’s the “last nub” lesson. Almost everyone who has used a mandoline for a while develops a strict personal rule: when the ingredient gets small, the mandoline’s
job is done. The final slice or two is finished with a knife, or the nub is saved for stock, soup, or snacking. This is not wasted food; it’s smart cooking. A mandoline’s
value is speed and uniformitynot squeezing out every last millimeter of potato at the expense of safety. The most seasoned cooks treat that last bit like a stop sign, not a challenge.
The takeaway from all these experiences is simple: a mandoline is safest when it’s used like a system, not a stunt. Stable base. Sensible thickness. Guard and/or glove.
Smooth strokes. Stop early. Brush for cleaning. Safe storage. If you build those habits, the mandoline becomes what people promise it is: a fast, satisfying tool that makes
your food look sharper than your schedulewhile keeping your hands exactly the same as they were when you started.