Table of Contents >> Show >> Hide
- What a Palm Sander Is (and What It’s Not)
- Before You Sand: Safety and Setup (The Unsexy Part That Matters)
- Sandpaper 101: Grit Choices That Actually Make Sense
- How to Use a Palm Sander Step by Step
- Step 1: Pick the right sandpaper (and attach it correctly)
- Step 2: Connect dust collection (yes, even for “small” jobs)
- Step 3: Put the sander flat on the surface before you start moving
- Step 4: Let the tool do the work (light pressure wins)
- Step 5: Move in a consistent pattern with overlap
- Step 6: Use the “pencil scribble” trick to avoid guess-sanding
- Step 7: Vacuum (or wipe) between gritsdon’t grind yesterday’s dust into today’s surface
- Step 8: Handle edges, corners, and profiles with intention
- Common Palm Sander Mistakes (and How to Fix Them Fast)
- Project Examples: What “Good Sanding” Looks Like in Real Life
- Quick Maintenance: Keep Your Palm Sander Working Like It’s Supposed To
- Real-World Lessons From the Sawdust Trenches (Experience-Based Tips)
There are two kinds of people in the DIY universe: those who think sanding is “quick prep,” and those who have stared into the abyss of a blotchy stain job and whispered, “I should’ve sanded more.” If you’re here, congratulationsyou’re choosing the timeline where your paint looks smooth, your clear coat doesn’t highlight every scratch like a neon sign, and your project doesn’t feel like it was finished with a cheese grater.
A palm sander (often called a 1/4-sheet finishing sander) is the small, easy-to-handle power tool that turns “ugh, sanding” into “okay, sanding is tolerable.” It’s not the most aggressive sander on the planet, but that’s kind of the point: it’s made for controlled smoothing, paint prep, and finish-ready surfacesespecially when you want to keep corners crisp and your sanity intact.
What a Palm Sander Is (and What It’s Not)
A palm sander uses a flat, square pad that vibrates in a tight pattern. Because the pad is square, it can get closer to corners than round-pad sanders. It’s great for:
- Finish sanding bare wood before stain, paint, or clear coat
- Scuff sanding between coats of paint or polyurethane
- Smoothing filler and leveling small patches
- Refreshing trim or furniture without removing a ton of material
What it’s not: a bulldozer. If you need to remove lots of stock fast (flatten a cupped board, strip thick finish quickly, reshape edges), you’ll be happier with a belt sander or a random orbital sander. But for controlled, clean, “ready for finish” work, the palm sander earns its keep.
Before You Sand: Safety and Setup (The Unsexy Part That Matters)
1) Dust is not “just dust”
Sanding creates fine particles that don’t politely fall to the floorthey hover, drift, and try to move into your lungs like they’re paying rent. Wear at least a well-fitting dust mask or, better, a respirator rated for dust. If you’re sanding old paint, mystery finishes, or anything you didn’t personally apply, treat the dust as suspicious and upgrade your precautions.
2) Control the workpiece
If your board can slide, it will slideusually exactly when your sander is halfway across it. Clamp your work to a bench, use a non-slip mat, or brace it against a stop block. A palm sander works best when the tool moves and the workpiece doesn’t.
3) Check the surface like a detective
Look for staples, brad nails, grit, dried glue blobs, or finish drips. A single hidden nail can shred sandpaper instantly. A dried glue spot can turn into an ugly “won’t-take-stain” patch later. Scrape glue squeeze-out, remove hardware, and wipe off debris before you start.
Sandpaper 101: Grit Choices That Actually Make Sense
Sandpaper grit is basically “how bitey is this paper.” Lower numbers = rougher and more aggressive. Higher numbers = smoother and more refined. The trick isn’t to sand forever with one gritit’s to progress through grits so each step removes the scratches from the previous step.
Here are practical starting points for a palm sander:
- 60–80 grit: Rough surfaces, heavy wear, noticeable flaws (use carefullyeasy to leave deep scratches)
- 100–120 grit: General smoothing; removing light finish; leveling minor imperfections
- 150–180 grit: Prepping for paint; refining bare wood; reducing visible scratch patterns
- 220 grit: Finish prep for many projects; smoothing between coats (depending on finish system)
Don’t skip grits like you’re speed-running a video game. If you jump from 80 straight to 220, you’ll still have 80-grit scratchesjust shinier. A common, reliable progression for wood is something like 80 → 120 → 150/180 → 220, adjusted based on how rough the starting surface is and what finish you’re using.
How to Use a Palm Sander Step by Step
Step 1: Pick the right sandpaper (and attach it correctly)
Most palm sanders use 1/4-sheet paper. Standard sandpaper sheets are typically 9″ × 11″, which conveniently tear into quarters. Some palm sanders use clamps; others use hook-and-loop. Either way:
- Make sure the paper lies flat with no wrinkles.
- If your sander has dust holes, align the paper holes (or punch matching holes).
- Clamp it tightloose paper flaps, tears, and sands like a wadded-up receipt.
Step 2: Connect dust collection (yes, even for “small” jobs)
Use the sander’s dust bag if it came with one. Better: connect a shop vac if your model supports it. Dust collection helps in three ways:
- Keeps your air cleaner
- Keeps the abrasive cutting instead of clogging
- Lets you actually see what you’re doing (a rare luxury in sanding)
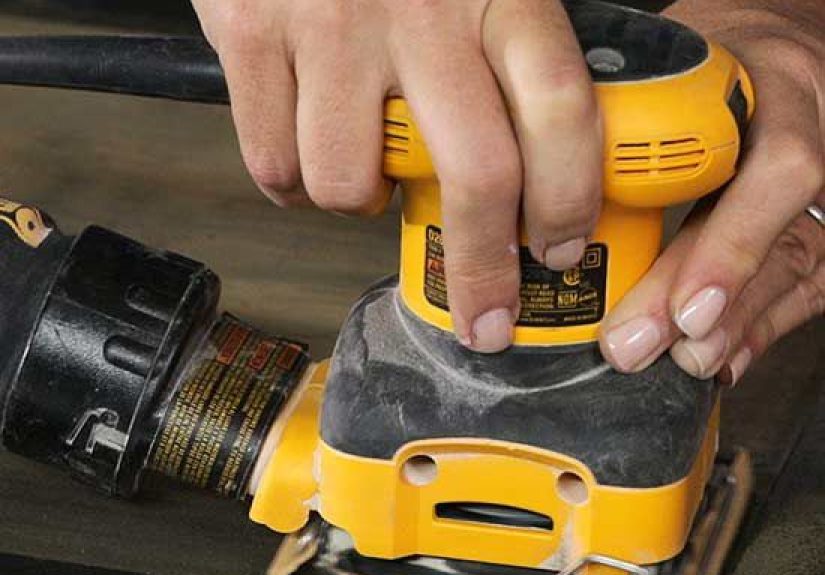
Step 3: Put the sander flat on the surface before you start moving
Set the sander flat on the workpiece, then turn it on. A palm sander isn’t trying to launch into orbit, but starting it mid-air and dropping it onto the surface can cause little dents, divots, or a momentary “chatter” mark. Start controlled, stay controlled.
Step 4: Let the tool do the work (light pressure wins)
Here’s the counterintuitive truth: pressing harder usually sands worse. Heavy pressure can:
- Create uneven spots (especially on softer woods)
- Increase swirl/scratch visibility
- Clog paper faster
- Make your hands feel like you shook hands with a jackhammer
Use light, steady pressurejust enough to keep full contact. Keep the pad flat and avoid tipping onto an edge (that’s how you round corners you meant to keep crisp).
Step 5: Move in a consistent pattern with overlap
Think “mowing the lawn,” not “drawing random loops.” Make slow, controlled passes:
- Move along the grain for most wood surfaces.
- Overlap passes by about 30–50% so you don’t leave stripes.
- Keep a steady pacetoo fast doesn’t remove scratches; too slow risks uneven sanding.
If you’re sanding a tabletop, break it into zones and complete each zone with the same grit before moving up. Consistency is how you get an even finish that doesn’t reveal surprise scratches when the stain hits.
Step 6: Use the “pencil scribble” trick to avoid guess-sanding
Lightly scribble pencil marks across the surface before sanding a grit. Sand until the pencil marks disappear evenly. This does two important things:
- Shows you whether you’re sanding the whole surface uniformly
- Stops you from sanding “just because,” which is how edges get rounded and veneers get regrets
Step 7: Vacuum (or wipe) between gritsdon’t grind yesterday’s dust into today’s surface
After finishing a grit, remove dust before moving to the next. Dust left on the surface can act like random extra grit, creating fresh scratches you didn’t plan on. A vacuum with a brush attachment works well. For wipe-down, use a slightly damp cloth when appropriate (and let the surface dry fully), or a dedicated dust-removal cloth meant for prep.
Step 8: Handle edges, corners, and profiles with intention
Palm sanders are great near corners, but they can still round edges if you linger or tilt. For crisp edges:
- Keep the pad fully supported on the surfacedon’t half-hang it off the edge.
- Use fewer passes on edges than on the field.
- For detailed profiles (like trim curves), switch to hand sanding with a sanding sponge.
Common Palm Sander Mistakes (and How to Fix Them Fast)
Mistake: The surface looks smooth… until finish reveals scratch city
Why it happens: You skipped grits, used worn paper, or didn’t remove previous scratches.
Fix: Back up one grit (sometimes two), use the pencil trick, sand evenly, then move forward again. Also check your lightingraking light (a flashlight held low) exposes scratches before your finish does.
Mistake: The sander “walks” or chatters
Why it happens: Uneven pressure, wrinkled paper, debris under the pad, or the workpiece moving.
Fix: Re-seat the paper, clean the pad, clamp the work, and lighten your grip. Let the pad ride flat.
Mistake: Sandpaper clogs instantly
Why it happens: You’re sanding resinous wood, soft paint, or a finish that’s gumming upoften with poor dust collection.
Fix: Improve dust extraction, reduce pressure, and replace paper sooner. For some finishes/paints, you may need a paper designed for anti-clog performance.
Mistake: Rounded edges and softened corners
Why it happens: Tilting the sander or focusing too long on edges.
Fix: Keep the pad fully on the surface, make fewer edge passes, and do final edge blending by hand.
Project Examples: What “Good Sanding” Looks Like in Real Life
Example 1: Refinishing a pine tabletop for polyurethane
Goal: Smooth surface, minimal scratches, ready for clear coat.
Approach: If the top is rough or has old finish remnants, start at 80 or 100. If it’s already fairly smooth, start at 120. Progress through 150/180, then finish at 220. Vacuum between grits. Use raking light and the pencil trick to make sure you’re not missing low spots. Pine is softlight pressure prevents dents and unevenness.
Example 2: Prepping painted trim for repainting
Goal: Scuff the surface so new paint bonds well (not strip to bare wood).
Approach: Use 150–220 grit. You’re not trying to remove all paintjust dull the sheen and smooth ridges. Keep dust under control, especially if the paint is old or unknown. After sanding, clean thoroughly so your new paint isn’t bonding to dust.
Example 3: Smoothing wood filler on a cabinet door
Goal: Level filler without digging a crater.
Approach: Let filler cure fully. Start at 120 or 150 with light pressure, feather the edges, then refine at 180/220. If you press hard, filler tends to sand faster than wood (or vice versa depending on product), which can create a visible dip. Slow and steady wins.
Quick Maintenance: Keep Your Palm Sander Working Like It’s Supposed To
- Empty the dust bag before it’s packed solid.
- Check the pad for embedded grit or damage; a beat-up pad can telegraph defects into your work.
- Inspect clamps (if your model uses them). Weak clamping = slipping paper = bad sanding.
- Store it clean. A sander tossed into a dusty pile of offcuts becomes a grit dispenser.
Real-World Lessons From the Sawdust Trenches (Experience-Based Tips)
Ask a room full of DIYers how sanding went on their last project and you’ll hear the same theme: sanding is never the hard partstopping at the right time is. The palm sander makes it easier to control the process, but it also makes it easy to keep going “just one more pass,” which is how edges mysteriously get softer and veneer starts looking nervous.
One of the most common first-time surprises is how much workholding matters. The first time a board slides while the sander is running, you learn two things instantly: clamps are cheaper than redoing a project, and your reflexes are not as fast as you think. A palm sander is compact, so people assume they can “just hold the piece.” Sometimes you can… until you can’t. The moment the pad catches an edge and the workpiece skitters, you realize you’ve been negotiating with physics instead of cooperating with it.
Another lesson: the palm sander is a finish tool, not a miracle worker. If a surface has serious milling marks, deep scratches, or thick old finish, the palm sander can do itbut it may take long enough that you’ll start naming the sander like it’s a coworker. In those cases, people often discover the joy of doing the early heavy lifting with a more aggressive tool (or a lower grit), then switching to the palm sander to refine. The palm sander shines when you’re in that “make it look professional” phase.
Then there’s the “smooth versus ready” awakening. A surface can feel smooth to your hand and still be full of sanding scratches that show up the second you apply stain or wipe on finish. This is where good lighting becomes your best friend. DIYers who level up quickly tend to adopt a few habits: they check with a flashlight held low across the surface, they vacuum between grits, and they stop guessing. The pencil scribble trick is a classic because it turns sanding into a simple visual test. When the pencil disappears evenly, you know you’ve actually sanded the whole areano myths, no vibes.
People also learn that new paper is cheaper than time. When the abrasive dulls or clogs, sanding stops being sanding and becomes “warm friction plus disappointment.” You push harder (because it feels like you should), which makes the scratch pattern worse and can heat up finishes, making them gum. Swapping to fresh paper feels almost sillylike, “That’s it?”until you realize you just cut your sanding time in half and your surface looks cleaner.
Finally, there’s the moment you realize the palm sander is basically a consistency machine. If you move steadily, overlap passes, keep the pad flat, and progress through grits without skipping like a stone across a pond, the results look polishedeven on basic projects. It’s not glamorous, but it’s satisfying in a strangely therapeutic way. You start with a surface that looks tired, and a few controlled steps later, it looks like it’s ready for its close-up. And when your finish goes on smoothly without highlighting surprise scratches, you’ll feel the rare DIY emotion known as “I nailed it on the first try.”