Table of Contents >> Show >> Hide
- Why This Hack Works (Even If Your Walls Don’t)
- Plan First, Saw Later
- Shopping List: What You’ll Need
- Build It: IKEA Bookcase to Built-In Desk Nook (Step-by-Step)
- 1) Prep the nook
- 2) Build a level base (the unglamorous hero)
- 3) Assemble and place the bookcases
- 4) Secure the units together and anchor to the wall
- 5) Add the desktop
- 6) Fill gaps and make it look built-in
- 7) Trim it out: baseboard, face frames, and optional crown
- 8) Caulk, sand, prime, and paint (aka: the glow-up)
- 9) Finish with lighting and cable management
- Design Ideas That Make This Nook Feel Custom
- Common Mistakes (So You Don’t Learn the Hard Way)
- Budget and Timeline (Realistic, Not “TikTok Fast”)
- Real-World Experiences: What This Project Feels Like (The Extra )
- SEO Tags
Every home has that weird little alcove: too small for a sofa, too awkward for art, and somehow always collecting mystery cords like it’s a charging station for ghosts. Good news: that nook isn’t useless. It’s just waiting to become your favorite “How did you get this custom built-in?” flex.
This DIY hack turns IKEA bookcases into a built-in-style desk nookthink shelves + workstation + storagewithout paying custom-cabinetry prices. The secret isn’t magic. It’s planning, leveling, anchoring, and trim. Trim is the mascara of home projects: suddenly everything looks finished, expensive, and like it didn’t cry in the car on the way here.
Why This Hack Works (Even If Your Walls Don’t)
Built-ins look “custom” because they appear to belong to the architecture: tight to the wall, consistent with the baseboards, and finished with the same paint and millwork details as the room. IKEA bookcases give you a straight, square starting point, and you provide the illusion: fill gaps, add face trim, and paint it all as one cohesive unit.
The result is a desk nook that can function as a homework station, a home office, a crafting corner, or a command center where you pay bills and pretend you enjoy spreadsheets.
Plan First, Saw Later
Step 1: Choose the right spot
Desk nooks work best in shallow recesses, spare bedrooms, hall alcoves, under-stair voids, or closets (yes, “cloffice” people, you are seen). Before you commit, stand there and do a quick reality check:
- Is there an outlet nearby? If not, plan for cord routing or call an electrician.
- Will a chair fit comfortably? You need knee room and elbow room, not “T-Rex typing posture.”
- Will doors/drawers open? Account for swing clearance and traffic flow.
Step 2: Measure like you mean it
Measure your nook in three places because walls love surprises:
- Width (top, middle, bottom)
- Height (left and right corners)
- Depth (especially if you have baseboards, door trim, or vents)
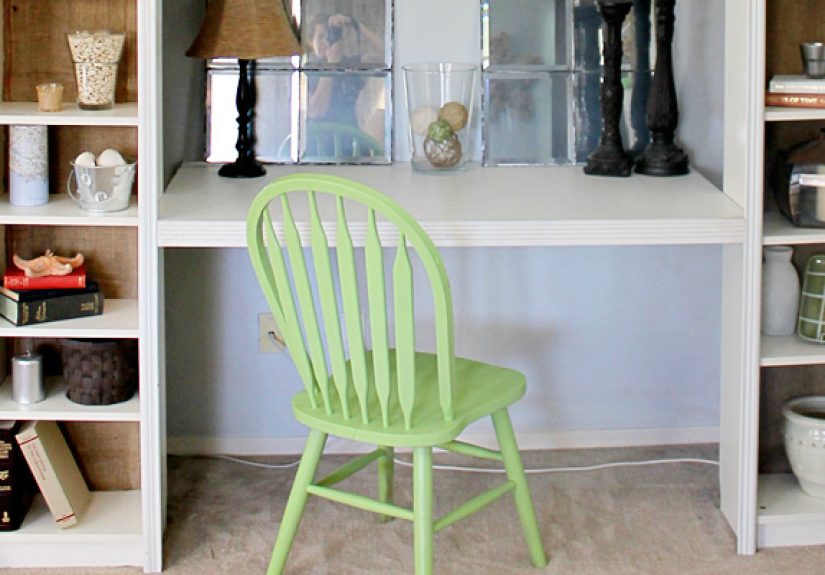
Popular IKEA bookcases (like the BILLY line) come in standard widths, and many DIYers build a desk nook by placing two bookcases on the sides and spanning a desktop between them. Your goal is a layout that looks intentional: either nearly wall-to-wall with fillers, or centered with symmetrical margins.
Step 3: Pick your IKEA “bones”
You can do this hack with lots of IKEA pieces, but here are the usual suspects:
- BILLY: classic, affordable, easy to trim out for built-in vibes.
- BRIMNES: chunkier style, often great when you want a more substantial look.
- KALLAX: cube storage; better for craft nooks or kid stations than tall built-ins.
- BESTÅ: excellent if you want lower cabinets and a more modular approach.
Want the “library wall” look? Consider adding doors (like glass-front or panel doors) to keep the lower shelves tidy and the upper shelves styled.
Step 4: Decide your desk height (so your body doesn’t file a complaint)
A typical desk height is around 29–30 inches for many adults, but the best setup depends on your chair and your body. Ergonomically, you’re aiming for elbows close to your sides and bent roughly around a right angle (give or take), with wrists neutral while typing.
If the desk surface ends up a bit high, don’t panicuse a footrest and adjust your chair. If it’s too low, consider a thicker desktop, a small riser base, or a keyboard tray to fine-tune the typing height.
Shopping List: What You’ll Need
This is a “choose your own adventure” build. Your exact list will depend on your nook and your style, but most desk nooks use:
- 2 IKEA bookcases (or more if you’re building a larger wall)
- Desktop: butcher block, plywood with edge banding, an IKEA countertop, or a solid-core slab
- Base materials: 2x4s (or plywood strips) for a level platform
- Filler panels: 1x material or plywood to close gaps
- Trim: baseboard, quarter round/shoe molding, and optional crown or top trim
- Fasteners: wood screws, finish nails/brads, construction adhesive (optional)
- Shims (you will use more than you think)
- Caulk + wood filler
- Primer + paint (and a topcoat if you want extra durability)
- Anchoring hardware (anti-tip straps or brackets)
Build It: IKEA Bookcase to Built-In Desk Nook (Step-by-Step)
1) Prep the nook
Remove everything in the area. Then identify:
- Wall studs (mark them lightly with painter’s tape)
- Outlets and cable paths
- Baseboards and trim obstacles
If your baseboards are thick, you have two main options: remove and reinstall (best built-in look) or notch/space out your units with fillers. Removing baseboard sounds scary, but it often creates the cleanest “it was always there” finish.
2) Build a level base (the unglamorous hero)
Floors are rarely level. Built-ins that ignore this become “modern art” in the worst way. A simple base platformoften a 2×4 frame with a plywood toplets you shim until everything is perfectly level and stable.
- Build the base to match the footprint of your bookcases.
- Shim it level front-to-back and side-to-side.
- Secure it to the floor if appropriate for your flooring type and comfort level.
Bonus: a base can also raise the units slightly, helping you hit a better desk height and giving you room to run baseboard across the front.
3) Assemble and place the bookcases
Assemble your IKEA bookcases according to the instructions, and check for square as you go. When you set them on the base, leave a small breathing space from the wall if needed for cords or baseboard clearance but don’t worry: trim and fillers will make it look tight later.
4) Secure the units together and anchor to the wall
This is not the fun part, but it’s the part that keeps the fun part from falling on anyone. Clamp adjacent units together, pre-drill, then screw them together through the side panels (in discreet, consistent locations).
Next: anchor to wall studs using anti-tip straps or brackets and the correct fasteners for your wall type. Even if your desk nook feels heavy and stable, anchoring is a best practiceespecially in homes with kids, pets, or adults who treat shelves like ladders.
5) Add the desktop
There are three common ways to support the desktop:
- Cleats: attach wood cleats to the inside walls of the bookcases and/or the wall, then rest the desktop on top.
- Side support + center support: cleats plus a center leg or a slim cabinet for extra strength (great for long spans).
- Desktop as a “bridge”: if your desk is thick and your span is short, it can rest directly on the bookcase sides.
A good rule: the longer the span and the heavier the desktop, the more support you need. Butcher block looks amazing and takes abuse well, but it’s heavyplan your supports accordingly.
6) Fill gaps and make it look built-in
Now we turn “two bookcases and a plank” into “custom millwork.” Most nooks have small gaps on the sides or at the top. Close them with filler strips or panels.
- Side fillers hide uneven walls and give you something to nail trim into.
- Top fillers close the gap to the ceiling (especially helpful if your units stop short).
If your wall is wavy (it is), you may need to scribe filler pieces so they follow the wall line. Scribing sounds fancy, but it’s basically “trace the wall’s weirdness, then cut it.” A slight back-bevel cut helps the face edge sit tight for a cleaner seam.
7) Trim it out: baseboard, face frames, and optional crown
To get the built-in illusion, integrate the same trim details already in your room:
- Baseboard: run baseboard across the front of the base platform and around the bookcases so it matches the room.
- Face trim: add 1x boards to the front edges to hide seams and create a furniture-to-cabinet transition.
- Top trim or crown: crown molding or a simple top cap makes it look “installed,” not “parked.”
If you’re adding crown or top trim, you’ll often need nailers (small support strips) behind it so you’re nailing into wood, not hope.
8) Caulk, sand, prime, and paint (aka: the glow-up)
IKEA finishes can be slick, and paint doesn’t love slick. The difference between “wow” and “why is it peeling?” is prep.
- Clean surfaces well (degrease if needed).
- Lightly scuff sand where appropriate.
- Prime properlymany DIY guides recommend a shellac-based or bonding primer for laminated surfaces.
- Paint in thin, even coats; let it cure before heavy use.
Pro-looking trick: once everything is installed, paint the fillers, trim, and bookcases the same color. That unified finish is what makes it read as one built-in unit instead of separate parts living in the same ZIP code.
9) Finish with lighting and cable management
A built-in desk nook feels much more “intentional” with:
- LED strip lighting under shelves or inside upper cabinets
- Cord grommets in the desktop
- Mounted power strip under the desk
- Adhesive cable raceways along the back
If you’re adding hardwired lighting or new outlets, follow local codes and consider hiring a licensed electrician. Your desk nook should spark creativitynot actual sparks.
Design Ideas That Make This Nook Feel Custom
Make it a “library office”
- Add doors on lower shelves for hidden storage.
- Use matching baskets or fabric bins for chargers and paper clutter.
- Install a picture light or sconces (battery versions exist) for that cozy, expensive look.
Make it kid-proof (and homework-friendly)
- Choose wipeable paint and a durable desk surface.
- Add a corkboard or magnetic board above the desk.
- Use labeled bins so “clean-up time” isn’t a dramatic stage production.
Make it tiny-space smart
- Use shallow shelves above and deeper storage below.
- Add a fold-down chair or a slim stool that tucks completely in.
- Consider a sliding door or curtain if your nook is in a living area.
Common Mistakes (So You Don’t Learn the Hard Way)
- Skipping the base: if your units aren’t level, nothing will line upespecially trim.
- Forgetting chair clearance: drawers, doors, and supports shouldn’t smash knees.
- Under-supporting the desktop: long spans need reinforcement to prevent sag.
- Not anchoring: tipping risk is real; strap it down.
- Painting without the right primer: laminate needs help for long-term adhesion.
- Rushing cure time: paint that feels dry can still be soft underneath.
Budget and Timeline (Realistic, Not “TikTok Fast”)
Costs vary by materials, but many DIYers land in the low hundreds to mid-hundreds for a polished desk nook. The IKEA pieces are often the predictable part; trim, paint, and a quality desktop are where budgets flex.
Timeline depends on your comfort level and how much finishing you do:
- Day 1: measure, buy, base platform
- Day 2: assemble, place, secure, desktop install
- Day 3: fillers + trim
- Day 4+: caulk, prime, paint, cure, style
The fastest builds look “good.” The best builds look “original to the home.” The difference is finishing time.
Real-World Experiences: What This Project Feels Like (The Extra )
People don’t just build an IKEA bookcase-to-desk nook for storage. They build it because they want a corner that finally behaves. In a lot of homes, the “office” is a kitchen counter, a couch armrest, or a dining table that’s permanently hosting a laptop and a pile of mail that could qualify as a small mountain range. A desk nook feels like a boundary: work goes here, clutter goes somewhere else, and meals stop sharing elbow space with a printer.
The first emotional stage of this project is confidence. It usually kicks in around the time the IKEA boxes arrive. DIYers start imagining a built-in that looks like a high-end catalog spread. They can already hear guests saying, “Wait… this was IKEA?” (Cue humble shrug. Cue internal victory dance.) Then stage two hits: reality. Reality is baseboards that aren’t straight, floors that slope like a gentle ski hill, and a nook that measures one width at the bottom and a completely different width at the top. This is where the project stops being “assembly” and becomes “carpentry-lite.”
The most common “learning moment” is the base. Folks who try to set bookcases directly on the floor often discover that one side sits higher, the shelves look slightly tilted, and trim gaps multiply like gremlins after midnight. People who build a simple leveled platform first typically report a much smoother installbecause once the base is level, everything else (alignment, seams, face trim) becomes easier to control.
Another shared experience: the desk height debate. Someone in the household will sit down and instantly declare, “This feels… tall?” or “Why are my shoulders in my ears?” That’s usually when DIYers start paying attention to ergonomicschair height, elbow position, and monitor placement. A small adjustment (raising the chair, adding a footrest, moving the keyboard surface) can turn a pretty nook into a nook you actually enjoy using.
Painting is its own emotional subplot. Lots of people go into it thinking paint is the final, easy stepthen discover that IKEA finishes can be slick and unforgiving. The people happiest with the long-term result tend to be the ones who take prep seriously: cleaning, scuffing where needed, using the right primer, and waiting for cure time before sliding in bins and books. It’s not glamorous, but it’s the difference between “still gorgeous two years later” and “why does it scratch if I look at it?”
And finally, there’s the payoff experience: the first time the desk nook is styled and in use. The laptop has a home. The charger isn’t lost in the couch cushions. The room feels calmer because the mess is contained behind doors or in baskets. Parents love having a visible homework zone without giving up an entire room. Remote workers love the psychological shift of a dedicated workstation. Even crafters love itbecause finally, the scissors aren’t migrating around the house like they’re on a world tour. The best part? It looks like you hired someone. And you get to smile and say, “Nope. IKEA… and a little trim sorcery.”