Table of Contents >> Show >> Hide
- Why Outfeed Support Matters More Than You Think
- Meet the Jacked-Up Outfeed Roller
- Key Benefits of a Jacked-Up Outfeed Roller
- Safety and Setup Tips for Using a Jacked-Up Outfeed Roller
- Jacked-Up vs. Traditional Outfeed Tables and Stands
- Choosing the Right Roller Head
- Real-World Use Cases in a Small Shop
- Extra: Lessons Learned from Using a Jacked-Up Outfeed Roller
- Final Thoughts: A Small Hack with Big Impact
If you’ve ever tried to rip an 8-foot board on a table saw by yourself, you already know the
moment of truth: that last couple of feet when the board wants to dive off the back of the saw,
tip, twist, and try to drag your cut with it. It’s not just annoying it’s a genuine safety issue.
That’s exactly the problem the Jacked-Up Outfeed Roller idea from The Family Handyman
aims to solve: a simple, height-adjustable outfeed roller built around a humble scissors jack and a sawhorse.
In this guide, we’ll walk through what a jacked-up outfeed roller is, why it’s such a smart shop
upgrade, how it compares with commercial roller stands and full outfeed tables, and practical
tips for using it safely with your table saw, planer, miter saw and more. We’ll wrap up with
real-world experiences and lessons learned so you can decide if this clever hack deserves a
permanent spot in your workshop.
Why Outfeed Support Matters More Than You Think
Outfeed support is any surface or device that catches and supports your workpiece as it exits a
tool usually a table saw, planer, jointer, or band saw. Without proper support, long or heavy
boards can:
- Tip off the back of the tool and leverage the board upward.
- Twist your cut and bind the blade, increasing the risk of kickback.
- Drag your hands and arms into awkward, unsafe positions as you try to “save” the board.
- End up dented, scratched, or on the floor instead of stacked neatly on your cart.
Woodworkers and tool manufacturers consistently stress that safe table saw use includes
adequate outfeed support so the workpiece stays flat and controlled until the blade stops
spinning. A good outfeed solution is less about convenience and more about
controlling the physics of a long board that doesn’t care about your fingers.
Common Outfeed Options (and Their Limitations)
Most small-shop woodworkers juggle one or more of these outfeed options:
-
A full outfeed table. The gold standard: a large flat surface, often the same height as
the saw, sometimes with built-in miter slots. It’s safe and stable, but it takes space and may
not be mobile. Many experienced woodworkers recommend this as the best long-term solution
if your shop can handle it. -
Commercial roller stands. Folding metal stands with a single roller or set of rollers.
They’re portable and affordable but notorious for one thing: if the roller isn’t perfectly
perpendicular to the cut, it can steer your workpiece away from the fence. -
Ball-bearing stands. These use a grid of small ball bearings so stock can move in any
direction. They solve the “sideways steering” problem of single rollers, but they can leave
tiny compression marks on softer woods and cost more. -
The “human helper” method. Effective but unreliable, especially if your helper gets
bored, distracted, or isn’t familiar with safe table saw technique.
The Jacked-Up Outfeed Roller sits in a sweet spot: almost as flexible as a commercial stand
but built from parts you might already have in the garage.
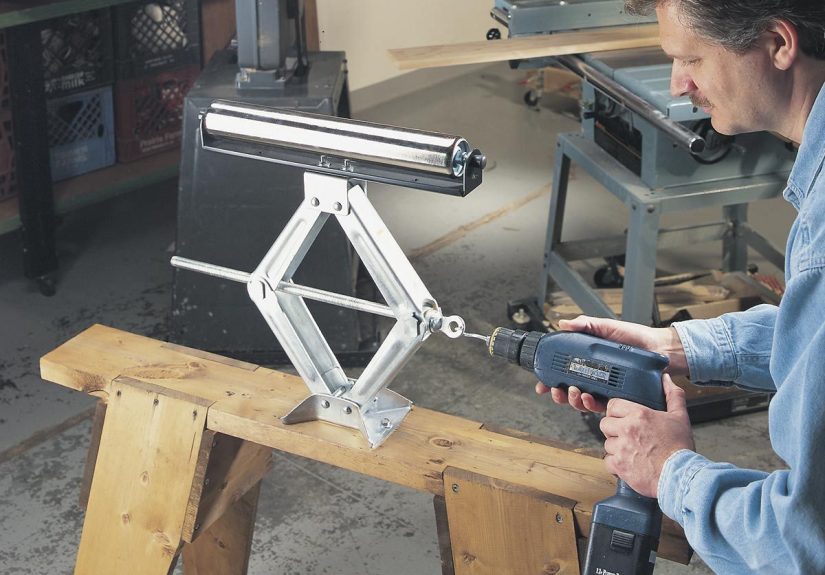
Meet the Jacked-Up Outfeed Roller
The Family Handyman’s jacked-up outfeed roller is essentially a mash-up of three simple items:
- A sturdy sawhorse for a wide, stable base.
- A scissors jack (like the one in your car trunk) mounted on top of the sawhorse.
- A bracketed roller (often sold as a stand-alone roller head) bolted to the top of the jack.
With this setup, you get a compact, adjustable-height support that you can crank up or down to
match whatever tool you’re using: table saw, planer, jointer, miter saw, or band saw. The roller
supports the board as it exits the tool, keeping your cut clean and your hands focused on guiding
instead of catching.
How the Jacked-Up Roller Works
The magic is all in the scissors jack. By bolting the jack firmly to the sawhorse and bolting the
roller head to the jack’s top plate, you turn the jack into a height-adjustable column. When you
crank the jack handle (or use a screw hook in a cordless drill, as some makers do for faster
adjustments), the roller rises or lowers smoothly.
Functionally, it behaves like a commercial roller stand, but with a much wider footprint thanks to
the sawhorse. That extra footprint translates into better stability when you’re wrestling long
2x10s, sheet goods, or heavy hardwood planks.
Key Benefits of a Jacked-Up Outfeed Roller
1. Fast, Precise Height Adjustment
Commercial roller stands use telescoping legs and friction locks. They work, but getting the
height dialed in can feel like playing “guess the notch.” A scissors jack is built to move heavy
loads in tiny, controlled increments that’s what it does under a car. In the shop, this means:
- Fine-tuning the roller height so it’s just below the tool’s surface.
- Compensating for uneven floors with a few turns of the jack.
- One-handed adjustments instead of wrestling with spring pins.
Some DIYers even slip a screw hook into the jack’s drive hole and spin it with a cordless drill
for ultra-fast setup between different tools or workpieces.
2. Works with Multiple Tools, Not Just the Table Saw
Because the jacked-up roller is freestanding, you’re not locked into a single machine. It can
support:
- Planer outfeed when you’re thicknessing long deck boards.
- Boards exiting a band saw during long resaw cuts.
- Long trim or siding pieces coming off a miter saw in a garage or driveway setup.
In a small shop where every square foot has to earn its keep, having one support that does all of
the above is a big win.
3. Stable but Portable
Typical roller stands have a relatively narrow base, which helps them store flat but makes them
easier to tip with a heavy, off-center board. The sawhorse base of a jacked-up roller spreads the
load out and lowers the center of gravity, so the whole setup resists tipping and wobbling.
At the same time, it’s still portable. You can move the whole assembly as a unit, or separate the
jack and roller head if you need the sawhorse for another project that day.
4. Budget-Friendly and DIYable
A decent commercial roller stand or ball-bearing stand can easily cost $60–$150, depending on
capacity and features. The jacked-up version can often be assembled from:
- An existing sawhorse.
- A retired scissors jack from an old vehicle or a budget replacement jack.
- A $20–$30 bracketed roller head from a woodworking supplier.
It’s not only cheaper; it’s also the kind of satisfying shop hack that makes you feel clever every
time you crank it up.
Safety and Setup Tips for Using a Jacked-Up Outfeed Roller
A jacked-up outfeed roller can make cutting long boards far safer if you set it up correctly.
Here are the key points that woodworking safety experts and experienced DIYers emphasize.
1. Set the Right Height
Your outfeed roller should be just a hair lower than the surface of your tool usually about
1/16 inch (1–2 mm). If it’s higher, the stock can catch on the roller and ride up, which may lift
it off the table and mess with your cut. If it’s too low, the board will sag and possibly bind.
With a scissors jack, that fine adjustment is easy: position a scrap board on the tool, slide the
roller underneath, and gently jack it up until the board barely kisses the roller, then back off a
fraction of a turn.
2. Keep the Roller Perpendicular
A single straight roller has to be perfectly perpendicular to the direction of feed. If it’s even a
little skewed, it will steer the board sideways as it rolls, pulling it away from your fence and
spoiling the cut.
To dial this in:
- Use a square or simply sight along the fence and line the roller up visually.
- Do a test cut on scrap to confirm the board tracks straight.
- Mark the floor with tape where the stand should sit for your most-used tool.
3. Consider Ball-Bearing Heads for Tricky Cuts
Some woodworkers prefer ball-bearing style supports for crosscuts or curved work, because they
let the stock move in any direction without steering it. If you’d rather avoid the
“perfectly perpendicular” dance, you can mount a small ball-bearing plate instead of a straight
roller on your jacked-up jack.
4. Lock Everything Down
A good rule: if it can move, lock it. That means:
- Ensure the sawhorse stands fully flat on the floor (shim if needed).
- Tighten all bolts so the jack and roller can’t twist under load.
- If your sawhorse has wheels, lock them those “rolling away mid-cut” stories are not fun.
Jacked-Up vs. Traditional Outfeed Tables and Stands
Is the jacked-up outfeed roller the one solution to rule them all? Not quite but it fills a big
gap between no outfeed support and a permanent full-size table.
When a Full Outfeed Table Wins
Many pro woodworkers argue that a solid outfeed table is still the safest and most accurate
solution for a primary table saw. A full table:
- Supports the entire board, not just along one line.
- Can double as an assembly or sanding surface.
- Doesn’t have moving parts to adjust every time.
If you have the space, building a folding or fixed outfeed table behind your saw is a fantastic
long-term upgrade. The jacked-up roller can then become a “floater” you deploy for the planer,
miter saw, or extra-long workpieces.
When the Jacked-Up Roller Shines
The jacked-up outfeed roller is especially useful when:
- Your shop is small and you can’t commit to a big outfeed table footprint.
- You use multiple tools that all need occasional outfeed help.
- You work in a garage or driveway and need something you can stash quickly.
It’s also a great “bridge solution” if you’re not ready to build a full outfeed table yet but know
you need safer outfeed support today.
Choosing the Right Roller Head
While the jacked-up part comes from the scissors jack and sawhorse, the roller head itself still
matters. Common options include:
-
Single straight roller. Great for straight rips and planing. Aim for a decent width (12–18
inches) for stability. -
Multi-roller assemblies. Several small rollers in a row can reduce the tendency to steer
the workpiece and spread the load. -
Ball-bearing plates. Best when stock might move sideways or on curves, or when you
want to eliminate steering issues altogether.
Most woodworking suppliers sell stand-alone roller or ball-bearing heads that can be bolted to
your jack. Some DIYers even build their own from PVC pipe, washers, or skate wheels for ultra
low-budget versions.
Real-World Use Cases in a Small Shop
So what does living with a jacked-up outfeed roller actually look like? Here are a few typical
scenarios where this setup earns its keep:
-
Ripping long construction lumber. When you’re breaking down 10- or 12-foot studs or
deck boards, the jack keeps the board from nose-diving as soon as it clears the blade. -
Surfacing rough stock on a planer. That first pass through the planer on a heavy board
can feel like wrestling a crocodile. Having outfeed support lets you focus on feeding the board
instead of catching it before it crashes to the floor. -
Breaking down sheet goods. Even with a helper, cutting big plywood panels on a jobsite
saw is stressful. The jacked-up roller takes some of the load so you don’t have to overreach. -
Miter saw trim work. Long baseboard or crown gets a stable, adjustable support instead of
balancing on a stack of paint cans and wishful thinking.
Over time, many DIYers end up building both: a dedicated outfeed table for the primary saw and a
mobile jacked-up roller to roam wherever it’s needed that day.
Extra: Lessons Learned from Using a Jacked-Up Outfeed Roller
Let’s talk about what happens after the novelty wears off and the jacked-up outfeed roller
becomes just another tool in the shop. Here are some experience-based insights and “wish I’d
known that sooner” moments that tend to show up once you’ve lived with this setup for a while.
1. Alignment Is a Habit, Not a One-Time Task
The first time you build the roller, you’ll fuss with getting it perfectly set up: height just right,
roller square to the fence, sawhorse feet planted solidly on the floor. Then you’ll use it for a few
weeks, casually kick it out of the way, drag it back, and wonder why your cuts suddenly drift.
The reality: every time you move the roller, you should give it a quick “two-second tune-up.”
Sight along your fence, nudge the stand so the roller is square, drop a scrap board on the tool
and check the height. Once you build that habit into your workflow, the roller simply becomes an
extension of your saw, not a wild card.
2. Uneven Floors Will Call You Out
In many garages and basements, the floor is not even remotely flat. The beauty of the scissors
jack is that you can compensate for that with almost surgical precision, but it also means you’ll
notice every little dip and hump.
A smart move is to identify the “sweet spot” behind each tool the place where the floor behaves
and mark those locations with tape. Then, when you roll the stand back into position, you’re
not starting from scratch. A couple of quick cranks on the jack and you’re dialed in.
3. You’ll Use It for More Than You Think
At first, you build the jacked-up roller for the table saw. But once it’s in the shop, it starts
showing up everywhere:
- As a temporary support when clamping up a long face frame or door.
- As an “extra hand” holding the far end of a workpiece while you test-fit cabinets or trim.
-
As a low, adjustable stand when you’re sanding or routing a long board and don’t want it
sagging in the middle.
The combination of adjustability and a compact footprint makes it one of those tools you wonder
how you worked without.
4. A Cordless Drill “Jack Driver” Is Worth It
Manually cranking a scissors jack isn’t exactly hard, but it’s also not something you look forward
to doing a dozen times a day. That’s why many users take the extra step of chucking a screw hook
or small adapter into a cordless drill and using that to spin the jack screw.
The first time you adjust from table saw height to planer height in about two seconds, you’ll be
sold. Just remember to go easy on the trigger you’re adjusting a support, not changing a tire.
5. Stability Beats Maximum Height
It’s tempting to crank the jack all the way up and brag about how tall your outfeed support can
go. In practice, you’ll quickly learn that the higher you go, the more sensitive the stand becomes
to bumps and side loads. There’s nothing like a top-heavy stand and a heavy board to make you
rethink your life choices.
A good rule of thumb: if you need to run the jack near its maximum height for a particular tool,
consider moving the tool or using a different support. Stability and safety should always win
over absolute height.
6. It’s Not a Substitute for Good Technique
A jacked-up outfeed roller can make your cuts smoother and safer, but it can’t fix poor technique.
You still need to:
- Use push sticks or push blocks where appropriate.
- Stand to the side of the blade’s line of fire.
- Keep your focus on the cut and your hands well clear of danger zones.
Think of the roller as your quiet shop assistant whose only job is to catch the board and let you
concentrate on guiding it safely. It can’t replace common sense, but it can make good habits
much easier to maintain.
Final Thoughts: A Small Hack with Big Impact
The Jacked-Up Outfeed Roller is not a flashy tool. It doesn’t have Wi-Fi, a laser, or a Bluetooth
logo. What it does have is the kind of practical ingenuity that The Family Handyman readers
love: take a familiar car jack, bolt it to a sawhorse, add a roller, and suddenly you’ve got a
shop workhorse that makes long cuts safer, cleaner, and a lot less stressful.
Whether you’re working in a one-car garage or a well-equipped basement shop, adding a jacked-up
outfeed roller is one of those upgrades that pays you back every single time you push a board
through a tool. It’s budget-friendly, customizable, and genuinely useful and in the world of
DIY, that’s a pretty jacked-up win.