Table of Contents >> Show >> Hide
- Why This Layered Ice Cream Cake Recipe Works
- Ingredients for Layered Ice Cream Cake
- Equipment You Will Need
- How to Make a Layered Ice Cream Cake
- Best Flavor Combinations for Layered Ice Cream Cake
- Tips for the Best Homemade Ice Cream Cake
- Common Mistakes to Avoid
- How to Store Layered Ice Cream Cake
- When to Serve This Easy Ice Cream Cake Recipe
- Final Thoughts
- Experiences Related to Making a Layered Ice Cream Cake
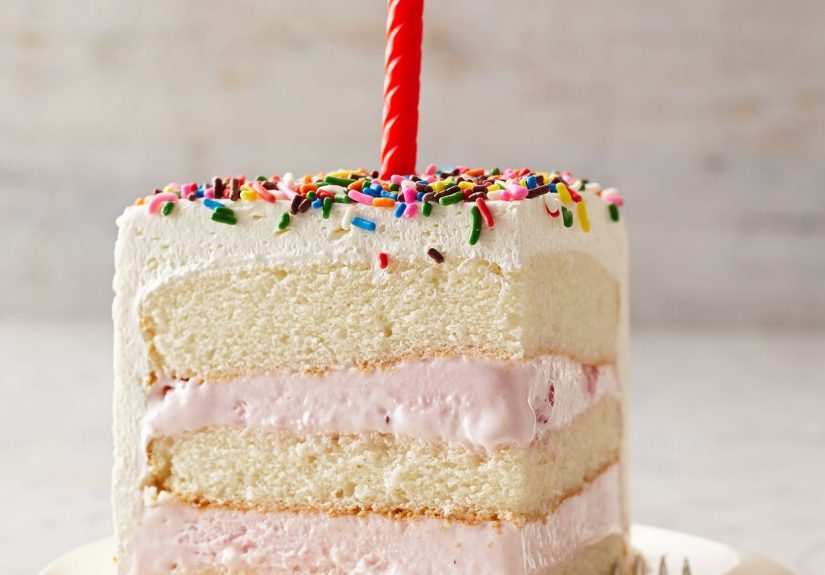
If regular cake is fun and ice cream is fun, then a layered ice cream cake is basically a party wearing formal clothes. It is cold, creamy, crunchy, a little dramatic, and absolutely worth clearing a shelf in your freezer for. The best part? You do not need a pastry degree, a blowtorch, or nerves of steel. You just need a little patience, a few smart layers, and the willingness to accept that “just one slice” is usually a beautiful lie.
This layered ice cream cake recipe is designed for real kitchens and real celebrations. It combines a crisp chocolate cookie crust, smooth layers of ice cream, a fudgy crunch center, and a cloud-like whipped topping finish. It looks impressive enough for birthdays, cookouts, graduation parties, and those random Tuesdays when life has tested your patience and only frozen dessert can fix the mood.
Even better, this recipe is flexible. You can swap flavors, add mix-ins, go full chocolate, lean fruity, or make it look like a sprinkle explosion. The method stays simple: build one layer at a time, freeze between steps, and let the cake do what all good desserts do bestmake everyone suddenly very interested in helping with cleanup.
Why This Layered Ice Cream Cake Recipe Works
A good homemade ice cream cake needs contrast. If everything is soft, it feels flat. If everything is frozen solid, it feels like you are chewing on a sweet snowbank. This version works because each layer has a job.
The crust adds structure
A chocolate cookie crust gives the cake a sturdy base and a bakery-style bite. It keeps the dessert from feeling like a bowl of melted feelings and helps each slice hold together better.
The ice cream layers create clean flavor contrast
Using two flavors keeps every bite interesting. Vanilla and chocolate are classic, but cookies and cream, strawberry, mint chocolate chip, coffee, or caramel swirl also work beautifully. Layered ice cream cake should feel a little playful, not like it was assembled under strict legal supervision.
The fudge crunch center brings the magic
If you have ever eaten an ice cream cake and thought, “What is that glorious crunchy chocolate layer and why do I want to marry it?” this section is for you. A mix of chocolate cookie crumbs and cooled fudge creates the signature middle layer that makes homemade ice cream cake taste extra special.
The whipped topping finish keeps it light
Instead of a heavy buttercream, whipped topping or lightly sweetened whipped cream makes the cake easier to frost, easier to slice, and far more refreshing. In other words, it behaves better in summer.
Ingredients for Layered Ice Cream Cake
For the crust
- 24 chocolate sandwich cookies, finely crushed
- 5 tablespoons unsalted butter, melted
- Pinch of salt
For the ice cream layers
- 1 1/2 quarts vanilla ice cream, softened just until spreadable
- 1 1/2 quarts chocolate ice cream, softened just until spreadable
For the fudge crunch center
- 1 1/2 cups chocolate cookie crumbs
- 3/4 cup hot fudge sauce
- 1/4 cup mini chocolate chips or crisp chocolate pearls
For the topping
- 2 cups whipped topping or stabilized whipped cream
- 2 tablespoons chocolate sauce, for drizzling
- 2 tablespoons rainbow sprinkles, chopped cookies, or shaved chocolate
Optional add-ins
- Crushed peanut butter cups
- Strawberry preserves
- Caramel sauce
- Toasted nuts
- Freeze-dried strawberries
Equipment You Will Need
- 8-inch or 9-inch springform pan
- Parchment paper or plastic wrap
- Offset spatula or large spoon
- Mixing bowls
- Freezer space you are emotionally prepared to sacrifice
How to Make a Layered Ice Cream Cake
Step 1: Prepare the pan
Line the bottom of a springform pan with parchment paper. If you like extra insurance, lightly line the sides with a strip of parchment or plastic wrap. This makes unmolding easier and helps the edges look tidy instead of “rustic,” which is often code for “I did my best.”
Step 2: Make the crust
In a bowl, mix the crushed cookies, melted butter, and salt until the texture resembles wet sand. Press the mixture firmly into the bottom of the pan. Use the flat bottom of a measuring cup to compact it. Freeze the crust for 15 to 20 minutes until firm.
Step 3: Add the first ice cream layer
Let the vanilla ice cream soften just enough to spread easily. You want it smooth, not soupy. Spread it over the chilled crust in an even layer. Work quickly, then return the pan to the freezer for 30 to 45 minutes, or until firm.
Step 4: Build the fudge crunch center
Stir together the cookie crumbs, hot fudge sauce, and mini chocolate chips. The mixture should be thick and spoonable, not runny. Once the vanilla layer is firm, gently spread the fudge crunch over the top. Freeze again for 15 to 20 minutes.
Step 5: Add the second ice cream layer
Spread the softened chocolate ice cream over the fudge crunch layer. Smooth the top with an offset spatula. Freeze for at least 2 to 3 hours, or until the entire cake is very firm. Overnight is even better if your schedule allows.
Step 6: Frost and decorate
Remove the outer ring of the springform pan. Frost the top and sides with whipped topping. Drizzle with chocolate sauce and finish with sprinkles, chopped cookies, or shaved chocolate. Freeze the decorated cake for another 30 minutes before serving so the topping sets properly.
Step 7: Slice like a pro
Let the cake stand at room temperature for about 10 minutes before slicing. Run a sharp knife under hot water, wipe it dry, and cut clean slices. Repeat between cuts if you want neat edges. If you do not care about neat edges because dessert is dessert, that is also a valid lifestyle choice.
Best Flavor Combinations for Layered Ice Cream Cake
Classic crowd-pleaser
Vanilla ice cream, chocolate ice cream, chocolate cookie crust, fudge crunch, whipped topping.
Birthday cake version
Birthday cake ice cream, vanilla ice cream, golden sandwich cookie crust, rainbow sprinkles, white chocolate drizzle.
Cookies-and-cream dream
Cookies and cream ice cream, chocolate ice cream, Oreo crust, crushed cookies in the center, whipped topping.
Strawberry-chocolate combo
Strawberry ice cream, chocolate ice cream, chocolate crust, freeze-dried strawberries on top, chocolate drizzle.
Mint chocolate chip version
Mint chocolate chip ice cream, chocolate ice cream, cookie crust, extra fudge crunch, crushed mints for garnish.
Coffeehouse style
Coffee ice cream, vanilla ice cream, chocolate crust, mocha fudge center, cocoa dusting on top.
Tips for the Best Homemade Ice Cream Cake
Do not over-soften the ice cream
Spreadable is the goal. Melted is chaos. If the ice cream gets too loose, return it to the freezer for a few minutes before layering.
Freeze between every major layer
This is not the step to rush. Freezing each layer keeps flavors distinct and prevents a slouchy, slippery cake.
Use a springform pan if possible
It makes unmolding much easier and gives the cake a cleaner shape. You can use a loaf pan or square pan, but a springform pan is the easiest route to “wow, you made that?” energy.
Keep decorations freezer-friendly
Whipped topping, cookie crumbs, chopped candy, and chocolate sauce work well. Fresh fruit can look pretty, but watery fruit can get icy or slippery after long freezer time.
Make it ahead
This dessert is ideal for preparing the day before a party. It actually benefits from extra freezer time, which is more than most people can say about themselves before guests arrive.
Common Mistakes to Avoid
- Skipping the pan liner: This can turn serving into a wrestling match.
- Using warm fudge on frozen ice cream: Cool it slightly first so it does not melt the layer underneath.
- Trying to slice immediately from the freezer: Give it a short rest so it cuts cleanly.
- Adding too many loose mix-ins: Too much bulk can make the layers uneven and hard to slice.
- Storing it uncovered: Ice cream cake absorbs freezer odors like a gossip absorbs rumors.
How to Store Layered Ice Cream Cake
Wrap the finished cake well and keep it in the freezer. It is best within 5 to 7 days for peak texture and flavor, though it can often last a bit longer if tightly covered. If you are storing leftover slices, wrap them individually so you can grab one later without chiseling through the entire cake.
For parties, keep the cake frozen until the last possible minute. Slice what you need, then return the rest to the freezer right away. Layered ice cream cake is festive, but it is not built for lingering on a warm patio while people debate whether they also want coffee.
When to Serve This Easy Ice Cream Cake Recipe
This dessert shines at birthdays, summer barbecues, graduation parties, baby showers, family reunions, and holiday weekends. It also works well as a make-ahead dessert for busy hosts because nearly all the work happens before guests arrive. Once it is done, your main responsibility is pretending you made something wildly complicated.
Final Thoughts
A layered ice cream cake recipe should feel achievable, fun, and just a tiny bit glamorous. This one checks every box. It is rich without being overwhelming, easy to customize, and stunning once sliced. Most importantly, it captures the nostalgic joy of bakery ice cream cake while giving you the freedom to make it exactly how you want.
Whether you keep it classic with vanilla and chocolate or turn it into a sprinkle-covered masterpiece, this dessert delivers the kind of reaction every home cook loves: silence for the first bite, followed by immediate questions about whether there is more in the freezer. That is when you know you nailed it.
Experiences Related to Making a Layered Ice Cream Cake
Making a layered ice cream cake is less like baking a regular cake and more like directing a very cold, very delicious stage production. Every phase has its own personality. The crust is the reliable opening act. The softened ice cream is the dramatic lead that must be handled gently but firmly. The freezer is the behind-the-scenes crew doing the real heavy lifting while you stand there pretending everything is under control.
One of the most memorable parts of the experience is the timing. With a regular cake, you bake, cool, frost, and you are basically done. With an ice cream cake, you build in chapters. That actually makes it enjoyable. You can press the crust, freeze it, answer an email, question your life choices, spread the first layer, freeze again, and still come back feeling like a dessert genius. It is ideal for people who like make-ahead recipes and do not enjoy last-minute kitchen panic.
There is also something deeply satisfying about smoothing out the layers. You start with a pan and a plan, and suddenly you are creating these neat stripes of vanilla, chocolate, fudge, crunch, and whipped topping. It feels creative in a way that is hard to explain until you do it. You are not just following a recipe; you are building anticipation. Everyone knows an ice cream cake is exciting. Nobody has ever heard “there is layered ice cream cake in the freezer” and reacted with polite indifference.
Serving it is its own experience too. The first slice always creates suspense. Will it come out clean? Will the layers show? Will the center hold? Then the knife glides down, the wedge lifts out, and suddenly you have this picture-perfect cross-section that looks like it came from a bakery display case with excellent lighting. That moment is weirdly thrilling. You remember every freezer trip, every spatula swipe, every minute of waiting, and it all feels justified.
Then come the reactions. Kids usually go wide-eyed first. Adults try to act composed, then immediately ask what is in the crunch layer. Someone always says it tastes better than store-bought. Someone else wants the recipe before they have finished chewing. Even the person who “doesn’t usually eat dessert” somehow ends up with a plate. Layered ice cream cake has that effect. It turns sensible people into second-slice negotiators.
Another great part of the experience is how customizable it is. You can make one version for a birthday, another for the Fourth of July, another for a summer dinner party, and another just because the freezer looked too empty. The basic method stays friendly, but the result can change with the season, the mood, or whatever ice cream was on sale. That flexibility makes the recipe feel personal instead of rigid.
In the end, layered ice cream cake is not just a dessert recipe. It is an event, a conversation starter, and a tiny lesson in patience with a very sweet reward. It asks you to slow down, work in stages, and trust the process. Then it repays you with cold, creamy, crunchy perfection and the kind of compliments that make you casually say, “Oh, this? I just threw it together,” even though both you and the freezer know the truth.