Table of Contents >> Show >> Hide
- Why Cookie Bars Are the Ultimate Leftover-Candy Move
- Quick Recipe Snapshot
- Ingredients
- Best Candy for Cookie Bars (and What to Avoid)
- Step-by-Step: Leftover Halloween Candy Cookie Bars
- Flavor Science (Without the Lab Coat)
- Easy Variations (Choose Your Candy Adventure)
- Common Mistakes (and How to Avoid Them)
- Storage and Freezing
- FAQ
- Real-Life Candy Bar Adventures: The 500-Word “Experience” Section
- Final Bite
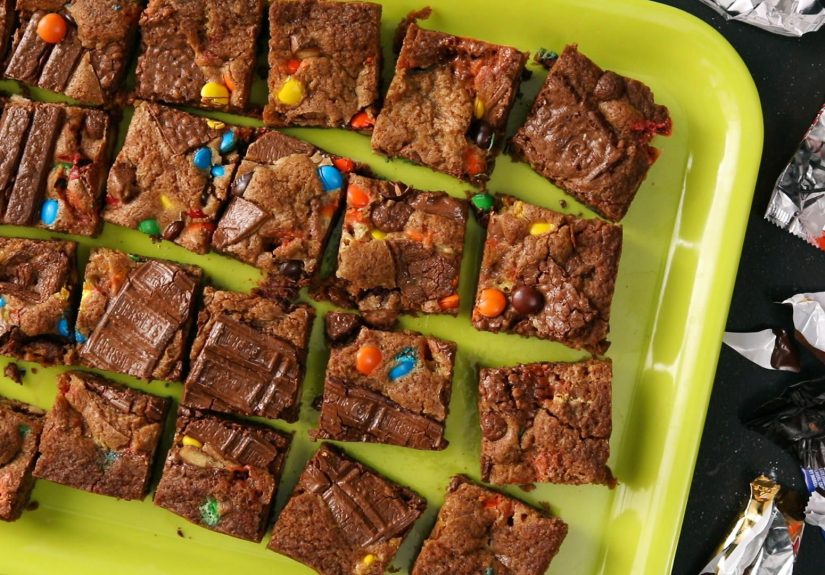
If your kitchen looks like a tiny candy convenience store after Halloweenmini wrappers in every drawer, a suspiciously heavy bowl on the counter, and one
lone candy corn staring into your soulcongrats. You have the most delicious “problem” on earth. The solution: Leftover Halloween Candy Cookie Bars.
Think of these as the low-effort, high-reward cousin of chocolate chip cookies: buttery, chewy in the middle, crisp at the edges, and absolutely
stuffed with chopped candy. No rolling dough balls. No batch-after-batch baking. Just one pan, one bake, and a very real chance that “cool completely
before slicing” becomes the day’s hardest life challenge.
Why Cookie Bars Are the Ultimate Leftover-Candy Move
Cookie bars are basically cookies that decided to work smarter, not harder. By pressing dough into a pan, you get:
- Chewy centers with crisp edges (the best of both cookie worlds).
- More candy per bite because mix-ins stay evenly distributed.
- Less mess (one bowl + one pan = fewer dishes to glare at later).
- Easy customization based on whatever candy you actually have (or “have,” after sampling).
Quick Recipe Snapshot
- Time: 15 minutes prep + 25–35 minutes bake
- Yield: 16 bars (or 12 big “I earned this” squares)
- Pan: 9×13-inch for classic bars; 9×9-inch for thicker, bakery-style squares
- Skill level: beginner-friendly, kid-approved, adult-approved, dentist-neutral
Ingredients
These are pantry-friendly on purpose. The candy is the star; the dough is the stage lighting.
Dry Ingredients
- 2 cups all-purpose flour
- 1 tablespoon cornstarch (optional, but helps with chew)
- 1 teaspoon baking powder
- 1/2 teaspoon baking soda
- 3/4 teaspoon kosher salt (or 1/2 teaspoon fine sea salt)
Wet Ingredients
- 1 cup (2 sticks) unsalted butter, melted and slightly cooled
- 1 1/2 cups packed light brown sugar
- 1/3 cup granulated sugar
- 2 large eggs, room temperature
- 2 teaspoons vanilla extract
Mix-Ins
- 2 to 2 1/2 cups chopped Halloween candy (bite-sized pieces)
- 1/2 cup semi-sweet chocolate chips or chunks (optional, but recommended)
- Flaky sea salt for finishing (optional, but highly encouraged)
Best Candy for Cookie Bars (and What to Avoid)
Best Choices
- Chocolate bars: Snickers, Milky Way, Twix, KitKat (chop into small pieces).
- Peanut butter cups: Reese’s hold up beautifully and taste like victory.
- Chocolate-coated candies: M&Ms or similar give color and crunch.
- Caramel/nougat candies: Great flavor, but chop small so they don’t create one mega-sticky crater.
Use With Caution
- Hard candies (Jolly Ranchers, lollipops): they melt into glassy sheets and can glue teeth to memories.
- Gummies: can turn weirdly tough or rubbery after baking.
- Candy corn: controversial. If you love it, use a small amount and brace yourself.
Pro tip: keep the candy pieces small (think pea to blueberry size). Big chunks create structural drama: pockets that melt too fast,
sink, or make the bars hard to cut cleanly.
Step-by-Step: Leftover Halloween Candy Cookie Bars
1) Prep Your Pan and Oven
- Preheat oven to 350°F.
- Line a 9×13-inch metal baking pan with parchment paper, leaving overhang on the long sides for easy lifting. Lightly spray the parchment.
2) Mix the Dry Ingredients
In a medium bowl, whisk together flour, cornstarch (if using), baking powder, baking soda, and salt. Set aside.
3) Build the Cookie Bar Base
- In a large bowl, whisk the melted butter, brown sugar, and granulated sugar until glossy and smooth.
- Add eggs and vanilla. Whisk until the mixture looks thick and cohesive (about 30–45 seconds).
- Fold in the dry ingredients with a spatula just until no flour streaks remain. Don’t overmixovermixing is how chewiness turns into cakiness.
4) Add the Candy
Fold in most of the chopped candy and chocolate chips, reserving about 1/2 cup candy for the top. The dough will be thick, like
“this is going to be amazing” thick.
5) Press, Top, Bake
- Press dough evenly into the prepared pan. Use slightly damp hands or a spatula to smooth the top.
- Sprinkle reserved candy over the surface and gently press it in so it sticks.
- Bake 25–35 minutes, depending on your pan and how thick your bars are. Start checking at 25 minutes.
Doneness cue: Edges should look set and lightly golden; the center should look slightly underdone but not raw. A toothpick in the center
should come out with moist crumbsnot wet batter. Remember: bars continue to set as they cool.
6) Cool Completely (Yes, Really)
Let bars cool in the pan for at least 1 hour (longer is better). Then lift out using parchment, transfer to a cutting board, and slice.
If you cut too early, you’ll get delicious chaos (which is still delicious, but messy).
Flavor Science (Without the Lab Coat)
These bars are built for chew. Here’s why the ingredient choices matter:
- Brown sugar adds moisture and that caramel-y, toffee-like depth that plays nicely with candy bars.
- Melted butter makes a denser, fudgier bar than creamed buttermore blondie vibes, less fluffy-cookie vibes.
- Cornstarch (optional) helps keep texture soft and tender, especially if your candy is extra chunky.
- Underbaking slightly protects the center from drying out. Your future self will thank you on day two.
Easy Variations (Choose Your Candy Adventure)
1) Brown Butter Upgrade
Brown the butter first for a nutty, toasted flavor that makes the bars taste like you tried harder than you did. Let it cool slightly before mixing.
(Your kitchen will smell like “fancy bakery,” which is a valid lifestyle choice.)
2) Peanut Butter Swirl
Warm 1/3 cup peanut butter and swirl it into the top before baking. Works especially well with Reese’s, Snickers, or anything chocolatey.
3) “Trail Mix” Candy Bars
Add 1/2 cup chopped toasted nuts (pecans or walnuts) and reduce candy by 1/2 cup. More crunch, less sugar overload, still fun.
4) Oatmeal Candy Cookie Bars
Swap 1/2 cup flour for 1/2 cup rolled oats for a slightly heartier bite. Great if you like a chewy, rustic texture.
Common Mistakes (and How to Avoid Them)
- Dry bars: Usually too much flour or overbaking. Spoon-and-level flour (or weigh it) and pull the bars when the center is just set.
- Greasy bars: Butter too hot when mixed, or candy with lots of added oils. Cool melted butter a few minutes before combining.
- Bars won’t cut cleanly: You sliced too soon. Cool fully, then use a sharp knife and wipe between cuts.
- Candy sinks: Pieces are too large. Chop smaller and reserve some candy for topping so it stays visible (and pretty).
Storage and Freezing
- Room temp: Store airtight up to 4–5 days. (They rarely last that long.)
- Fridge: Up to 1 week for maximum chew insurance.
- Freeze: Wrap individual bars and freeze up to 2 months. Thaw at room temperature or microwave 10–15 seconds for warm-gooey vibes.
FAQ
Can kids help?
Absolutely. This is a perfect “dump, stir, sprinkle” recipe. Give them a butter knife to “decorate” the top with candy and you’ll have both bars and
entertainment.
What pan is best?
A metal pan bakes more evenly for cookie bars. Glass works too, but it can change bake timestart checking early and watch the center.
Do I need a mixer?
Nope. A whisk and a spatula are enough. The goal is smooth batter and minimal overmixing once flour goes in.
How do I make them extra thick?
Use a 9×9-inch pan and bake longer (often 30–40 minutes). If you do this, be extra serious about cooling before slicing.
Real-Life Candy Bar Adventures: The 500-Word “Experience” Section
The first time I made leftover Halloween candy cookie bars, it wasn’t because I was being thrifty. It was because the candy bowl had become a negotiation
table. You know the one: kids circling like tiny stock traders, adults pretending they’re “not really into sweets,” and everyone mysteriously knowing
exactly how many peanut butter cups are left.
Cookie bars turned out to be the diplomatic solution. Instead of arguing over who gets the last mini Snickers, you chop everything up and declare,
“Now we all get Snickers.” It’s the culinary version of world peacewrapped in butter and baked at 350°F.
My favorite part is the candy selection strategy. There’s always a moment where someone says, “Should we put all of it in?” and you have to
respond like a responsible adult while quietly thinking, “Yes. Obviously. This is America.” The truth is you can absolutely use a mix, but a little
planning makes the bars taste even better. For example, pairing Reese’s + KitKat + M&Ms gives you peanut butter richness, crispy
wafer crunch, and that candy-coated snap. A Twix + Snickers combo leans caramel-forward and feels like you ordered dessert at a steakhouse.
If you toss in a few chocolate chips, you get melty chocolate seams that make every square look like it belongs in a bakery display case.
The second best part is how the house smells. Cookies are great, but cookie bars smell like cookies that filed paperwork and got promoted. There’s more
butter, more brown sugar, and that warm caramel note that makes people wander into the kitchen “just to see what’s going on.” This is also when you learn
the true meaning of patience. The recipe says “cool completely,” and suddenly everyone becomes a lawyer arguing loopholes: “What if we cut just the corner?”
“What if we call it a ‘taste test’?” “What if I use a spoon and pretend I’m not cutting?”
I’ve tried both outcomes. Cutting early gives you gooey spoon barsmessy, glorious, and suspiciously gone in five minutes. Cooling properly gives you neat,
stackable squares that travel well, freeze well, and make you look like the organized kind of person who labels leftovers. (Even if you don’t.)
Over the years, these bars became a post-Halloween tradition, mostly because they solve multiple problems at once: you clear candy clutter, make an easy
dessert, and create something that feels festive without being fussy. Plus, there’s a special joy in watching someone take a bite and say, “Wait… is that
a piece of Twix AND Reese’s in the same bar?” Yes. Yes, it is. Welcome to the dream.
Final Bite
Leftover Halloween candy cookie bars are the easiest way to turn trick-or-treat excess into a dessert that feels intentional, indulgent, and just chaotic
enough to be fun. Chop, stir, bake, sprinkle a little flaky salt, and enjoy the rare moment when “leftovers” tastes better than the original plan.