Table of Contents >> Show >> Hide
- Why a Milk Bottle for Santa Is Such a Fun Christmas Craft
- Supplies You’ll Need
- Choosing the Best Bottle
- Step 1: Clean and Prep the Bottle Properly
- Step 2: Decide on Your Design Style
- Step 3: Apply the Main Design
- Step 4: Add the Finishing Details
- How to Keep the Bottle Food-Friendly
- Easy Styling Ideas for Christmas Eve
- Common Mistakes to Avoid
- Gift and Keepsake Variations
- Real-Life Experiences With a Milk Bottle for Santa
- Conclusion
There are holiday traditions, and then there are tiny upgrades to holiday traditions that make you feel suspiciously accomplished. Leaving out milk and cookies for Santa already has elite December energy, but serving that milk in a personalized bottle? That is the kind of cheerful overachievement that makes a kitchen counter look like it belongs in a Christmas movie.
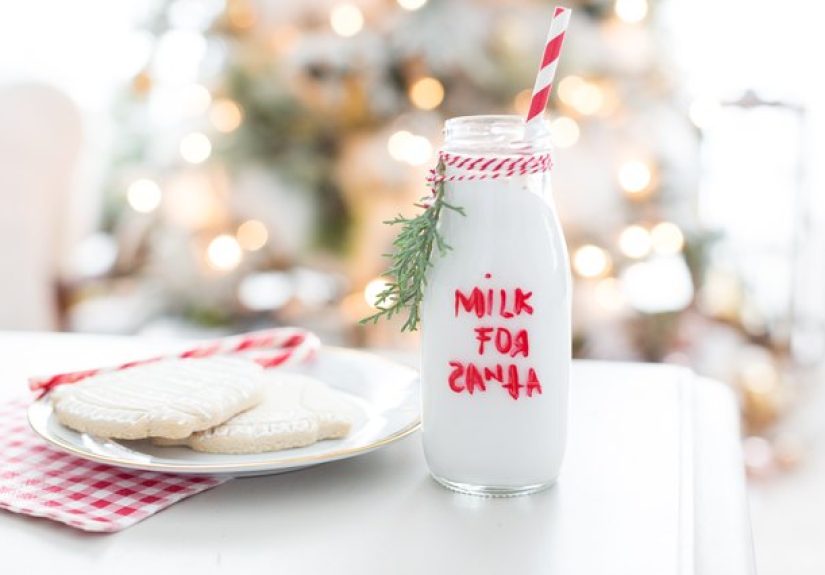
This Milk Bottle for Santa tutorial shows you how to turn a plain glass bottle into a charming Christmas Eve keepsake without making the project complicated, expensive, or covered in glitter for the next 11 months. You can keep it simple with vinyl lettering, go classic with painted details, or make it feel extra special with a child’s name, a date, or a playful “Official North Pole Delivery” label.
Best of all, this is a project that works for real life. It can be done in one afternoon, it looks far more expensive than it is, and it can become part of your family’s holiday decorating routine year after year. Whether you want a farmhouse-style Christmas bottle, a vintage-inspired Santa milk jar, or a modern personalized bottle that looks crisp and clean on a tray beside cookies, this tutorial will walk you through the whole thing.
Why a Milk Bottle for Santa Is Such a Fun Christmas Craft
A milk bottle for Santa sits right at the sweet spot between decor and tradition. It is decorative enough to photograph, practical enough to use, and sentimental enough to become part of the yearly Christmas Eve setup. In other words, it earns its place in the holiday storage bin.
It also solves a very specific seasonal design problem: a random carton of milk next to a paper plate of cookies does not exactly scream “magical holiday moment.” A festive bottle does. It makes the tradition feel intentional, and it gives kids something tangible to help create. They can choose the bottle shape, pick the design, and proudly tell everyone that Santa prefers his milk served with style.
Another reason this craft works so well is flexibility. You can use a minimalist design with white vinyl on clear glass, a red-and-white painted bottle with candy-cane flair, or a rustic bottle dressed up with twine, a paper tag, and a striped straw. There is no single right answer here, which is excellent news for people who love crafts and also for people whose craft personality is more “aggressively hopeful beginner.”
Supplies You’ll Need
Basic materials
- 1 glass milk bottle with lid, cork, or stopper
- Dish soap and warm water
- Rubbing alcohol and a lint-free cloth
- Adhesive vinyl or food-safe enamel paint for glass
- Transfer tape if using vinyl
- Small scissors or craft knife
- Painter’s tape for clean lines
- Ribbon, baker’s twine, or gift tag
- Optional: striped paper straw, cookie tray, mini chalkboard sign
Optional design extras
- Name decals like “Santa,” “From the Smith Kids,” or “North Pole Dairy”
- Snowflakes, stars, holly leaves, reindeer, or candy-cane motifs
- White paint pen for tiny details
- Red enamel dots or faux wax-seal stickers
- Vintage-style label printed on cardstock
If you own a cutting machine, this project gets even easier. But you do not need one. Hand-cut labels, paint pens, or even a neat handwritten tag can still make the bottle look festive and polished.
Choosing the Best Bottle
The ideal bottle is clear glass, easy to clean, and has a smooth enough surface for vinyl or painted details. A small classic milk bottle is the obvious winner, but swing-top bottles, juice bottles, and narrow-neck glass containers can work beautifully too.
Look for a shape that matches the style you want. A squat, old-fashioned bottle feels nostalgic and cozy. A tall bottle with clean lines looks more modern. If the bottle will actually hold milk for Santa on Christmas Eve, make sure it has a secure lid and that you can clean the inside thoroughly. Decorative is good. Decorative and practical is holiday gold.
If you are thrifting or reusing a bottle from another product, check the glass for chips, cracks, rough edges, or lingering odors. A bottle that still smells like yesterday’s fancy lemonade is not quite delivering “freshly poured for Santa.”
Step 1: Clean and Prep the Bottle Properly
This step is not glamorous, but it is what separates a cute finished craft from a peeling, smudgy, slightly chaotic one. Wash the bottle inside and out with warm water and dish soap. Remove all labels and sticky residue. If needed, soak the bottle to loosen stubborn adhesive, then scrub it clean and rinse thoroughly.
Once dry, wipe the outside with rubbing alcohol. This helps remove fingerprints, oils, and invisible residue so your vinyl or paint sticks better. It is a tiny step with a very dramatic payoff. Think of it as the craft equivalent of washing your face before makeup: annoying for 20 seconds, worth it for the result.
If you are planning to serve real milk in the bottle, do not skip the cleaning step or assume “it looks fine” is the same thing as “it is food-ready.” Clean glass is happy glass.
Step 2: Decide on Your Design Style
Before you start applying anything, decide which direction you want the bottle to go. The best milk bottle for Santa tutorial is not just about the method. It is about choosing a style that fits your home, your holiday decor, and your patience level.
Style option 1: Clean and classic
Use white or red permanent vinyl with a simple phrase like “Milk for Santa” and a small star or snowflake. This is crisp, easy, and hard to mess up.
Style option 2: Vintage Christmas
Add an old-fashioned label, striped twine around the neck, and soft cream or red painted details. This style looks wonderful on a wooden tray with gingerbread cookies.
Style option 3: Child-personalized
Add text like “Made with Love by Emma” or “Santa’s Midnight Snack Stop.” Kids adore this version because it feels like part craft, part letter, part evidence for the case that Santa definitely visited.
Style option 4: Rustic farmhouse
Use black script vinyl, a kraft paper tag, and a simple bottle shape. Pair it with a checkered napkin and a cookie board for the full cozy-kitchen effect.
Step 3: Apply the Main Design
If you are using vinyl
Cut your design, weed away the extra material, and apply transfer tape. Position the wording on the bottle carefully before pressing it down. Start from the center and smooth outward to help avoid bubbles. Burnish well, then remove the transfer tape slowly.
Keep the layout balanced. On a small bottle, oversized text can look cramped fast. A short phrase in the center usually works best, with a simple icon underneath or near the neck. “Milk for Santa” is timeless for a reason. It is short, recognizable, and leaves room for style.
If you are using paint
Use painter’s tape to block off guide lines if needed. Apply light coats rather than one heavy layer, especially on glass. Let each coat dry before adding the next. If your paint is made specifically for glass, follow the curing instructions exactly. That part matters more than crafters like to admit.
Paint can create a softer, more handmade look than vinyl. It is perfect if you want brushed lettering, little holly berries, snow drifts, or a tiny Santa hat near the neck of the bottle. Just remember that for any bottle that will hold actual milk, the decorative elements should stay on the outside only.
Step 4: Add the Finishing Details
This is where the bottle becomes less “nice craft” and more “why does this look like I casually know how to style a holiday magazine shoot?”
- Tie red-and-white baker’s twine around the neck
- Add a mini gift tag with the date or your family name
- Use a striped straw for extra whimsy
- Attach a tiny bell or wooden snowflake charm
- Place the bottle on a tray with cookies and a folded napkin
You can also add a matching note for Santa or a mini sign that says “Please enjoy.” This works especially well if you are styling a full Christmas Eve station for kids. Suddenly the whole setup feels magical, intentional, and just the right amount of extra.
How to Keep the Bottle Food-Friendly
If this bottle is only decorative, you have more freedom. But if it will actually hold milk, use common sense and keep the design food-conscious.
- Decorate the outside only
- Keep paint, adhesive, and embellishments away from the lip and inside of the bottle
- Leave the drinking area plain and clean
- Use products intended for glass when possible
- Follow all curing and washing directions from the product manufacturer
- When in doubt, use the bottle as decor and pour milk into it only right before serving
A smart workaround is to use vinyl on the outside or add a removable paper tag instead of heavy embellishment. That keeps the bottle looking festive without making care complicated. It is the holiday crafting version of choosing shoes that are both cute and walkable. Rare, powerful, and deeply appreciated.
Easy Styling Ideas for Christmas Eve
Once your Santa milk bottle is ready, the surrounding setup is easy. The bottle is the hero piece, but the supporting cast helps sell the story.
Classic cookie tray setup
Pair the bottle with chocolate chip cookies on a white plate, a plaid napkin, and a handwritten note to Santa. This is simple, timeless, and very photogenic.
North Pole snack station
Add a second little dish labeled “Carrots for Reindeer.” Kids absolutely love this detail, and honestly, Rudolph has earned it.
Modern neutral setup
Style the bottle with wood tones, linen, and black-and-white labels. This works beautifully if your Christmas decor leans minimal or Scandinavian.
Vintage-inspired setup
Use a lace-trimmed napkin, old-fashioned sugar cookies, a brass tray, and a cream-colored bottle tag. This look feels warm, nostalgic, and just theatrical enough.
Common Mistakes to Avoid
Even an easy Christmas bottle craft has a few traps. Thankfully, most of them are avoidable.
Skipping the prep work
If vinyl is peeling or paint is streaking, the glass was probably not clean enough. Prep is boring, but it saves the project.
Using too many design elements
A bottle is a small surface. You do not need script, snowflakes, bells, ribbons, glitter, holly, candy canes, stars, and a monogram all fighting for space. Pick two or three details and let them breathe.
Decorating the rim
If the bottle will hold real milk, keep the mouth and rim undecorated. Cute should never win over practical.
Rushing dry time
The holiday season encourages reckless optimism. “It looks dry” is not the same as “it is cured.” Give your materials the time they need.
Gift and Keepsake Variations
A milk bottle for Santa also makes a sweet handmade gift. You can create one for grandparents to display with holiday decor, make several for siblings, or package a bottle with a cookie mix jar and a “Christmas Eve box.”
Another great idea is turning the bottle into a dated keepsake. Add the year and your child’s name so the bottle becomes a memory marker. Over time, you may end up with a small collection that shows changing handwriting, different design phases, and the evolution from “Mom, Santa likes blue” to “I am 12 and this is ironically charming.”
Real-Life Experiences With a Milk Bottle for Santa
The first time I made a milk bottle for Santa, I thought it would be one of those quick “adorable in theory” projects that somehow turns into an evening of peeling crooked stickers and asking why glue exists. Instead, it became one of those rare holiday crafts that actually delivered. The bottle took less time than expected, looked much better than expected, and immediately made the Christmas Eve setup feel more special.
What surprised me most was how much children notice presentation. A regular glass of milk would have been perfectly fine, of course, but the decorated bottle changed the mood. Suddenly the tradition felt official. It felt like Santa had a reservation. Kids who are otherwise suspicious of vegetables and bedtime routines became deeply invested in whether the bottle cap was secure and whether the label faced forward “so Santa can read it.” That kind of enthusiasm is hard to buy in a store, which is probably why handmade Christmas details tend to stick in family memory.
I have also learned that the simplest design usually wins. One year, I tried to make the bottle look extra elaborate with too many tiny details. It was not terrible, but it definitely had the vibe of a craft project that needed someone to step in and say, “Let’s back away from the ribbon.” The prettier version was the one with clean lettering, a small snowflake, and baker’s twine around the neck. It looked finished without trying too hard, which is an excellent lesson for almost every holiday project ever made.
Another experience that stands out is how useful this craft can be for different age groups. Younger kids enjoy choosing colors, stickers, and cookie pairings. Older kids tend to love the personalization part, especially when the bottle includes a family joke, a “Certified Santa Fuel” label, or a date that turns it into a keepsake. Adults, meanwhile, enjoy the bottle for a completely different reason: it photographs beautifully, and it makes the kitchen look festive with minimal effort. That is a strong return on investment for one bottle and a little vinyl.
One practical lesson I would absolutely pass along is this: make the bottle before Christmas Eve. Not on Christmas Eve. Holiday optimism loves to whisper, “You can totally do this at 9:15 p.m. while cookies bake.” Holiday optimism is a liar. Make the bottle a few days ahead, let everything cure or set properly, and then all you have to do is fill it, place it on the tray, and enjoy the moment.
Most of all, this project works because it supports a feeling rather than just filling a space. It helps create that little pause on Christmas Eve when the house is quiet, the cookies are ready, and everything feels warm, expectant, and just a tiny bit enchanted. A milk bottle for Santa is not a big thing in the grand scheme of the holiday season, but that is exactly why it matters. Small traditions are often the ones people remember best.
Conclusion
A well-made milk bottle for Santa turns a familiar tradition into a memorable Christmas detail. It is easy enough for beginners, customizable enough for creative crafters, and charming enough to become part of your yearly holiday ritual. Clean the bottle well, choose a design that fits your style, keep any food-contact area undecorated, and let the finishing details do the festive heavy lifting.
Whether you go with simple white lettering, vintage charm, or a personalized family keepsake, this project proves that a little effort can add a lot of magic. And if Santa happens to appreciate thoughtful presentation, polished lettering, and a properly styled cookie tray, then honestly, you are just being a very responsible host.