Table of Contents >> Show >> Hide
- What Is Hypertufa, Exactly?
- Gathering Tools and Materials
- Step-by-Step: Molding Your Rustic Hypertufa Planters
- Letting Your Hypertufa Planters Cure
- Making Hypertufa Look Old and Rustic
- Best Plants for Rustic Hypertufa Planters
- Troubleshooting Common Hypertufa Problems
- Real-Life Experiences with Molding Rustic Hypertufa Planters
- Conclusion: Your Garden, Your Rustic Hypertufa Story
If you’ve ever picked up a gorgeous, “weathered stone” planter at a garden center, checked the price, and quietly put it back like it was made of diamonds, hypertufa is about to become your new favorite hobby. These DIY rustic hypertufa planters look like ancient stone troughs, weigh less than concrete, and cost surprisingly little to make. Yes, it’s messy. Yes, you will be covered in dust. But you’ll also end up with custom containers that look like they’ve lived in your garden for decades.
This guide walks you through everything: what hypertufa actually is, how to mix and mold it, how to cure it properly, and how to give your rustic hypertufa planters that beautifully aged lookwithout waiting 100 years.
What Is Hypertufa, Exactly?
Hypertufa is a man-made material designed to mimic old stone troughs and rock. Traditional recipes use Portland cement, peat moss, and a lightweight aggregate like perlite or vermiculite. The result is:
- Lighter than concrete – easier to move around the yard.
- Porous – roots love the drainage and airflow.
- Rustic and stone-like – perfect for cottage gardens, rock gardens, Alpine plants, succulents, and herbs.
Think of hypertufa as “faux stone for people who love plants and aren’t afraid of a little mess.” When you mold your own rustic hypertufa planters, you shape the size, the texture, the patina, and even the color.
Gathering Tools and Materials
Before you start, set up a dedicated workspace outdoors or in a well-ventilated area. Portland cement dust is no joke, so treat this like a mini construction sitejust one where the finished project holds petunias instead of people.
Core Ingredients
- Portland cement (Type I) – Do not use premixed concrete or mortar.
- Peat moss – Sift out large chunks for smoother containers.
- Perlite or vermiculite – Adds lightness and porosity.
- Water – Clean, cool water.
A classic mix many DIYers love is a 1:1:1 ratio: one part Portland cement, one part peat moss, one part perlite by volume. For a slightly lighter, more textured planter, some crafters use around 2:3:3 (cement:peat:perlite). You can experiment once you get a feel for the texture.
Optional Add-Ins
- Concrete colorant – For subtle gray, tan, or charcoal tones.
- Fibers or reinforcing mesh – Adds strength for larger planters.
- Sand – For a denser, more stone-like feel.
Safety Gear
Portland cement is alkaline and dusty, so suit up:
- Heavy-duty rubber or nitrile gloves
- Dust mask or respirator
- Safety glasses
- Old clothes you don’t mind ruining
Molds and Tools
- Two containers to use as molds (one larger, one slightly smaller)
- Plastic sheeting or garbage bags
- Cooking spray or light oil (as a release agent)
- Mixing tub, wheelbarrow, or large bucket
- Trowel, scoop, or your gloved hands
- Wire brush or old kitchen scrubber for texturing edges
- Drill with masonry bit (for extra drainage holes, if needed)
Step-by-Step: Molding Your Rustic Hypertufa Planters
Once you’ve gathered everything, it’s time to mix, mold, and make magic. Here’s a straightforward path from powder to planter.
Step 1: Prep the Work Area and Molds
- Cover your work surface with plastic to catch splatters.
- Line your main mold (the larger container) with a plastic bag to help release the planter later.
- Lightly spray the plastic and your inner mold with cooking spray or rub a little oil on them.
This helps the rustic hypertufa planter slide out instead of clinging for dear life.
Step 2: Mix the Dry Ingredients
- Measure equal parts Portland cement, peat moss, and perlite by volume into your mixing tub.
- Break up any clumps with your gloved hands.
- Stir thoroughly until the mixture looks uniformno streaks of cement or peat pockets.
Take your time with this stage. A well-blended dry mix means a stronger, more consistent planter.
Step 3: Add Water Slowly
Now add water gradually, mixing as you go. You’re aiming for a texture that’s often described as “crumbly cottage cheese” or “stiff oatmeal”moist enough to hold its shape when squeezed, but not so wet that it slumps or oozes.
- If it crumbles apart when you squeeze a handful, add a little more water.
- If water pools or it feels soupy, add a bit more dry mix.
The right consistency is crucial: too dry and your planter may be weak or crumbly; too wet and it can crack or slump in the mold.
Step 4: Form the Base
- Pack a layer of hypertufa mix into the bottom of your lined outer mold, about 1–2 inches thick.
- Press firmly to eliminate air pocketsthink of making a really sturdy mud pie.
This layer becomes the bottom of your rustic hypertufa planter, so don’t skimp on thickness.
Step 5: Add the Inner Mold and Build the Walls
- Place the smaller container (inner mold) in the center, upside down if needed, leaving even space around the edges.
- Weight the inner mold with bricks or rocks so it doesn’t lift as you pack in the mix.
- Begin adding hypertufa mix between the molds, pressing it down firmly.
- Aim for walls at least 1.5–2 inches thick for durability.
This is where the personality of your DIY hypertufa planter shines. For a rustic look, don’t worry about perfectly smooth wallsslight bumps, ridges, and texture add charm.
Step 6: Create Drainage Holes
Good drainage is non-negotiable for healthy plants. While the mix is still workable, poke holes through the bottom with a dowel, gloved finger, or the handle of a trowel. Aim for at least three drainage holes for medium-size planters.
Step 7: Shape and Texture the Surface
Now for the fun, artsy part:
- Rough up the top edge with your fingers or a tool for a chipped stone effect.
- Press small stones, leaves, or bark pieces lightly into the surface to create patterns (you can remove them after the initial set).
- Use a wire brush later, once the planter is partly cured, to refine the rustic texture.
Remember, you’re going for “found in an old European courtyard,” not “fresh off an assembly line.”
Letting Your Hypertufa Planters Cure
Curing is the quiet, behind-the-scenes stage where the chemistry happens and your planter gains strength. Rushing this step is the fastest way to get cracks or weak spots.
Stage 1: Initial Set (24–48 Hours)
- Cover the entire mold with plastic to keep moisture in.
- Set it in a cool, shaded spotavoid direct sun and wind.
- After about 24 hours, test a corner: it should feel firm but still slightly “green” or carvable.
In warm climates, you may be able to demold closer to 24 hours; cooler weather may require closer to 48 hours.
Stage 2: Demolding and Refining
- Carefully remove the inner mold, then peel away the plastic and outer mold.
- If the surface still yields slightly to pressure, this is a perfect time to:
- Round sharp edges with a gloved hand.
- Add more texture using a wire brush or old fork.
- Carve shallow grooves or “chisel marks” for a stone-cut look.
Your rustic hypertufa planter will look lighter gray as it dries and cures further.
Stage 3: Full Cure (2–4 Weeks)
To fully cure:
- Wrap or cover the planter with plastic again to retain moisture for the first few days.
- Keep it in a shaded, cool location.
- After a few days, remove the plastic and allow it to air-dry and strengthen for 2–4 weeks.
Many gardeners also leach out excess lime from the cement before planting by soaking the container in water for several days or rinsing it repeatedly. This helps protect sensitive plants from alkaline shock.
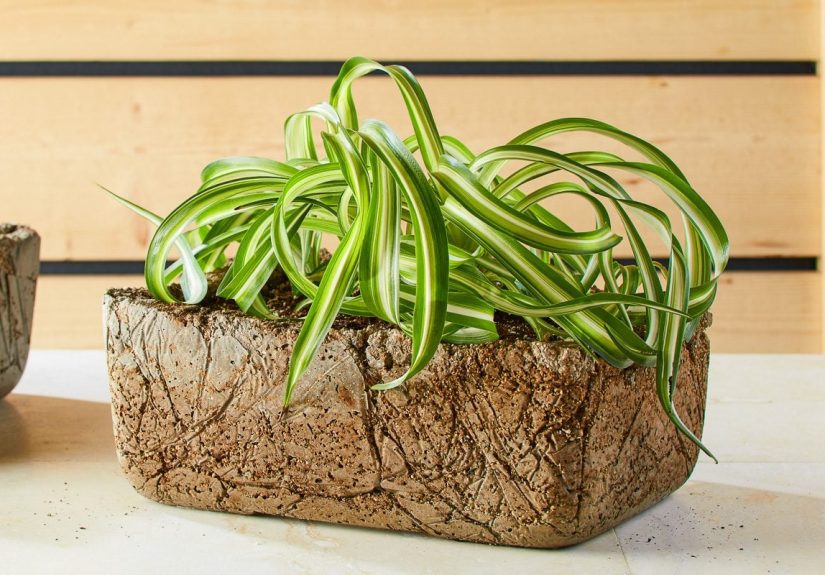
Making Hypertufa Look Old and Rustic
Hypertufa already looks a bit like stone, but you can push it into full “ancient artifact” territory with a few tricks.
Embrace Imperfection
- Let the rim stay rough instead of perfectly level.
- Leave small pits and voidsthey read as natural weathering.
- Vary wall thickness slightly for handmade character (just don’t go too thin).
Texture and Color Tricks
- Use a wire brush once the planter is firm but not rock-hard to scuff the surface.
- Rub a thin slurry of cement and water into selected areas for subtle tonal variation.
- Introduce concrete pigments in earthy hues (charcoal, buff, soft brown) when mixing.
Fast-Forwarding the “Mossy” Look
Want that moss-covered, secret-garden vibe? Try:
- Brushing the exterior with yogurt or buttermilk, then placing the planter in a shady, damp spot.
- Encouraging moss growth by nestling the container near existing moss patches.
Moss isn’t guaranteed, but over time, the porous, rustic hypertufa surface invites lichens and algae to move in and decorate.
Best Plants for Rustic Hypertufa Planters
Because hypertufa containers are well-draining and slightly alkaline at first, they’re especially beloved for certain plant types.
- Alpine and rock-garden plants – Saxifrages, aubrieta, small dianthus.
- Succulents and sedums – Hens and chicks, creeping sedums, tiny agaves.
- Herbs – Thyme, oregano, lavender (in larger troughs).
- Dwarf conifers – In deeper hypertufa troughs with time to fully cure.
Before planting, always check drainage and consider using a gritty, well-draining potting mix to complement the container’s porous structure.
Troubleshooting Common Hypertufa Problems
Cracking or Crumbling
If your DIY hypertufa planter cracks or crumbles:
- You may have added too much water.
- The walls might be too thin.
- The planter might have cured too quickly in direct sun or wind.
Try thicker walls, a slightly drier mix, and more patient, shaded curing next time.
Planter Too Heavy
For lighter containers:
- Use more perlite and less sand.
- Stick to modest sizes or troughs instead of huge, deep pots.
- Consider using your hypertufa planter as a decorative outer cachepot with a lighter plastic pot tucked inside.
Plants Not Thriving
If plants sulk or yellow in a new rustic hypertufa planter:
- Make sure you leached excess lime by soaking or rinsing the planter before planting.
- Use appropriate potting mixgritty for succulents, rich and well-draining for herbs.
- Check that drainage holes are open and not clogged with roots or soil.
Real-Life Experiences with Molding Rustic Hypertufa Planters
Once you make your first rustic hypertufa planter, you’ll understand why people get hooked. The process feels like a mix between baking, sculpting, and gardeningall rolled into one wonderfully messy afternoon.
The first time many gardeners try hypertufa, they start overly polite with the mix: they trowel it carefully, smooth every edge, and fuss over getting perfectly straight walls. The result is…fine. But the magic happens when you relax a bit.
Imagine this: you’ve got your mix at just the right consistency, you press it into the mold, and then you give yourself permission to play. You rough up the rim with your fingers. You press a fern frond into the side, lift it away, and see the delicate imprint left behind. You carve a few shallow grooves like ancient tool marks. Suddenly the planter looks less like a weekend project and more like a relic unearthed from a crumbling stone wall.
One common “aha” moment for beginners comes during demolding. At first, the planter may look a bit dull and pale. But as it cures, the surface shifts to a soft, stone-gray color, and subtle speckles from the perlite start to show. If you run your hand over it, you’ll feel the porous, rock-like texture that makes rustic hypertufa planters so charming. It’s at this point that a lot of people walk back outside and immediately mix another batch.
Experiences also vary based on climate. In hotter, drier regions, people quickly learn that their planters need extra pampering during curing. They keep the containers wrapped in plastic longer, mist them occasionally, and move them out of the sun. In cooler or damp climates, the challenge is usually patience: the mix feels dry on the outside, but the inside still needs more time to cure. The gardeners who resist the urge to plant too early are rewarded with tougher, longer-lasting containers.
Then there’s the question of how rustic is “too rustic.” Some DIYers embrace cracks, chips, and uneven edges as part of the charm. They’ll even intentionally knock a bit off the rim to make the planter look like it has survived a century of winters. Others prefer a softer rustic look with slightly rounded edges and gentle textures rather than dramatic craters and gouges. Over time, most people settle into their personal style, just like they do with pottery or woodworking.
A favorite experience for many is watching how plants interact with hypertufa over time. Succulents spill over the edge, covering the rough rim with rosettes and trailing stems. Moss creeps in along the base where water occasionally splashes. Tiny self-sown seedlings pop up in nooks and crannies. The planter stops looking “new” and starts looking like it’s always been part of the garden. That’s the real payoff: your own rustic hypertufa planter slowly turns into a living, evolving piece of garden art.
Finally, hypertufa becomes a social thing more often than you’d expect. Once friends see these handmade stone-like containers on your porch or patio, the questions start: “You made that?” “Wait, out of what?” It’s not uncommon to end up hosting a hypertufa afternoon where everyone brings old plastic tubs, buys a bag of cement, and leaves with gray hands, happy plants, and at least one new rustic hypertufa planter they can’t wait to show off.
Conclusion: Your Garden, Your Rustic Hypertufa Story
Molding your own rustic hypertufa planters is one of those DIY projects that gives back again and again. You spend a few hours mixing, molding, and getting gloriously messy, and in return you get custom stone-look containers that age beautifully, support healthy roots, and quietly steal the show in your garden.
Once you understand the basicssafe handling of cement, the right mix ratio, patient curingyou can scale up to large troughs, tiny succulent bowls, or themed collections of planters that look like they came from an old European courtyard. And the best part? Every little imperfection just makes them more charming.
meta_title: Molding Your Own Rustic Hypertufa Planters
meta_description: Learn how to mix, mold, and cure rustic hypertufa planters at home, with step-by-step tips, aging tricks, and real-life DIY experiences.
sapo: Rustic hypertufa planters look like weathered stone, cost a fraction of store-bought versions, and are surprisingly fun to make. In this in-depth guide, you’ll learn exactly how to mix the hypertufa recipe, mold unique containers using simple household molds, cure them for long-lasting strength, and give them an aged, moss-ready patina. We’ll also cover the best plants for hypertufa, troubleshooting common issues like cracking, and real-life experiences that help you avoid beginner mistakes and create planters that feel like they’ve always belonged in your garden.
keywords: rustic hypertufa planters, DIY hypertufa planters, how to make hypertufa pots, hypertufa containers, hypertufa mix ratio, curing hypertufa planters, aging hypertufa