Table of Contents >> Show >> Hide
- Why Skillet Focaccia Works So Well
- Main Keyword-Perfect Summary (a.k.a. what you’re making)
- Ingredients for No-Knead Skillet Focaccia
- Equipment
- Step-by-Step: No-Knead Skillet Focaccia Recipe
- 1) Mix the dough (2 minutes of glory)
- 2) Quick folds (optional, but great for lift)
- 3) First rise: choose your schedule
- 4) Oil the skillet like you’re preparing it for a red-carpet event
- 5) Preheat the oven (hot oven = happy bubbles)
- 6) Dimple, top, and bake
- 7) The “extra crisp” finish (optional, but wildly satisfying)
- 8) Cool (briefly), slice, and try not to eat half standing at the counter
- Pro Tips for Better No-Knead Focaccia
- Troubleshooting
- Flavor Variations (a.k.a. how to flex without trying too hard)
- Serving Ideas
- Storage & Reheating
- FAQ
- Printable Recipe Card: No-Knead Skillet Focaccia
- Kitchen Notes: of Real-Life No-Knead Skillet Focaccia Experiences
If you’ve ever wanted to bake bread that looks like it came from a trendy café but requires the physical effort of…
texting, this no-knead skillet focaccia recipe is your new best friend.
It’s pillowy inside, crisp-edged on the outside, and unapologetically glossy with olive oil (as focaccia should be).
Best part? The dough does most of the work while you do important thingslike staring lovingly at the oven light.
This guide walks you through a reliable cast iron focaccia method with options for
same-day baking or an overnight cold rise for deeper flavor. I’ll also show you how to troubleshoot sticky dough,
coax bigger bubbles, and top it like you mean it.
Why Skillet Focaccia Works So Well
The cast-iron advantage
A heavy skillet (especially cast iron) holds heat like it has a grudge. That steady heat helps the focaccia
rise tall, brown evenly, and develop those crunchy, almost-fried edges where olive oil meets hot metal.
Translation: you get bakery vibes with weeknight effort.
Why “no-knead” isn’t “no-structure”
No-knead doughs rely on time and hydration to build gluten.
A wetter dough encourages an open crumb and bigger bubblesaka the focaccia “crater landscape.”
You can also do a few quick folds in the bowl to help the dough hold onto all that glorious gas.
(Think of it as teaching the dough posture. We’re aiming for “tall and airy,” not “sad pancake.”)
Main Keyword-Perfect Summary (a.k.a. what you’re making)
This is an easy no-knead focaccia bread baked in a skillet with olive oil, flaky salt,
and optional rosemary. The dough is mixed in one bowl, rises mostly hands-off, then puffs up in the pan
and bakes until golden. You’ll get a tender interior, crisp bottom, and a top that begs for more olive oil.
Ingredients for No-Knead Skillet Focaccia
Base dough (for a 10–12 inch skillet)
- 3 1/4 cups (500g) bread flour or all-purpose flour (bread flour = chewier, taller; AP = softer)
- 2 1/2 tsp kosher salt (reduce if using fine/table salt)
- 1 tsp instant yeast (or 1 1/4 tsp active dry yeast)
- 1 2/3 cups (400g) room-temp water (the dough should be sticky and loose)
- 1 1/2 tbsp olive oil (mixed into the dough)
For the skillet + topping
- 3–5 tbsp extra-virgin olive oil (yes, really; focaccia is not a “light oil” bread)
- Flaky sea salt (the crunchy finishing salt is a big part of the magic)
- 1–2 tbsp fresh rosemary (optional, but highly encouraged)
Optional flavor boosters (pick a lane or mix carefully)
- Sliced garlic (best brushed with oil so it doesn’t burn)
- Olives, roasted red peppers, cherry tomatoes, caramelized onions
- Parmesan or Pecorino (add near the end if you want less browning)
- Red pepper flakes, dried oregano, everything seasoning (because we contain multitudes)
Equipment
- 10–12 inch oven-safe skillet (cast iron is ideal, but any heavy ovenproof skillet works)
- Large mixing bowl + sturdy spoon or spatula
- Plastic wrap or a lid/towel for covering
- Optional: kitchen scale (makes wet doughs easier and more consistent)
Step-by-Step: No-Knead Skillet Focaccia Recipe
1) Mix the dough (2 minutes of glory)
- In a large bowl, whisk flour, salt, and yeast.
- Add water and stir until no dry flour remains. The dough will look shaggy, sticky, and a little “blob-like.” Perfect.
- Drizzle in 1 1/2 tablespoons olive oil and fold/stir to incorporate.
- Cover and rest for 20 minutes. This short rest helps hydration and gluten formation without any kneading.
2) Quick folds (optional, but great for lift)
If you want a focaccia that rises a bit higher and slices like a dream, do 2–4 rounds of quick folds:
- Wet your hand (or lightly oil it). Grab one side of the dough, stretch up gently, and fold it over itself.
- Rotate the bowl and repeat 3–4 times (like folding a very lazy letter).
- Cover and rest 15 minutes. Repeat 1–3 more times.
If you skip folds, you’ll still get excellent focacciajust slightly less “structured cloud.”
3) First rise: choose your schedule
Option A: Same-day focaccia (faster)
- Cover the bowl and let the dough rise at room temperature until roughly doubled and puffy, about 3–4 hours (depending on warmth).
Option B: Overnight cold rise (best flavor + easier handling)
- Cover and refrigerate for 8–24 hours (and in some methods, up to a couple days). Cold fermentation builds flavor and makes sticky dough easier to manage.
- When ready to bake, let the dough sit at room temperature for 45–90 minutes so it can warm up and get lively again.
4) Oil the skillet like you’re preparing it for a red-carpet event
- Pour 2–3 tablespoons olive oil into the skillet and swirl to coat bottom and sides.
- Scrape the dough into the skillet. Turn it once to coat with oil (this prevents sticking and helps create that crisp crust).
- Gently press the dough outward. If it springs back, wait 10 minutes and try againgluten relaxes when you stop arguing with it.
- Cover and let rise until very puffy and jiggly, about 1 1/2–2 hours (longer if your kitchen is cool).
5) Preheat the oven (hot oven = happy bubbles)
Preheat to 450°F. If your oven runs cool or you want a deeper crust, go up to 475°F.
A hot oven helps the dough “spring” and sets the crust before the focaccia dries out.
6) Dimple, top, and bake
- Drizzle another 1–2 tablespoons olive oil over the dough.
- With oiled fingers, press straight down to create deep dimples all over. Don’t be shyfocaccia wants texture.
- Sprinkle flaky sea salt and rosemary (or your chosen toppings).
- Bake 25–30 minutes, rotating once, until deeply golden on top and crisp underneath.
7) The “extra crisp” finish (optional, but wildly satisfying)
For next-level crust: carefully lift the focaccia out of the skillet and place it directly on the oven rack for
3–5 minutes. This helps crisp the edges and bottom even more.
8) Cool (briefly), slice, and try not to eat half standing at the counter
Cool at least 10 minutes before slicing so the crumb sets. Then cut into wedges or squares and
serve warm. If there’s leftover oil in the pan, brush it on top like the delicious finishing move it is.
Pro Tips for Better No-Knead Focaccia
Sticky dough is normaldon’t panic-bury it in flour
No-knead focaccia dough is wet on purpose. Use oil or water on your hands instead of dumping in flour.
Adding too much flour can make the bread dense and less bubbly.
Want bigger bubbles? Think: hydration + time + heat
Bigger bubbles typically come from a wetter dough, enough fermentation time, and a hot oven.
If you can, do the overnight rise. It’s the easiest “upgrade” with the biggest payoff.
Flour choice matters (but not in a scary way)
Bread flour tends to produce a chewier crumb and better height. All-purpose flour
still works and often gives a slightly softer bite. If your AP flour brand absorbs less water, hold back a tablespoon
or two of water at firstthen add it if the dough seems stiff.
Salt: measure thoughtfully
Kosher salt varies by brand and crystal size. If you’re using table salt, use less by volume.
The goal is savory, not “why is my mouth suddenly a desert?”
Troubleshooting
My focaccia didn’t rise much
- Check yeast freshness (dead yeast = tragic flatbread).
- Give it more timecool kitchens slow fermentation.
- If refrigerated, make sure the dough warms up before the final proof.
It browned on top but the bottom is pale
- Make sure there’s enough oil in the skillet to “fry” the bottom crust slightly.
- Try baking a little longer, or finish 3–5 minutes directly on the oven rack after removing from the pan.
- Place the skillet in the lower third of the oven for more bottom heat.
It’s dense inside
- It may need a longer final rise (look for jiggly, marshmallowy dough).
- Too much flour during handling can tighten the dough.
- Over-baking can dry the crumb; pull it when deeply golden, not fossilized.
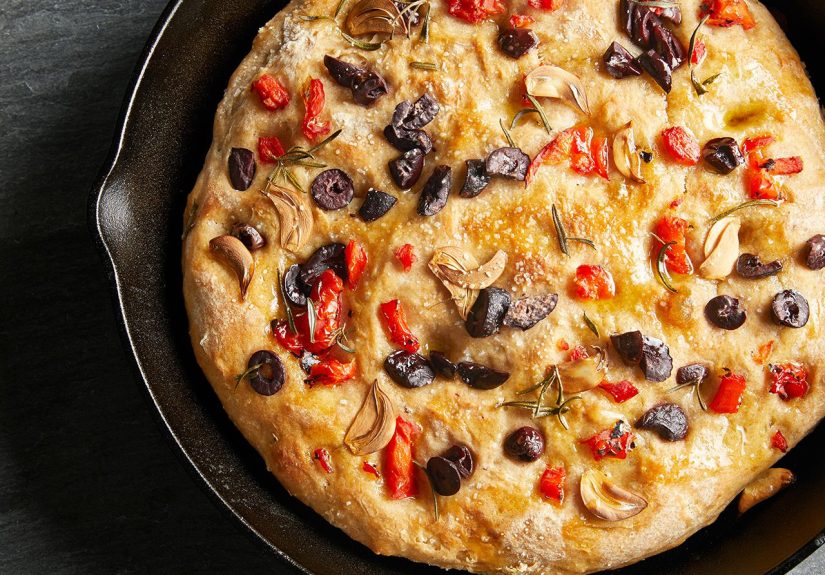
Flavor Variations (a.k.a. how to flex without trying too hard)
Classic rosemary + flaky salt
The iconic combo. Add rosemary before baking and finish with flaky salt right after it comes out.
Garlic-Parmesan focaccia
Brush the top with olive oil mixed with minced garlic. Add Parmesan in the last 8–10 minutes so it melts and browns
without turning bitter.
Cherry tomato + oregano
Press halved cherry tomatoes into the dimples, sprinkle oregano, and add a touch of extra salt.
The tomatoes concentrate and get jammy, and suddenly your kitchen smells like a vacation.
Olive + roasted pepper
Scatter chopped olives and roasted peppers on top. Keep toppings light so the dough can still puff.
Serving Ideas
- Soup sidekick: Tomato soup, minestrone, creamy mushroomfocaccia doesn’t discriminate.
- Sandwich superstar: Slice horizontally and stuff with turkey, mozzarella, or roasted veggies.
- Focaccia pizza: Add ricotta, herbs, and other toppings after dimpling (or treat it like a thick, fluffy pizza base).
- Snack mode: Dip into olive oil + balsamic, or make a salty-sweet bite with honey and flaky salt.
Storage & Reheating
- Best day-of: Focaccia shines when fresh.
- Room temp: Store in a paper bag or loosely wrapped for up to 1–2 days.
- Reheat: Warm in a 300°F oven for about 10 minutes to revive the crust.
- Freeze: Slice, wrap well, freeze up to 2 months. Reheat from frozen at 325°F until warm.
FAQ
Can I use active dry yeast instead of instant?
Yes. Active dry works welljust give it a little extra time. If you prefer, you can dissolve it in water first
to “prove” it (especially useful if you’re unsure your yeast is alive).
Do I need a stand mixer?
Nope. A bowl, a spoon, and the patience to let the dough do its thing are enough.
What skillet size is best?
A 10-inch skillet yields thicker focaccia; a 12-inch makes it a little thinner with more crisp surface.
Both are excellent. Choose your adventure: “pillowy” vs. “extra-crispy edges.”
Printable Recipe Card: No-Knead Skillet Focaccia
Ingredients
- 3 1/4 cups (500g) bread flour or all-purpose flour
- 2 1/2 tsp kosher salt
- 1 tsp instant yeast (or 1 1/4 tsp active dry)
- 1 2/3 cups (400g) room-temp water
- 1 1/2 tbsp olive oil (in dough)
- 3–5 tbsp olive oil (for skillet + topping)
- Flaky sea salt, rosemary (optional)
Instructions
- Mix flour, salt, yeast. Add water; stir until no dry flour remains. Stir in 1 1/2 tbsp olive oil.
- Rest 20 minutes. Optional: do 2–4 rounds of bowl folds every 15 minutes.
- First rise: 3–4 hours at room temp OR refrigerate 8–24 hours (then warm 45–90 minutes).
- Oil skillet (2–3 tbsp). Add dough, coat with oil, press gently outward.
- Cover and rise 1 1/2–2 hours until very puffy and jiggly.
- Heat oven to 450°F (or 475°F for darker crust). Dimple with oiled fingers, drizzle oil, add toppings.
- Bake 25–30 minutes until deeply golden. Optional: finish 3–5 minutes on oven rack for extra crispness.
- Cool 10 minutes, slice, and enjoy.
Kitchen Notes: of Real-Life No-Knead Skillet Focaccia Experiences
The first time I made no-knead skillet focaccia, I had the confidence of someone who had watched exactly one bread video
and decided, “Yes. I am a baker now.” Spoiler: I was not. I was a person with a bowl of sticky dough and a rising suspicion
that I had created a new form of edible glue. If this is you, welcomepull up a chair, and let’s talk about the oddly
therapeutic journey of trusting wet dough.
Here’s what I learned fast: focaccia dough looks wrong before it looks right. When you mix it, it’s shaggy and clings to
everything like it’s emotionally attached. The instinct is to add flour. Resist that urge like it’s a late-night online cart
checkout. Instead, oil your hands, give the dough a short rest, and suddenly it becomes more cooperative. It won’t turn into a
neat little ball (focaccia isn’t that kind of bread), but it will shift from “chaos” to “organized chaos,” which is a major win.
The overnight rise is where the magic happens. The dough goes into the fridge looking like an awkward blob and comes out
smelling faintly sweet and yeasty, like it’s been quietly plotting flavor. It’s also easier to handle cold; it feels less like
it’s trying to escape the bowl. The next day, when I tip it into an olive-oiled skillet, it spreads slowly, like it’s settling
in for a spa day. That oil isn’t just for tasteit’s a texture cheat code. It’s how you get that crackly, golden bottom that
makes people ask, “Did you buy this?” (You can pause dramatically before answering. You earned that.)
The dimpling step is my favorite, because it’s impossible to do it politely. You have to commit. Press straight down with
your fingertips like you’re playing a tiny bread piano. The first time, I was too gentle and ended up with “suggested dimples.”
Later batches got real dimplesdeep enough to hold little pools of oil and salt. That’s when the focaccia started tasting like
focaccia, not just “nice bread.”
The moment it comes out of the oven is pure dopamine. You’ll hear faint crackling as the crust cools. The rosemary smells
like you suddenly live in a coastal town and own linen napkins. The edges are crisp, the center is soft, and if you slice it
too early you’ll be tempted to eat the steamy middle like a very happy raccoon. My best advice? Cool it for ten minutes, then
cut. And if you mess up a batchif it’s pale, dense, or a little uneventoast it the next day. Focaccia has a great second act.