Table of Contents >> Show >> Hide
- What Is a Raffia Limewash Brush, Exactly?
- Why Limewash Needs a Different Kind of Brush
- Raffia vs. Standard Limewash Brushes
- Best Projects for a Raffia Limewash Brush
- How to Use a Raffia Limewash Brush (Without Regret)
- Texture Control: Getting the Look You Want
- Cleaning and Caring for a Raffia Limewash Brush
- Common Mistakes (and How to Avoid Them)
- Buying Tips: What to Look for in a Raffia Limewash Brush
- FAQ
- Experiences: What It’s Like to Work With a Raffia Limewash Brush (500+ Words)
- Conclusion
Some tools are born in a lab. Others are born on a sunbaked porch with a nail, a bundle of fiber, and the kind of
patience you only get from living in a place where walls are meant to age gracefully.
The raffia limewash brush is firmly in the second category.
At first glance, it looks like a tiny broom that wandered away from its job and got into interior design.
But give it a bucket of limewash and a porous surface, and it becomes a texture-making machineone that can lay down
a finish with depth, movement, and that “old house, but make it chic” vibe people try (and fail) to fake with rollers.
This guide breaks down what a raffia limewash brush is, why it works so well with limewash and mineral finishes,
how it compares to standard masonry/limewash brushes, and how to use it without turning your project into
a modern art piece titled Oops.
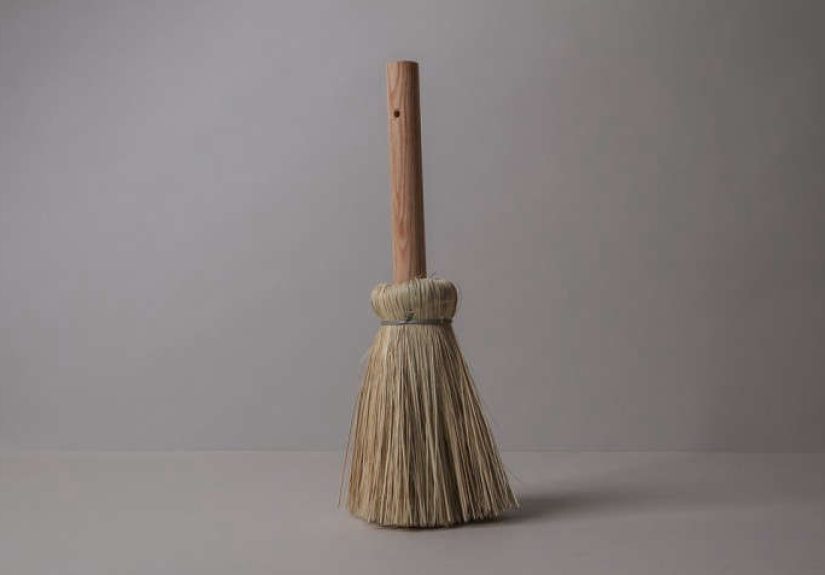
What Is a Raffia Limewash Brush, Exactly?
A raffia limewash brush is a handmade brush/broom made from natural raffia fiberstypically bundled,
bound, and attached to a handle in a simple, durable form.
Traditionally, versions of this tool have been used for whitewashing/limewashing exterior walls in
vernacular architecture (think humble homes where the finish is meant to breathe, weather, and be refreshed).
A well-known retail example is described as a handmade raffia brush used to whitewash houses in Portugal’s Alentejo region,
and it’s also pitched as handy for sweeping ash or garden debrisbecause traditional tools love having side quests.
The magic is in the fiber: raffia is a natural plant-based material that’s tough, flexible, and slightly springy.
Unlike many synthetic bristles that can feel too “precise,” raffia is irregular in a way that helps create the soft,
broken, organic texture people want from limewash finishes.
Why the shape matters
Most raffia limewash brushes have a looser, more open “broomy” head than a dense block brush. That means:
- More texture per stroke (great if you want visible movement and variation).
- Less paint held than a thick masonry brush (so you work in smaller sections or reload more often).
- More “randomness” built-inperfect for limewash’s imperfect, layered look.
Why Limewash Needs a Different Kind of Brush
Limewash isn’t typical wall paint. It’s a mineral coatingoften lime, water, and pigmentsmeant to soak into porous
surfaces rather than sit on top like a plastic film. That’s why application technique (and your brush choice)
matters so much.
Natural fiber bristles: the not-so-secret advantage
Multiple limewash manufacturers and specialists recommend natural bristle or natural fiber brushes
because they hold the watery material well and release it evenly, helping you avoid harsh lines and patchiness.
Wide, masonry-style brushes are commonly recommended for that soft, streaky movement limewash is known for.
Limewash technique also leans into visible brushwork: crosshatch, random strokes, or directional patterns can all
be part of the final aesthetic. In other words: the brush marks aren’t a flawthey’re the point.
Damp surfaces are your friend
A consistent theme across limewash instructions is dampening the surface (wet but not dripping)
so the limewash doesn’t dry too fast and can absorb more evenlyespecially on thirsty masonry.
If you skip this, your finish can dry in streaks or “edges,” and limewash loves to memorialize your mistakes.
Raffia vs. Standard Limewash Brushes
A raffia limewash brush can be the star of the show, but it’s not the only brush in this genre.
Many limewash brands recommend thick, wide stain or masonry brushes (often 4–6 inches) designed to move mineral
coatings across big areas efficiently.
| Brush Type | Best For | Texture & Look | Speed | Beginner Friendliness |
|---|---|---|---|---|
| Raffia Limewash Brush | Accent walls, small areas, rustic finishes, “handmade” character | High texture, broken strokes, organic variation | Medium | High (for artsy texture), Medium (for uniform coverage) |
| Wide Masonry / Limewash Block Brush | Large walls, brick exteriors, consistent coverage | Controlled texture, classic limewash movement | Fast | High |
| Small Tapered / Round Natural Bristle Brush | Cutting in, corners, edges, detail work | More precise marks | Slow | High |
If you’re using modern limewash products, you’ll often see brands recommending a specific style of brush
for example, a thick stain/masonry brush in the 4–6 inch range and application by brush rather than roller or spray,
because brushwork is essential to the finish.
A raffia brush fits into this world as the “texture specialist”: it shines when you want visible character.
Best Projects for a Raffia Limewash Brush
Think of the raffia limewash brush like a chef’s torch: you can cook without it, but when you want that
finishing touchhello, caramelized textureit suddenly makes sense.
Great matches
- Accent walls where movement matters more than uniformity.
- Fireplace surrounds (brick/stone) when you want a softened, aged look.
- Garden walls, planters, and outdoor features that benefit from a rustic finish.
- Textured plaster or lime plaster where the brush can “dance” over highs and lows.
- Decor pieces like terracotta pots, small masonry objects, and even limewash-style crafts.
Less ideal matches
- Ultra-smooth drywall if you want a clean, uniform finish (a standard block brush is easier).
- Sealed or painted masonry where limewash can’t soak in properly.
- Large, open walls if you’re on a deadline and don’t want to reload often.
How to Use a Raffia Limewash Brush (Without Regret)
Limewash rewards a calm pace and punishes panic-touch-ups. With a raffia brush, that’s doubly true because the texture
is more pronounced. Here’s a practical method that works for most mineral/limewash applications:
1) Prep like you mean it
- Protect floors, trim, and adjacent surfaces (limewash splatter is not a cute accessory).
- Clean masonry thoroughlydust, soot, and grime block absorption.
- Check absorbency: mist water on the surface; if it beads and sits, it may be sealed and not a good candidate.
2) Dampen the surface
Mist or wet the wall so it’s damp but not running. This helps the limewash stay workable longer and reduces harsh dry-edge lines.
Work in manageable sections (for example, a few feet wide) so you can keep a wet edge.
3) Mix and thin with intention
Limewash products vary: some come concentrated and require dilution; others are ready to use but may still benefit from
controlled thinning depending on your surface and desired opacity.
The key: aim for a consistency that loads onto the raffia fibers without clumping, and test a small area first.
4) Apply in overlapping, irregular strokes
Load the raffia brush, then apply using a crosshatch or loose multi-directional pattern.
The goal is “even coverage” from a distance, not a uniform film up close.
Keep your edge wet: once limewash starts drying, brushing back over it can create darker patches or visible lap marks.
5) Let it dry, then decide if it needs another coat
Limewash often dries lighter and can look uneven while wet. That’s normal.
Many limewash looks rely on multiple thin coats rather than one heavy coat.
If you want more depth, add a second coat with a similar patternsometimes changing direction slightly for richer movement.
Texture Control: Getting the Look You Want
A raffia limewash brush can create everything from subtle drift to dramatic “clouds.” The difference comes down to
pressure, loading, and pattern.
Subtle, airy texture
- Use less product per load.
- Apply lighter pressure, letting the fiber tips skim the surface.
- Keep strokes longer and more blended.
Bold, rustic movement
- Load more heavily (but avoid dripping).
- Use shorter, choppier strokes that overlap irregularly.
- Embrace variationlimewash is supposed to look lived-in, not laminated.
Pro tip: combine brushes
Many DIYers and pros use a wide masonry brush for broad coverage and a more “expressive” tool (like raffia) for finishing passes,
feature areas, or to add movement where the wall looks too flat.
If your corners and edges look messy, switch to a smaller natural bristle brush for cutting in.
Cleaning and Caring for a Raffia Limewash Brush
Limewash is alkaline, and you don’t want it curing inside your brush head like a tiny cement sculpture.
Clean-up is usually simple if you do it immediately:
- Rinse thoroughly with clean water right after use.
- Gently comb the fibers with your fingers (or a brush comb) to remove trapped material.
- Hang to dry so air circulates through the raffia bundle.
- Avoid soaking for days; prolonged soaking can weaken bindings and make fibers limp.
Storage matters: keep it dry, out of direct sunlight, and not crushed under a pile of “future projects” you’ll definitely start
right after you reorganize the garage (so… 2037).
Common Mistakes (and How to Avoid Them)
Mistake: Using it on a sealed surface
Limewash needs porosity. If water beads on your wall, limewash may not bond well. Test first and choose an appropriate primer
if your product requires it.
Mistake: Overworking drying areas
Limewash can show lap marks and touch-up patches if you go back into drying sections. Work in smaller zones and maintain a wet edge.
Mistake: Applying too thick
Heavy coats can reduce the breathable, mineral character and increase the chance of uneven drying. Thin coats build a better finish.
Mistake: Expecting “perfectly even”
Limewash is a finish with movement. If you want a uniform, washable, wipeable film, a standard acrylic paint will be happier at that job.
Limewash is the moody artist who refuses to color inside the lines.
Buying Tips: What to Look for in a Raffia Limewash Brush
- Fiber quality: Look for raffia that’s springy, not brittle.
- Binding strength: A tight wrap means less shedding and better control.
- Handle comfort: If you’re doing a wall, your hand will care. A lot.
- Head size: Larger heads = faster coverage; smaller heads = more detailed texture work.
- Multipurpose value: Many traditional raffia brushes double as small brooms for ash or garden cleanup.
FAQ
Can I use a raffia limewash brush with modern limewash paints?
Yesespecially if you want strong texture. Many modern limewash systems still emphasize brush application and visible movement.
For very large walls, you may prefer a wide masonry/limewash brush for base coverage and use raffia for finishing texture.
Do I need to dampen the wall every time?
On porous masonry, dampening is often recommended because it slows drying and improves absorption.
On less porous, primed, or interior surfaces, follow the product’s instructionssome systems rely more on primer than saturation.
Is this the same as a whitewash brush?
The tool can be used for whitewashing and limewashing, but the coatings differ.
Whitewash is often a diluted paint or stain mixture, while limewash is mineral-based (lime + water) and behaves differently on masonry.
Experiences: What It’s Like to Work With a Raffia Limewash Brush (500+ Words)
Here’s the honest, real-world truth: the first five minutes with a raffia limewash brush can feel like you’re doing something
wildly incorrect. The brush doesn’t “paint” so much as it scumbles, flicks, drags, and stamps texture onto the surface.
That’s the pointbut your brain, trained by years of smooth-wall painting, may need a minute to emotionally adjust.
In many DIY accounts of limewash projects, people describe a turning point somewhere around the first quarter of the wall.
At the start, the finish looks streaky, patchy, and too contrasty. Then it dries back, the mineral haze softens,
and the surface suddenly reads as intentionallike plaster that has a story.
The raffia brush amplifies that transformation because it creates micro-variations: little whispery gaps, heavier deposits,
and overlapping fibers that mimic the irregularity of old lime finishes.
One common “aha” moment: loading less product usually looks better.
New users tend to dunk and drag, which can create drips and heavy bands. After a few passes, most people learn to load,
tap off excess, and build in thin layers. The finish becomes calmer and more dimensional, especially on textured plaster
or matte, absorbent surfaces. On brick, raffia fibers can catch on edges and mortar joints, which is either delightful
(if you want rustic drama) or maddening (if you wanted a neat, consistent wash). Testing a small hidden area is the move.
Another repeated lesson: the wet edge rule is not a suggestion.
Limewash and mineral coatings can show overlaps if you stop mid-wall and return after a section has started to dry.
With a raffia brush, those overlaps can look even more pronounced because the texture is directional.
People who have the best outcomes usually plan their work like a tiny choreography:
dampen, apply, overlap, step back, resist the urge to “fix,” and keep moving.
The raffia brush also changes how you think about “mistakes.”
A roller mark is a mistake. A brush streak in latex is a mistake.
But with limewash texture, a slightly heavier patch can become the most charming part of the walllike a natural cloud
that breaks up a flat area. Many DIYers find they get better results when they stop chasing symmetry and instead aim for
balance: if one area is heavier, they echo that weight elsewhere so the wall reads cohesive.
And then there’s cleanup and reuse. People often report that natural fiber tools feel “alive” compared to synthetics:
they soften slightly as they’re used, they respond to water, and they develop a rhythm.
If you rinse promptly and dry it properly, a raffia limewash brush can last project after project.
Some owners even keep it as a multipurpose toolone day it’s for limewash texture,
the next it’s sweeping fireplace ash or dusting off a garden path.
It’s a very old-world vibe: one tool, many jobs, and a finish that looks better with a little time.
Bottom line: the raffia limewash brush isn’t for people who want sterile perfection. It’s for people who want walls that feel
handmadesurfaces with softness, depth, and just enough irregularity to make guests say, “Wait… what paint is that?”
(You can smile and say, “It’s not paint,” and enjoy your new personality as a person who casually drops the word carbonation at dinner.)
Conclusion
A raffia limewash brush is a simple tool with a surprisingly sophisticated superpower:
it helps mineral finishes look genuinely lived-in, not manufactured.
Use it when you want texture and character, pair it with good prep and thin coats,
and let limewash do what it does bestcreate depth through imperfection.
If you’re willing to trade a little “control” for a lot of charm, this humble raffia bundle might become your favorite
finish-making sidekick.