Table of Contents >> Show >> Hide
- Why a Discarded Vanity Makes a Great Rolling Workbench
- What to Look for in a Vanity Before You Bring It Home
- How to Turn a Vanity Into a Rolling Workbench
- Smart Design Features That Make the Bench Better
- Best Uses for a Rolling Vanity Workbench
- Mistakes to Avoid
- Why This Upcycled Workbench Project Works So Well
- Conclusion
- Extra Experience: What Building and Using One Really Feels Like
Note: Clean, publication-ready HTML only.
There are two kinds of people in this world: people who see an old bathroom vanity on the curb and keep driving, and people who slow down and think, “That could hold clamps.” This article is for the second group.
A rolling workbench from a discarded vanity is one of those gloriously practical DIY projects that checks every box at once. It saves money, keeps usable furniture out of the waste stream, adds storage to your shop, and gives you a movable workstation that can roll where the mess is instead of forcing the mess to come to you. For a garage, shed, craft room, or small workshop, that is a pretty sweet upgrade for something that started life next to a toothbrush holder.
The beauty of using an old vanity is simple: it already has the one thing many DIY benches lack on day onestorage. Drawers, cabinets, side panels, and a compact footprint make it a smart base for a mobile bench. Add a stronger top, reinforce the structure, install locking casters, and suddenly that forgotten bathroom cabinet becomes the hardest-working piece of furniture in the room.
Why a Discarded Vanity Makes a Great Rolling Workbench
Most workbench tutorials start with a pile of lumber. That is fine. Noble, even. But an old vanity gives you a head start. The frame is already built, the compartments are already there, and the proportions often work well in smaller garages where a giant bench would eat the whole room like an all-you-can-saw buffet.
A vanity also brings several built-in advantages:
1. Ready-made storage
Drawers can hold measuring tools, sandpaper, fasteners, glue, and all the random bits that somehow multiply when no one is looking. Cabinet bays can store power tools, paint, or shop towels. Instead of building a bench and then figuring out where everything goes, you start with a bench base that already understands the assignment.
2. A compact footprint
Many bathroom vanities are narrower than traditional workbenches, which makes them a good fit for tight spaces. If your workshop is technically “the left side of the garage, near the bikes and holiday decorations,” that smaller footprint matters.
3. Easy customization
Because vanities come in many widths and styles, you can tailor the build to your needs. A wider vanity can become a serious assembly station. A smaller unit can turn into a rolling cart for painting, gardening, or light woodworking. Open-bottom vanities are great for adding a shelf, while drawer-heavy ones make excellent tool organizers.
4. Budget-friendly upcycling
Repurposing old furniture is not just thrifty; it is practical. Reuse keeps useful materials in circulation longer and helps reduce waste. In plain English: you spend less, throw away less, and get to feel smug in a productive, tool-holding way.
What to Look for in a Vanity Before You Bring It Home
Not every castoff vanity deserves a second act as a mobile workbench. Some are solid. Some are one aggressive screwdriver twist away from becoming kindling with delusions of grandeur.
Choose a vanity with these traits:
Sturdy side panels and base
Look for a unit with solid wood, plywood, or decent cabinet-grade construction. Thin particleboard can work for light-duty use, but it often needs more reinforcement, especially if you plan to add heavy tools or a thick top.
Usable storage layout
Drawers are fantastic. Full-width sink cutouts are less fantastic. If the vanity had plumbing, expect to modify the interior. That is not a dealbreaker, but it does mean more work with fewer opportunities to brag early.
Reasonable dimensions
Think about final bench height before adding casters and a new top. A rolling bench that is too tall becomes awkward fast. Mobility is helpful; working at shoulder height like a confused T. rex is not.
Flatness and squareness
If the cabinet rocks, twists, or looks like it survived three remodels and a small flood, be realistic. Minor repairs are normal. Major structural therapy may not be worth it unless you enjoy rebuilding cabinets from the emotional wreckage of other cabinets.
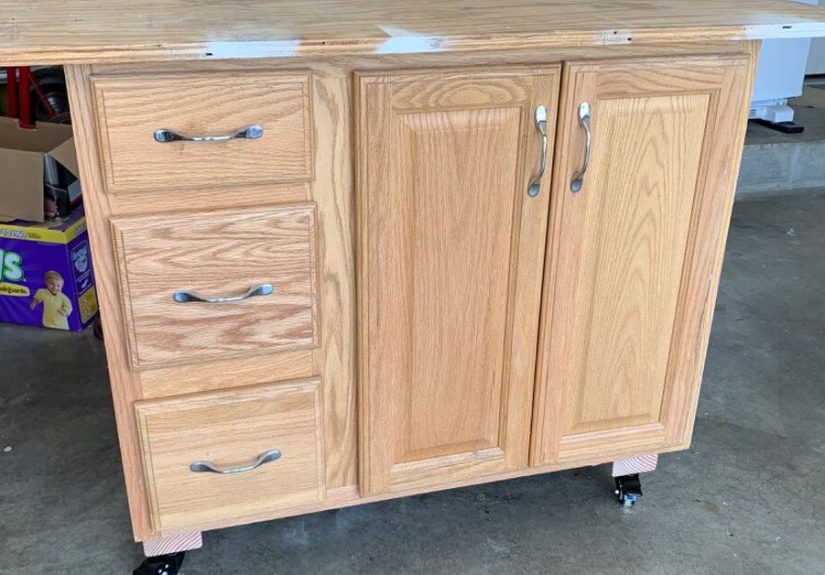
How to Turn a Vanity Into a Rolling Workbench
Step 1: Strip out the bathroom bits
Remove the sink, faucet, plumbing hardware, backsplash, and countertop if they are still attached. Clean everything thoroughly. You are building a shop workstation, not preserving mysterious caulk fossils.
Patch any holes left by plumbing with plywood inserts, backing strips, and wood filler where needed. If the back is open, consider enclosing part of it for strength.
Step 2: Reinforce the cabinet
This is the most important upgrade. Vanities are built to hold a sink and some toiletries, not a miter saw, a vise, and your full emotional commitment to weekend projects.
Add reinforcement where it counts:
- Install wood cleats inside the cabinet corners.
- Strengthen the bottom with plywood if it feels thin.
- Add a back panel or cross braces to reduce racking.
- Secure loose joints with screws and glue.
If the vanity has a toe-kick, inspect it carefully. That area often needs extra support because the casters will transfer movement and load through the base.
Step 3: Build a better top
The original vanity top may be fine for folding towels. It is usually less fine for pounding, clamping, painting, cutting, or gluing. Replacing it with a tougher surface is what turns the piece from “repurposed cabinet” into “actual workbench.”
Popular choices include:
- Plywood for affordability and strength
- MDF with laminate for a flat, easy-to-clean work surface
- Butcher block or hardwood for durability and a more finished look
A layered plywood top is a smart middle ground. It is sturdy, easier on the wallet than hardwood, and forgiving enough for general shop use. Let the top overhang slightly if you want space for clamps. That little lip becomes surprisingly useful once the bench enters active service.
Step 4: Add locking casters
This is where the “rolling” part earns its paycheck. Use locking swivel casters rated for the combined weight of the vanity, the top, the tools inside it, and whatever project you pile on top after promising yourself you would keep things light. Four matching casters usually work well, though larger benches may benefit from heavier-duty hardware and extra reinforcement.
Mount casters to a reinforced base, not flimsy cabinet skin. If necessary, add a plywood sub-base or thicker mounting blocks underneath. The goal is smooth movement when rolling and total confidence when locked.
And yes, the locks matter. A mobile workbench that drifts during sanding or sawing is not “dynamic.” It is annoying.
Step 5: Improve the storage
Now that the vanity has a new job, make the inside match the mission. Add drawer dividers, small bins, magnetic strips, hooks, or a slide-out tray. The back or side panels are good spots for pegboard, clamp racks, or a paper towel holder if your projects tend to involve finishes, glue, or general chaos.
Think in zones:
- Top drawer: layout tools, pencils, utility knife, tape measure
- Middle storage: drills, chargers, sanding supplies
- Lower shelf or cabinet: paint cans, shop vac hose, heavy tools
Keeping heavier items low improves stability and makes the bench feel better when rolling across a garage floor.
Smart Design Features That Make the Bench Better
Add a pegboard or tool panel
A tool panel above or on the side of the bench gives you quick access to frequently used hand tools. That means less rummaging, less muttering, and fewer five-minute searches for the square you literally just had in your hand.
Install a vise
If your projects include woodworking, metalwork, or repair tasks, a small bench vise is a game changer. Make sure the top and cabinet structure below it are reinforced enough to handle the load.
Use a protective finish
A shop bench does not need babying, but it does need some protection. Paint the cabinet, seal the wood, or coat the top with a durable finish that can handle dust, moisture, and the occasional coffee ring of regret.
Upgrade the lighting nearby
Good task lighting makes any bench more useful. If your garage lighting is dim, place the rolling bench where you can work under brighter fixtures, or add a dedicated light source. Better visibility improves accuracy, workflow, and safety.
Best Uses for a Rolling Vanity Workbench
This project is surprisingly versatile. Depending on the size and finish, your converted vanity can serve as:
- A woodworking bench for small and medium projects
- A painting and finishing cart
- A gardening potting bench for a garage or shed
- A craft station with mobile storage
- A repair bench for household fixes and hobby tools
- An assembly table that rolls out when needed and parks when done
That flexibility is what makes a DIY rolling workbench so appealing. In smaller shops, furniture that can move is not a luxury. It is survival.
Mistakes to Avoid
Ignoring height
A vanity plus a thick top plus casters can quickly become too tall. Measure everything before assembly. The final height should feel comfortable for the kind of work you do most often.
Underestimating weight
Rolling benches are convenient, but casters have limits. If you plan to store heavy tools or mount a serious machine on top, size the hardware accordingly and reinforce the base.
Keeping weak materials unreinforced
Particleboard, thin backs, and fragile bottoms need help. Add plywood, cleats, or braces before you trust the cabinet with real shop duty.
Creating beautiful chaos inside
A workbench with drawers can still become a junk cave. Add organizers from the start. Your future self will be deeply grateful and maybe slightly emotional.
Forgetting safety basics
Secure stored materials so they do not slide or fall. Keep sharp tools organized. Avoid overload. Maintain clear walking paths around the bench. A well-designed shop is not just efficient; it is safer and less stressful to use.
Why This Upcycled Workbench Project Works So Well
The charm of a rolling workbench from a discarded vanity is that it blends three good ideas into one project: upcycling, organization, and mobility. You are not just building a table. You are creating a workstation with character, storage, and enough adaptability to earn its floor space.
It also solves a very real problem in home workshops: most people do not have unlimited square footage. A rolling bench gives you flexibility. A vanity gives you built-in organization. A custom top gives you strength. Together, they create a practical bench that feels intentional, not improvised.
And honestly, there is something satisfying about transforming an old bathroom fixture into a hardworking shop companion. It is the kind of project that feels clever every single time you open a drawer and find exactly what you need.
Conclusion
If you have access to an old vanity, a few basic tools, and a healthy appreciation for useful junk, this is a project worth building. Start with a sturdy cabinet, reinforce it well, add a durable top, install locking casters, and organize the interior for the tasks you do most. The result is a mobile workbench with storage that looks custom, works hard, and costs far less than buying a new one.
In a world full of disposable furniture and overpriced workshop gear, turning a discarded vanity into a rolling workbench feels refreshingly practical. It is resourceful. It is efficient. And it is a lot more fun than pretending you needed that old vanity for “future bathroom parts.”
Extra Experience: What Building and Using One Really Feels Like
The first time I worked from a rolling vanity bench, I learned something immediately: mobility changes how a shop feels. Before that, every project happened in fixed zones. Sanding in one corner. Painting near the door. Assembly wherever there was enough elbow room and not too much holiday decor. With the rolling bench, the workspace came to the project. That sounds minor until you actually live with it for a while.
One of the biggest surprises was how useful the old vanity drawers became. On paper, drawers are just drawers. In practice, they become the difference between a smooth Saturday project and a scavenger hunt. One drawer held pencils, squares, hearing protection, and a tape measure. Another became the “messy but important” drawer for screws, glue, painter’s tape, and sandpaper. Instead of spreading tools across every flat surface like I was opening a tiny hardware store, everything had a home.
The second pleasant surprise was that an upcycled bench has personality. A brand-new utility bench can be great, but a converted vanity has quirks that make it memorable. Maybe one drawer still slides with a little attitude. Maybe the side panel has old hardware holes from its former life. Maybe the cabinet was once painted a color that no human has willingly selected since 2008. Once cleaned up and repainted, those details stop feeling like flaws and start feeling like history.
There are lessons, of course. The biggest one is not to skip reinforcement. Early on, I treated the vanity like it was sturdier than it really was. Then I loaded it with tools and realized the base needed more support before I could trust it long-term. After adding braces and a stronger bottom panel, it felt completely differentless like repurposed furniture and more like a proper workstation.
I also learned that locking casters are worth every penny. Cheap wheels make a bench feel wobbly and reluctant, like a shopping cart with opinions. Good casters make it glide when you want movement and stay planted when you do not. That one detail changes the entire experience of using the bench.
Over time, the bench became the place where small jobs naturally landed. Tightening loose hardware. Cutting trim pieces. Potting plants. Touching up paint. Fixing a lamp. It turned into the first surface I reached for, not the backup. That is probably the highest compliment a workshop project can get: it becomes part of your routine so naturally that you stop noticing it and just keep using it.
That is why this kind of project sticks with people. It is not only about saving an old vanity. It is about creating a workbench that matches real lifemessy, movable, useful, and a little bit proud of how cleverly it came together.