Table of Contents >> Show >> Hide
- Why Solar Powered Pumpkin Lights Are a Halloween Win
- How Solar Garden Lights Work (So Your Pumpkins Don’t Betray You)
- 3 DIY Methods for Solar Powered Pumpkin Lights
- Supplies You’ll Want (No Need to Overthink It)
- Step-by-Step: Solar Stake Light Pumpkin (Method 1)
- Step 1: Test your solar light before you commit
- Step 2: Choose your pumpkin style (real vs. faux)
- Step 3: Create an access opening
- Step 4: Mount the solar light head
- Step 5: Stabilize it (so wind doesn’t turn your pumpkin into modern art)
- Step 6: Add “glow control” (optional but awesome)
- Step 7: Place your solar pumpkin where it can actually charge
- Design Ideas That Look Way More Impressive Than the Effort Required
- Weatherproofing and Pumpkin Longevity (Because Nature Is Not a Halloween Decor Fan)
- Troubleshooting: When Your Pumpkin Light Won’t Turn On
- Safety Notes (Not the Scary Kind)
- Conclusion: A Brighter, Safer, “Set-It-and-Glow” Halloween
- Real-World Maker Notes: of “Been There” Tips
Halloween lighting is a spectrum. On one end: a single tealight doing its best in a windy jack-o’-lantern like it’s auditioning for a survival show.
On the other: a yard so bright the International Space Station could leave a Yelp review. If you want the fun glow without cords, outlets, or open flames,
solar powered pumpkin lights are the sweet spoteasy DIY, safer than candles, and delightfully low-maintenance.
This guide walks you through multiple ways to make DIY solar pumpkin lights using common solar garden lights (and a little craftiness),
plus design ideas, weatherproofing tips, and troubleshooting so your pumpkins shine on Halloween night… and don’t tap out early like a flimsy costume seam.
Why Solar Powered Pumpkin Lights Are a Halloween Win
- No flames: You get the classic glow without the candle risk.
- No cords: Perfect for pathways, porches, and yards where outlets are scarce.
- Automatic “on at dusk” vibes: Most solar lights turn on by themselves when it gets dark.
- Reusable: Use faux pumpkins and you’ve basically created a yearly Halloween tradition in light form.
- Budget-friendly: Solar stake/path lights are widely available and often inexpensive.
How Solar Garden Lights Work (So Your Pumpkins Don’t Betray You)
Solar garden lights are tiny self-contained systems: a small solar panel charges a rechargeable battery during daylight, and at night an LED runs off that
stored energy. Many include a light sensor (or a simple circuit that “knows” it’s dark when the panel stops producing power), which is why they often
switch on automatically at dusk and turn off at dawn.
Translation: if the solar panel is shaded all day (or dusty, or pointed at the ground, or shoved under a pumpkin lid like it’s hiding from responsibility),
your pumpkin light may glow for about five minutesor not at all. The panel needs real daylight exposure to charge well.
3 DIY Methods for Solar Powered Pumpkin Lights
Pick your method based on what you have: solar stake lights, solar string lights, or solar jar-style lights. You can also mix methods for different “zones”
(pathway vs. porch vs. steps).
Method 1: The “Solar Stake Light Swap” (Easiest + Most Popular)
This is the classic: take a solar path/stake light, remove the stake, and mount the light head on (or into) a pumpkin. The solar panel stays outside on top,
and the LED glows inside the pumpkin at night.
Method 2: Solar String Lights Inside the Pumpkin (Great for Big Glow)
Use a solar fairy-light set (with a small panel on a stake or clip). Coil the lights inside a pumpkin for an even glowespecially great for larger pumpkins,
stacked pumpkin displays, or multiple mini pumpkins connected by one string.
Method 3: The “Solar Jar Lid” Hack (A+ for Faux Pumpkins)
Solar “jar lights” or DIY versions made from the tops of solar path lights can be placed inside pumpkins, behind cutouts, or inside a glass jar set within
a carved pumpkin for a neat lantern-within-a-lantern effect.
Supplies You’ll Want (No Need to Overthink It)
Core supplies (choose based on your method)
- Solar path/stake lights (one per pumpkin) or solar string lights or solar jar-style lights
- Pumpkins (real or faux)
- Optional: battery-operated tea lights (backup plan for cloudy stretches)
Tools + “make life easier” extras
- Craft knife or pumpkin carving kit (for real pumpkins)
- Utility knife or craft blade (for faux pumpkins)
- Drill + bits (optional, great for dotted “starry” designs)
- Hot glue gun or outdoor-rated adhesive or silicone sealant (for mounting)
- Painter’s tape and marker (for layout)
- Paper towels (because pumpkin guts are basically nature’s confetti)
Step-by-Step: Solar Stake Light Pumpkin (Method 1)
This is the most “do it in an afternoon” versionand it looks surprisingly polished when you line a few up along a walkway.
Step 1: Test your solar light before you commit
Charge it in full sun for a day. At dusk, confirm it turns on. If it has a switch, make sure it’s set to ON. (Yes, this step is here because everyone,
at least once, has blamed the universe when it was actually the switch.)
Step 2: Choose your pumpkin style (real vs. faux)
- Real pumpkins: Best for classic carving and that “porch pumpkin” charm. Downside: weather + rot + squirrels who think you set out a buffet.
- Faux pumpkins: Best for reusing year after year. Also easier to drill clean holes without the squish factor.
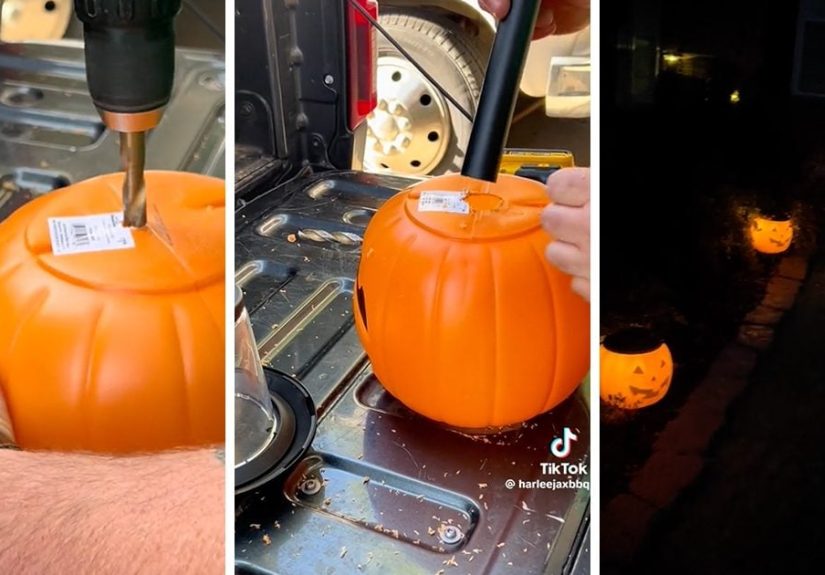
Step 3: Create an access opening
For the cleanest look, cut an opening in the bottom of the pumpkin so you can hide the light inside and keep the top intact. Bottom-access
also keeps the lid from getting awkward if you’re mounting the solar panel above.
Step 4: Mount the solar light head
Remove the stake/spike portion. You typically want the LED “lamp” part inside the pumpkin and the solar panel on top (or outside) where it gets sun.
Depending on your light design:
- Option A (top mount): Cut a hole in the lid/top just large enough for the light head to sit securely.
- Option B (inside mount): Place the light inside and run the panel/neck through a snug opening so the panel rests outside.
- Option C (bucket/faux pail pumpkins): Some plastic pumpkin buckets let you thread the light through an existing opening or a drilled hole.
Step 5: Stabilize it (so wind doesn’t turn your pumpkin into modern art)
- Use hot glue for quick indoor/covered setups.
- Use outdoor silicone or weather-resistant adhesive for porches and yards.
- Use zip ties through small holes (faux pumpkins) for a removable, reusable mount.
Step 6: Add “glow control” (optional but awesome)
If you want a softer lantern effect, lightly scrape the inside of carved areas thinner (real pumpkins) or add a layer of vellum/frosted plastic behind cutouts
(faux pumpkins). The result: less “flashlight in a gourd,” more “warm spooky ambiance.”
Step 7: Place your solar pumpkin where it can actually charge
Aim for a sunny spot for the panelideally several hours of direct sun. Clean the panel occasionally (dust is the silent villain of solar charging).
Design Ideas That Look Way More Impressive Than the Effort Required
1) Solar Pumpkin Pathway
Use several small-to-medium pumpkins spaced evenly. Keep face designs simple and bold so the light reads from the streetbig eyes, toothy grin, crescent moons,
or classic triangles.
2) “Drilled Constellation” Pumpkins
Drill holes in patterns (stars, swirls, polka dots). This looks especially good with warm LEDs. Faux pumpkins work great here for crisp edges.
3) Porch Trio with Different Personalities
Mix a traditional jack-o’-lantern, a “cat silhouette,” and a dotted lantern pumpkin. Keeping a consistent light color (all warm white) ties the set together.
4) Pumpkin Lantern + Jar Glow Combo
Place a solar “jar” light inside a larger carved pumpkin, or set a glowing jar behind a pumpkin cutout for a layered, haunted-cottage effect.
Weatherproofing and Pumpkin Longevity (Because Nature Is Not a Halloween Decor Fan)
Protect the solar parts
- Avoid pooled water: Elevate pumpkins slightly or place them on a tray/brick so they’re not sitting in soggy leaves.
- Ventilation matters: If moisture builds up inside, the light can fog or corrode. A small hidden vent hole helps.
- Seal smart: If rain is likely, use silicone around openings where the solar light passes through.
Make real pumpkins last longer (pick one approach)
Real pumpkins naturally start breaking down after carving. To slow it down, keep them cool/shaded when possible and remove as much pulp as you can.
Common preservation approaches include:
- Vinegar solution: Often suggested as a gentler alternative to bleach for slowing mold growth.
- Diluted bleach solution: Sometimes recommended for disinfecting (note: treat bleach carefully and keep it away from kids and pets).
- Petroleum jelly on cut edges: Helps reduce drying and shriveling by sealing exposed surfaces.
Practical pro tip: carve closer to Halloween if you want the freshest look. If you’re decorating early, consider faux pumpkins for the “set it and forget it”
version of spooky season.
Troubleshooting: When Your Pumpkin Light Won’t Turn On
Problem: It doesn’t light up at night
- Check the switch: Many solar lights have an ON/OFF switch under the cap.
- Test the sensor: Cover the solar panel completely with your handsome lights turn on when the panel is dark.
- Charge time: Give it a full day of sun. Cloudy days can reduce charge.
- Battery check: Solar lights use rechargeable batteries. If it’s old, swap it with the same type/size (rechargeable only).
- Panel cleaning: Wipe the panel. Dust and pollen can noticeably reduce charging.
Problem: It turns on, but it’s dim
- Not enough sun: Move the panel to a brighter spot.
- Short winter days: Less daylight can mean shorter runtime. Consider higher-quality solar lights or a hybrid plan (solar for ambiance + a few battery LEDs for backup).
- Too much light leakage: If your pumpkin has huge openings, the glow can look weaker. Add diffusion (vellum/frosted plastic) behind cutouts.
Safety Notes (Not the Scary Kind)
- Avoid open flames: LEDs and solar lights give you the glow without candle hazards.
- Tool safety: Use carving tools carefully; for teens/kids, an adult should handle knives and drills.
- Battery basics: Use only the correct rechargeable battery type for your solar light. Don’t mix battery types, and don’t use damaged batteries.
- Weather awareness: If a storm is coming, bring pumpkins under coverelectronics and puddles rarely become friends.
Conclusion: A Brighter, Safer, “Set-It-and-Glow” Halloween
Solar powered pumpkin lights are one of those rare DIY wins: they look festive, they’re practical, and they solve multiple Halloween problems
at once (cords! flames! dead batteries!). Whether you go with a simple solar stake conversion, tuck solar fairy lights inside a pumpkin, or build a glowing
jar-lantern setup, you’ll end up with a yard that feels welcoming, spooky, and just the right amount of magical.
And if one pumpkin misbehaves? Congratulationsyou’ve unlocked the most authentic Halloween feature of all: a decoration that’s slightly haunted.
Real-World Maker Notes: of “Been There” Tips
If you’ve ever tried a Halloween DIY that looked effortless online and then, in real life, turned into a small negotiation with physics… welcome. Solar
pumpkin lights are very doable, but a few “experience-based” lessons make the difference between a smooth setup and a porch full of confused gourds.
First: solar panels are picky about sunlight. A pumpkin on a shaded porch might look adorable at noon, but if the panel only gets a little
indirect light, your LED may fade early. Makers who get the best results usually treat the solar panel like a tiny houseplant: it needs light, it does better
when it’s clean, and it gets dramatic when ignored. If your porch is shaded, consider placing the solar panel in a nearby sunny spot and running the light
cable (if your model allows), or choose a yard location that gets several hours of sun.
Second: condensation is real. A carved pumpkin is basically a natural humidifier, especially after warm days and cool nights. DIYers often
notice fogging inside the pumpkin, which can make the light look dim and, over time, can be rough on the electronics. The fix is simple: add a small vent
hole in the back (hidden from view) and avoid sealing the pumpkin so tightly it can’t breathe. If you’re mounting the solar light through a snug opening,
use silicone only where water would enternot like you’re caulking a bathtub.
Third: mounting matters more than carving. People tend to spend an hour perfecting a spooky face and then “plop” the light in like it’s a
garnish. The most stable builds either (a) create a snug hole that holds the light head firmly, (b) add a small interior support (foam, a plastic cup, or a
zip-tie bracket in faux pumpkins), or (c) use a removable adhesive method so you can swap batteries or fix alignment later. A wobbly light looks fine until
the first gust of wind turns your jack-o’-lantern into a lighthouse.
Fourth: warm white usually wins. Cool white LEDs can feel a little “garage fluorescent,” especially through pumpkin walls. Warm white reads
more like classic candlelightcozy, spooky, and photo-friendly. If you’re mixing multiple pumpkins, using the same color temperature across all of them makes
the display look intentional (even if you assembled it while eating candy corn).
Fifth: faux pumpkins are the long-game champion. Makers who switch to faux pumpkins often say it’s because they’re tired of carving the night
before Halloween, only to watch a masterpiece slump by November 1. Faux pumpkins drill cleanly, store easily, and let you reuse the same solar light setup
year after year. If you still love real pumpkins, a hybrid approach is common: real jack-o’-lanterns on Halloween week, faux lantern pumpkins for the full
season.
Finally: plan for “cloudy week insurance.” Even great solar lights can struggle during a run of bad weather. Experienced decorators keep a
few battery tea lights or a small LED puck as a backup for key pumpkins (like the ones right by the front steps). That way your display still shines when the
forecast refuses to cooperate. Think of it as Halloween resiliencebecause the only thing that should be unpredictable on October 31 is the jump scare.