Table of Contents >> Show >> Hide
- Why This Spring Chick Cookies Recipe Works
- Ingredients for the Cookies
- Tools You Will Want Nearby
- How to Make Spring Chick Cookies
- How to Decorate the Chick Cookies
- Flavor Tips and Easy Variations
- Common Problems and How to Fix Them
- Serving Ideas for Spring Parties
- How to Store Spring Chick Cookies
- Why These Cookies Are Worth Making Every Spring
- The Experience of Making Spring Chick Cookies
Some desserts whisper “spring.” These cookies practically chirp it. A good Spring Chick Cookies Recipe should deliver two things at once: buttery, tender sugar cookies that actually taste good, and decorations cute enough to make people pause before eating them for a full dramatic three seconds. These cheerful little chick cookies are bright, playful, and surprisingly doable, even if your previous cookie-decorating experience mostly involved spreading frosting with a butter knife and hoping for the best.
The beauty of spring chick cookies is that they work for almost everything on the seasonal calendar. They fit right in at Easter brunch, baby showers, school parties, spring bake sales, and those random weekends when you want your kitchen to look like a pastel explosion in the best possible way. They are also wonderfully flexible. You can make them elegant with smooth royal icing, whimsical with candy eyes, or kid-friendly with simple yellow glaze and orange sprinkles. In other words, these cookies are less “fussy bakery project” and more “adorable edible mood booster.”
This recipe walks you through a reliable sugar cookie base, easy decorating steps, troubleshooting tips, flavor variations, and practical storage advice. It is written for real kitchens, real schedules, and real bakers who may or may not have flour on their shirt by the end. No judgment. That is part of the spring baking aesthetic.
Why This Spring Chick Cookies Recipe Works
A lot of decorated cookie recipes look amazing in photos and then betray you in real life by spreading into weird blobs in the oven. This version is designed to avoid that heartbreak. The dough is rich enough to taste buttery and soft, but firm enough to hold a chick shape. A short chill time helps the cookies bake evenly, and a simple royal icing gives you the crisp finish that makes the design pop.
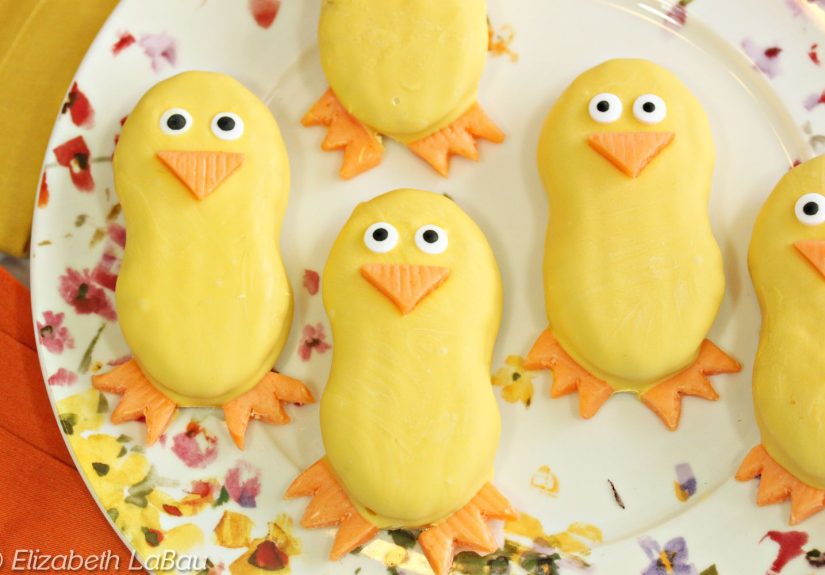
Another reason this recipe works is that the decoration is intentionally simple. You are not painting the ceiling of a Renaissance chapel here. The basic design uses a yellow icing base, two small eyes, and an orange beak. Add wings, feet, blush cheeks, or a cracked eggshell detail if you want extra flair, but the cookies still look charming without a dozen tiny piped elements.
Ingredients for the Cookies
For the sugar cookie dough
- 2 3/4 cups all-purpose flour
- 1/2 teaspoon baking powder
- 1/4 teaspoon salt
- 1 cup unsalted butter, softened
- 3/4 cup granulated sugar
- 1 large egg
- 2 teaspoons vanilla extract
- 1/4 teaspoon almond extract, optional
For the royal icing
- 3 cups powdered sugar
- 2 tablespoons meringue powder
- 5 to 6 tablespoons warm water, plus more as needed
- Yellow gel food coloring
- Orange gel food coloring
- Black gel food coloring, or edible marker for eyes
Optional decorations
- Yellow sanding sugar
- Mini heart sprinkles for beaks or bows
- Candy eyes
- Pastel sprinkles
Tools You Will Want Nearby
You do not need a TV baking competition setup, but a few basics help. A rolling pin, parchment paper, mixing bowls, a hand or stand mixer, cooling racks, piping bags, and a chick-shaped cookie cutter are ideal. No chick cutter? Use a round cutter and decorate the face, or use an egg-shaped cutter and turn the wider end into the chick’s head. Creative problem-solving is the unofficial spice of spring baking.
How to Make Spring Chick Cookies
1. Make the dough
In a medium bowl, whisk together the flour, baking powder, and salt. In a large bowl, beat the softened butter and sugar until light and creamy, about 2 to 3 minutes. Add the egg, vanilla extract, and almond extract if using. Mix until smooth. Add the dry ingredients gradually and mix just until a soft dough forms. Do not overmix. Cookie dough is like a spring picnic: better when it stays relaxed.
2. Chill the dough
Divide the dough into two disks, wrap them, and chill for at least 1 hour. This step matters. Chilled dough is easier to roll, easier to cut, and far less likely to morph into abstract modern art in the oven.
3. Roll and cut
Preheat the oven to 350°F. Line baking sheets with parchment paper. Roll one disk of dough on a lightly floured surface to about 1/4 inch thick. Cut into chick shapes and place the cookies on the prepared sheets, leaving about 1 inch between them. Re-roll scraps once. Beyond that, the dough starts to get tired, and tired dough does not lead to glamorous cookies.
4. Bake
Bake for 8 to 10 minutes, or until the edges are just beginning to turn pale golden. You do not want deep browning here. These are delicate spring cookies, not campfire survivors. Let them cool on the baking sheet for 2 minutes, then move them to a wire rack and cool completely.
How to Decorate the Chick Cookies
1. Mix the royal icing
Beat the powdered sugar, meringue powder, and 5 tablespoons of warm water until smooth and glossy. If it is too stiff, add a little more water, a few drops at a time. Divide the icing into bowls and tint most of it yellow, a small amount orange, and a tiny amount black if piping the eyes. For outlining, keep the icing slightly thicker. For flooding, thin it until it flows smoothly but still holds its shape for a few seconds before settling.
2. Outline and flood
Pipe a yellow outline around each cookie, then fill in the center with thinned yellow icing. Use a toothpick to nudge the icing into corners and pop any air bubbles. This tiny step makes a big difference and gives the surface that smoother, bakery-style finish people always pretend they are not impressed by.
3. Add the details
Once the yellow base has set slightly, add an orange beak and little feet if your design includes them. Pipe or dot on black eyes, or use an edible marker once the base is dry. For extra personality, add tiny wings, eyelashes, blush dots, or a cracked-shell edge along the bottom. Suddenly the cookies start looking like they have opinions, and that is when the fun begins.
4. Let them dry completely
Leave the decorated cookies at room temperature for at least 6 to 8 hours, or overnight, before stacking or packaging them. Royal icing needs time to firm up. Rushing this step is how adorable chicks become smudged yellow mysteries.
Flavor Tips and Easy Variations
This Spring Chick Cookies Recipe is meant to be dependable, but it is not rigid. A little lemon zest in the dough makes the cookies taste brighter and more spring-like. A touch of almond extract gives them bakery-style depth. For a softer frosting finish, use a simple glaze instead of royal icing. The design will be less sharply defined, but the cookies will still look sweet and festive.
You can also turn these into a whole spring cookie collection. Make half the batch as chicks, then use egg, bunny, flower, and carrot cutters for the rest. Use the same dough and icing colors, and suddenly you have a coordinated Easter dessert platter that looks far fancier than the actual effort required. This is the kind of kitchen trick worth keeping.
Common Problems and How to Fix Them
Why did my cookies spread?
The dough was probably too warm, overworked, or rolled too thin. Chill it longer before baking and keep the thickness close to 1/4 inch.
Why is my icing too runny?
Add more powdered sugar, a little at a time, until it reaches the right consistency. Royal icing should flow, not sprint.
Why are there bumps in my icing?
Those are often air bubbles or lumps in the sugar. Stir gently, let the icing rest briefly, and use a toothpick to smooth the surface after flooding.
Why do my decorations smear?
The base layer probably was not dry enough. Let each layer set before adding more detail unless you intentionally want a wet-on-wet marbled effect.
Serving Ideas for Spring Parties
These cookies shine on a dessert tray with mini cupcakes, lemon bars, and fruit. They also make fantastic edible place settings. Wrap each cookie in a clear bag, tie it with pastel ribbon, and set one on each plate for Easter brunch. For kids’ parties, let guests decorate their own chick cookies with bowls of icing, sprinkles, and candy decorations. It gets a little messy, yes, but “creative chaos” is a traditional spring color palette.
How to Store Spring Chick Cookies
Store fully dried decorated cookies in an airtight container at room temperature for up to 5 days. Place parchment paper between layers to protect the icing. Unfrosted cookies can be frozen for up to 3 months, and the dough can also be frozen before baking. If you are making these ahead for a party, bake the cookies one day, decorate the next, and package them after the icing is fully set. That timeline keeps stress low and results high, which is a strong life philosophy beyond cookies.
Why These Cookies Are Worth Making Every Spring
There are plenty of spring desserts out there, but decorated chick cookies hit a rare sweet spot. They are nostalgic without feeling old-fashioned, cute without being complicated, and festive without needing a mountain of specialty ingredients. They invite creativity, make great photos, and actually taste like real homemade sugar cookies instead of edible cardboard wearing a yellow costume.
If you want a cheerful baking project that works for family gatherings, homemade gifts, classroom celebrations, or a quiet weekend in the kitchen, this recipe earns its keep. Once you make one batch, there is a very real chance spring chick cookies become part of your annual dessert rotation. And honestly, there are worse traditions than filling your kitchen with butter, vanilla, and a flock of tiny cookie birds.
The Experience of Making Spring Chick Cookies
Baking spring chick cookies is not just about ending up with a plate of decorated sugar cookies. The experience itself is a big part of the charm. There is something instantly cheerful about working with yellow icing, pastel sprinkles, and cookie shapes that look like they belong in a storybook. Even before the first tray goes into the oven, the kitchen starts to feel lighter, softer, and more playful. It is one of those baking projects that changes the mood of the room without trying too hard.
For a lot of people, these cookies also create a perfect mix of structure and creativity. The dough gives you a reliable routine: mix, chill, roll, cut, bake. Then the decorating stage opens the door to fun. One cookie can have wide cartoon eyes, another can wear a little bow, and another can look suspiciously dramatic with long piped eyelashes. No two need to match exactly, and that is part of what makes the process relaxing. The cookies do not have to look flawless to be delightful. In fact, slightly quirky chicks often end up being the favorites.
These cookies are also great for shared baking memories. Kids can help stir the dough, press the cutters, or place sprinkles. Adults can handle the piping bags and pretend they are calm professionals, even while whispering “please do not blob” under their breath. The project naturally invites conversation, laughter, and the sort of mild kitchen chaos that somehow becomes the part everyone remembers most fondly later. Flour on the counter, extra icing on a fingertip, a tray of cookies with wildly different facial expressions; it all adds to the experience.
Another lovely part of making spring chick cookies is how adaptable the pace can be. You can spread the work over two days and make it feel easy. Bake one evening, decorate the next day, and enjoy the process instead of rushing it. That slower pace gives the recipe a calm, seasonal feel. It becomes less about checking off a dessert and more about carving out a small spring ritual. In a world full of hurried shortcuts, a cookie that asks you to pause long enough for icing to dry feels oddly refreshing.
Then there is the visual payoff. Few homemade treats look this bright and celebratory without advanced pastry skills. A tray of spring chick cookies instantly looks party-ready. Bring them to brunch, a bake sale, or a family gathering, and they tend to get the same reaction every time: a smile first, then a reach for the nearest cookie. They photograph beautifully, gift well, and carry that homemade warmth people notice right away.
Most of all, the experience of making these cookies feels joyful. Not serious. Not intimidating. Joyful. They are a reminder that seasonal baking can be playful, a little imperfect, and still completely beautiful. Whether you make them alone with your favorite playlist on, with children crowding the counter, or with friends who all insist their chick is the cutest, the process leaves behind more than dessert. It leaves behind a spring memory you can remake every year, one buttery cookie at a time.