Table of Contents >> Show >> Hide
- Why This Beginner Watercolor Wall Art Project Actually Works
- What You Need For DIY Watercolor Wall Art
- How To Make Beginner Watercolor Wall Art, Step By Step
- Beginner Watercolor Techniques That Make Art Look Better Fast
- Common Beginner Mistakes And How To Avoid Them
- How To Frame And Display Your DIY Watercolor Art
- Why DIY Watercolor Wall Art Is Worth Trying
- A Beginner’s Experience With DIY Watercolor Wall Art
If you have ever stared at a blank wall and thought, “Wow, this space really needs something beautiful, affordable, and slightly more interesting than a mass-produced print of a mysterious leaf,” this project is for you. DIY watercolor wall art is one of the easiest ways to make custom decor without needing a fine arts degree, a fancy studio, or the patience of a saint. In fact, the charm of watercolor is that a little looseness is part of the magic. Tiny blooms, soft edges, and unexpected blending are not disasters. They are texture. They are mood. They are what make people tilt their heads and say, “Wait, you made that?”
This beginner-friendly watercolor wall art project works because it leans into simple materials, easy techniques, and a relaxed process. You are not trying to paint a photorealistic swan wearing emotional baggage. You are creating abstract, flowing, layered color that looks modern, calming, and surprisingly expensive once it is framed. That is the sweet spot.
Whether you want a large statement piece for a living room, a soft pastel painting for a bedroom, or a cheerful abstract design for a hallway that has been feeling emotionally unavailable, this watercolor art idea gives you room to experiment. Better yet, it is forgiving. Very forgiving. Like, “paper-towel-that-oops-and-keep-going” forgiving.
Why This Beginner Watercolor Wall Art Project Actually Works
The best DIY projects for beginners do not require perfect control. They require a good process. Watercolor wall art checks that box in a big way. The look depends on flow, movement, transparency, and layering, which means the medium does part of the creative work for you.
It embraces softness instead of precision
Watercolor is famous for luminous washes, gentle gradients, and organic blending. That makes it ideal for abstract wall art. You do not have to outline every shape or fill in every corner with surgeon-level accuracy. A soft edge can look intentional. A color bloom can look stylish. A little unpredictability can make the final piece more dynamic, not less.
It is low-cost compared with store-bought statement art
Large-scale wall art can get expensive fast. Meanwhile, watercolor supplies for a beginner setup can stay pretty reasonable. A blank canvas or heavy watercolor paper, a basic paint set, water, brushes, tape, and paper towels will take you far. You are basically trading one pricey home decor purchase for a creative afternoon and bragging rights.
It is genuinely beginner-friendly
Many beginner art projects claim to be easy, then casually ask you to master perspective, botanical anatomy, and emotional resilience. Not this one. This watercolor wall art idea is built around washes, swirls, tilting, blotting, and layering. Those are approachable skills, and they get better quickly with practice.
What You Need For DIY Watercolor Wall Art
You can make this project on a white canvas for a decor-forward look or on heavy watercolor paper if you want a more traditional watercolor surface. If you are brand-new, both options work. Canvas gives you a ready-to-hang base. Watercolor paper gives you more classic paint behavior.
Basic supply list
- White canvas or 140 lb cold-press watercolor paper
- Watercolor paints or liquid watercolors
- Foam brush or round watercolor brush
- Clean water
- Palette or small dish for mixing
- Paper towels or soft cloth
- Masking tape or painter’s tape
- Board or flat surface for support
- Optional: waterbrush, spray bottle, dropper bottle, or empty condiment bottle for movement effects
- Optional: frame, mat board, wood lattice strips, or hanging hardware
If you choose watercolor paper, cold-press paper is a smart starting point because it has enough texture to hold the paint well while still allowing some detail. If you choose a thinner paper, it may buckle more easily. That is why beginners are often happier with heavier paper or a watercolor block. In plain English: your art should look dramatic, not physically stressed.
How To Make Beginner Watercolor Wall Art, Step By Step
Step 1: Pick a color story before you touch the paint
Before you start, decide on a palette. This sounds obvious, but it prevents that classic beginner move where every color on the tray gets invited to the party and the result becomes swamp-adjacent. A limited palette almost always looks more polished.
Try one of these easy combinations:
- Blush, terracotta, and warm beige for a soft modern look
- Blue-gray, navy, and sage for calm coastal vibes
- Mustard, rust, and dusty pink for retro warmth
- Lavender, mauve, and pale blue for dreamy bedroom art
- Black, taupe, and muted green for minimalist abstract decor
If in doubt, choose two main colors and one accent. That gives you enough variety without turning your art into a weather report.
Step 2: Prep your surface
If you are using watercolor paper, tape it to a board or flat work surface. This helps control warping and gives you a clean border if you want one. If you are using canvas, place it flat and protect the table underneath. Your furniture did not volunteer for watercolor duty.
For a looser abstract effect, lightly wet the surface first. On canvas, you can use a foam brush to spread clean water in sections. On watercolor paper, use a brush with clean water to dampen the area you plan to paint. The key word is damp, not flooded. You want the surface ready to move color, not auditioning to become a pond.
Step 3: Drop in the first color wash
Apply your first color in soft puddles or flowing strokes. If the surface is damp, the pigment will spread and diffuse beautifully. This is the part where beginners often panic because the paint starts doing watercolor things. Let it. That motion is your friend.
Use broad strokes for a modern look. If you are working large, move section by section so the water does not dry before you get to it. You are aiming for consistency, not chaos.
Step 4: Add a second color and blend the edges
While the first layer is still wet, introduce a second color. Place it near the first and let them mingle. You can encourage blending with a clean damp brush, a foam brush, or a slight tilt of the board or canvas. Gentle blending creates those pretty transitions that make watercolor feel airy and sophisticated.
If you notice excess paint or water pooling in one area, blot lightly with a paper towel. Do not scrub. Watercolor responds best when you act more like a calm guide and less like a panicked houseguest cleaning up spilled juice.
Step 5: Create movement and abstract texture
This is where the wall art starts to feel intentional. Tilt the surface to guide the paint. Press lightly with a paper towel for cloud-like textures. Use a dropper or squeeze bottle to push color into subtle swirls. Let some areas stay pale and transparent while others deepen.
The secret is not to overwork the surface. Once colors start to get muddy, the painting loses that fresh, luminous feeling. Make a move, step back, and evaluate. Watercolor rewards restraint. It is the chill artist in the room.
Step 6: Let it dry completely
This is the least glamorous step and one of the most important. Let the piece dry flat. Even if it feels dry after a few hours, give it enough time to fully settle before adding another layer or framing it. Overnight is a safe bet, especially for canvas or heavily worked paper.
Step 7: Decide whether it needs one more layer
Once dry, look at the piece from across the room. This matters because it is going on a wall, not into a microscope. Ask yourself:
- Does it need more contrast?
- Does one corner feel too empty?
- Would a few darker strokes help anchor the composition?
- Does it already look finished and you are just being dramatic?
If it needs more depth, add another controlled wash or a few darker accents. If it looks balanced, stop. Finished is a beautiful thing.
Beginner Watercolor Techniques That Make Art Look Better Fast
Wet-on-wet
This means applying paint to a damp surface. It creates soft edges and flowing blends, which is exactly what you want for abstract watercolor wall art.
Wet-on-dry
This means adding paint to a dry surface. It gives you more control and slightly crisper marks. It is useful for adding final accents after the base layers dry.
Lifting
If a section gets too dark, use a damp brush, tissue, or paper towel to lift some pigment. This can create highlights, soften edges, or rescue an area that went a little too enthusiastic.
Layering
Watercolor becomes richer when transparent layers build on top of each other. Just let one layer dry before adding the next, unless you specifically want softer diffusion.
Common Beginner Mistakes And How To Avoid Them
Using too many colors
More colors do not equal more sophistication. They often equal mud. Stick with a small palette and let the variation come from water, layering, and transparency.
Choosing paper that is too light
Thin paper buckles faster and can feel harder to control. If you are using paper, heavier watercolor paper is usually worth it for a better beginner experience.
Overworking the paint
One of the fastest ways to flatten watercolor is to keep brushing after the magic has happened. Make your mark, let the paint move, and resist the urge to “fix” every tiny thing.
Forgetting the wall test
Art that looks odd close-up can look fantastic from a few feet away. Tape the piece to the wall temporarily and look at it in the room where it will live. Watercolor wall art is interior decor as much as it is painting.
How To Frame And Display Your DIY Watercolor Art
A good frame is the final glow-up. It turns “I made a thing” into “I created custom art for my home,” which is a much more fun sentence.
For watercolor paper
Use a mat if you want a polished, gallery-style look. Matting also gives the artwork breathing room and helps separate the painted surface from the glazing. Choose simple frame styles in wood, white, black, or light oak for versatile decor.
For canvas
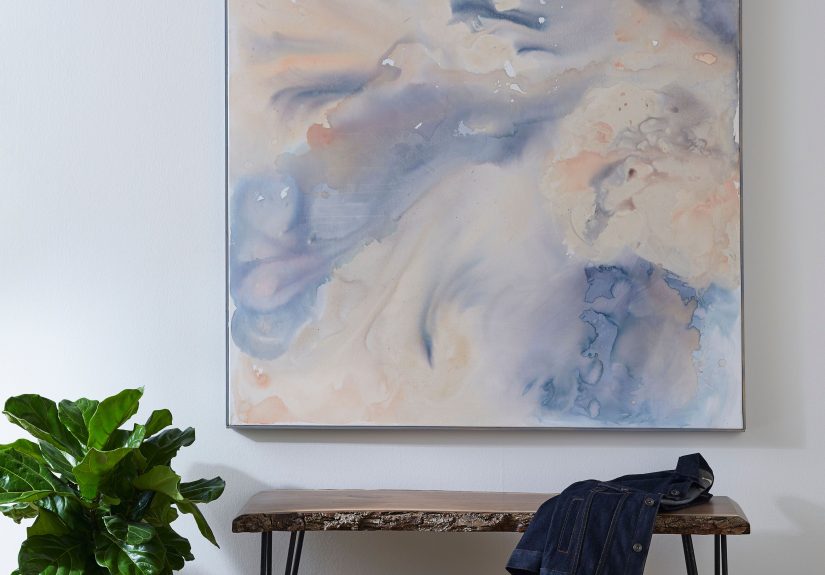
You can hang it unframed for a clean modern look, or add slim wood lattice strips for a simple DIY frame. This detail makes the piece look more finished without stealing attention from the painting itself.
For placement
Watercolor wall art looks especially good in bedrooms, entryways, reading nooks, bathrooms with decent ventilation, and above benches or consoles. If the palette is soft, it can calm a room. If the palette is bold, it can act like a focal point. Either way, it beats staring at a blank wall that gives nothing.
Why DIY Watercolor Wall Art Is Worth Trying
This project works because it combines creativity, home decor, and low-pressure experimentation. You do not need to be an experienced painter to make something frame-worthy. You only need a few supplies, a limited palette, and the willingness to let watercolor behave like watercolor.
That is the real beginner lesson here: stop expecting perfection and start looking for beauty in movement, softness, and happy accidents. Watercolor wall art is not about mastering every brushstroke. It is about learning how color, water, and surface interact, then using that interaction to make something personal and stylish. In other words, you are not just making art. You are upgrading your walls and your confidence at the same time. Multitasking queen behavior.
A Beginner’s Experience With DIY Watercolor Wall Art
The first experience many beginners have with watercolor wall art is a mix of curiosity and low-level panic. You set everything up, pick your colors, wet the paper or canvas, and then suddenly realize there is no undo button. That moment feels dramatic, but it passes fast. Once the first puddle of color hits the surface and starts spreading, something changes. The project stops feeling intimidating and starts feeling oddly relaxing.
One of the most surprising parts of making beginner watercolor art is how quickly the process becomes immersive. You start out thinking about supplies, technique, and whether your brush is too wet. Ten minutes later, you are leaning over the piece, tilting it gently, blotting here, softening an edge there, and watching color drift in a way that feels half planned and half magical. It is not the kind of craft that demands perfect control. It rewards observation. That alone makes it much less stressful than many beginner art projects.
Another common experience is the emotional roller coaster of “This looks terrible,” followed closely by, “Wait… this actually looks kind of amazing.” Watercolor has that effect. While it is wet, the piece can seem messy or unfinished. Then it dries, the colors soften, the layers settle, and suddenly the painting looks intentional. A lot of beginners quit mentally too early because they judge the work before it has had time to become itself. Watercolor teaches patience in the sneakiest possible way.
There is also a confidence boost that comes from seeing homemade art in an actual room. A beginner painting on a table can look like a casual weekend craft. The exact same piece in a frame above a console table looks like decor. That shift is huge. It helps beginners understand that wall art does not need museum-level complexity to be effective. It needs shape, color harmony, movement, and a little confidence in presentation.
Many people also discover that watercolor wall art feels more personal than store-bought decor. Even if the design is abstract, the colors say something about your taste. Soft neutrals feel calm. Dusty blues feel airy. Warm peaches and rust tones feel cozy. Bold greens and dark indigo feel modern and moody. You are not just making something pretty. You are making something that belongs specifically in your home. That connection gives the final piece more meaning than something grabbed off a shelf in five distracted minutes between candles and throw pillows.
Most importantly, beginners often walk away from this project wanting to make another one. That is a strong sign you picked the right creative starting point. The process is approachable, the materials are manageable, and the result feels real. Not “good for a beginner.” Just good. That is the kind of experience that builds momentum. One piece becomes a pair. A pair becomes a small gallery wall. Before long, you are casually talking about color palettes and paper weight like a person who absolutely has opinions about mat board. Growth looks different for everyone.
So yes, this DIY watercolor wall art is perfect for beginners. Not because it is foolproof, but because it gives you room to learn without punishing you for being new. It lets the process stay playful while still producing something beautiful enough to hang on your wall. And honestly, that is the dream: beginner art that does not look beginner once it is done.