Table of Contents >> Show >> Hide
- Why This Wolf Costume Works (Kid Logic + Parent Reality)
- Materials and Tools (Choose Your Adventure)
- Option 1: The No-Sew Hoodie Wolf (Fast, Cozy, Crowd-Pleasing)
- Option 2: The Sew-Simple Hooded Wolf Cape (Warm, Dramatic, Extra Howly)
- Make It Look More “Real” Without Making It Complicated
- Safety and Comfort Checklist (Because Wolves Need Rules Too)
- Time and Budget: What to Expect
- Wolf Costume Variations Kids Go Wild For
- Cleaning and Storage (So You Can Reuse It for Dress-Up)
- Real-World Costume Experiences and Lessons (Extra 500+ Words)
- Conclusion
Your kid wants to be a wolf. Not a “cute puppy.” A wolf. The kind that prowls the living room, howls at the microwave beep, and forms a pack with the dog (who did not consent). The good news: a DIY wolf costume for kids is one of those rare crafts that can look seriously awesome without requiring an engineering degreeor a midnight hot-glue spiral into madness.
Below you’ll find two build paths (no-sew and sew-simple), plus upgrades that make the costume look “store-bought,” feel comfy, and survive trick-or-treating, school parades, and the inevitable couch-jumping. Let’s make a wolf costume that kids love wearingand adults love not fixing every 12 minutes.
Why This Wolf Costume Works (Kid Logic + Parent Reality)
A kid-approved wolf costume hits three requirements: it looks like a wolf from across the room (ears + tail + fuzzy texture), it’s comfortable (no itchy seams, no stiff mask, easy bathroom breaks), and it’s durable (because wolves don’t “walk carefully”). The trick is building a recognizable silhouette first, then adding detail where it counts.
The “Wolf Silhouette” Checklist
- Ears: tall-ish triangles with a softer inner ear.
- Tail: fluffy, slightly curved, and securely attached (but not dangerously attached).
- Fur texture: faux fur accents or trim in gray/charcoal/cream.
- Paws: optional, but instantly boosts cuteness.
- Face detail: makeup or a hood with a simple snout shapeskip vision-blocking masks.
Materials and Tools (Choose Your Adventure)
Base Outfit (for both versions)
- Gray hoodie (or sweatshirt) + gray sweatpants/leggings
- Optional: lighter gray shirt for a “wolf belly” look
Wolf Add-Ons
- Felt sheets (gray, charcoal, cream/pale pink)
- Faux fur (¼–½ yard is plenty for trim + tail; more if you make a cape)
- Headband (plastic or fabric-wrapped) or plan to attach ears to the hood
- Hot glue gun + glue sticks (or fabric glue for a slower, less “ouch” option)
- Velcro (hook-and-loop) or snaps for easy closures
- Safety pins (large, sturdy) or a small belt clip for tail attachment
- Poly-fil stuffing (or scrap fabric) for tail volume
- Scissors + craft knife/box cutter (helpful for cutting faux fur backing cleanly)
- Optional sewing supplies: needle, thread, sewing machine, clips/pins
- Wide-tooth comb (to fluff fur and free trapped fibers from seams)
Faux Fur Tips That Save Your Sanity
Faux fur looks magical… until you cut it like regular fabric and your house becomes a snow globe of fuzz. Use these quick wins:
- Cut from the back: slice through the backing, not the fur fibers. A craft knife helps you avoid choppy edges.
- Mark nap direction: fur has a “grain” (nap). Keep it flowing down the body for a natural look.
- Longer stitches: if sewing, lengthen stitch size and avoid tiny stitches that sink into the fluff.
- Trim seam allowance pile: trimming fur in the seam allowance helps reduce bulk.
- Comb out the seam: after stitching, use a comb or seam ripper tip to pull trapped fibers out, hiding the seam line.
Option 1: The No-Sew Hoodie Wolf (Fast, Cozy, Crowd-Pleasing)
This is the “it’s Tuesday and the costume parade is Friday” build. It looks great in photos, feels like pajamas, and can be adjusted in minutes.
Step 1: Create Wolf Ears (Headband or Hood)
- Make an ear template: draw a triangle ear about 3–4 inches tall for little kids, 4–5 inches for older kids. Slightly curve the outer edge so it looks less like a shark fin and more like a real ear.
- Cut felt: cut 4 outer ears (gray/charcoal) and 2 inner ears (cream/pale pink), slightly smaller.
- Assemble: glue inner ear pieces onto two outer ears. Then glue each to a matching outer ear to make two double-layer ears.
- Attach:
- Headband method: wrap the bottom of each ear around the band and glue securely.
- Hood method: hand-stitch or glue ears to the hood seam line so they stand up.
Pro move: add a small triangle of craft foam between felt layers (only at the base) if your kid’s ears keep flopping like tired lettuce.
Step 2: Add a Fluffy Wolf Tail (Pin-On, Clip-On, or Belt-Loop)
The tail is where the wolf magic really happens. Keep it lightweight and securekids sit, run, climb, and occasionally attempt to “chase their tail” in circles.
No-Sew Faux Fur Tail (Quick Version)
- Cut the shape: from faux fur backing, cut two tail shapes (a long teardrop, about 12–18 inches depending on height).
- Glue edges: with fur sides facing inward, glue around the edge, leaving a 3–4 inch opening at the top.
- Turn right-side out: pull it through the opening. Fluff with a comb.
- Stuff lightly: add poly-fil so it holds shape but stays flexible.
- Close and attach: glue the opening closed around a loop of ribbon or a fabric tab. Add a safety pin or clip to the tab for attachment.
Attachment Ideas That Don’t Drive You Nuts
- Safety pin to waistband: fastest; use a big pin and double-check it’s closed.
- Clip to belt loop: sturdy; great for sweatpants with loops.
- Velcro tab: sew or glue a soft Velcro piece to the tail tab and match it on the hoodie/pants (easy to remove for washing).
Step 3: Add a Wolf Belly and Chest Fur
This step makes the costume look intentional (instead of “gray sweatshirt with opinions”).
- Cut a belly patch: from light gray felt, cut an oval (roughly from chest to belly button area).
- Attach: glue or hand-stitch the patch to the front of the hoodie or shirt.
- Optional fur chest: add a strip of faux fur at the hood edge or chest area for extra “wolf fluff.”
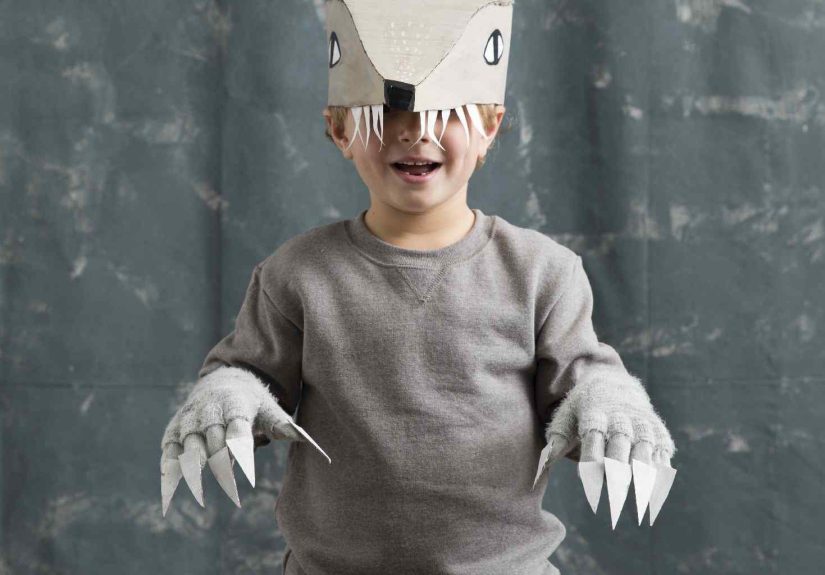
Step 4: Make Easy Wolf Paws (Mittens Upgrade)
If your kid loves “acting,” paws are the cheat code. If your kid hates things on their hands, skip this and keep everyone happy.
- Start with gloves or mittens: gray knit gloves work great.
- Add paw pads: cut small ovals from black or charcoal felt and glue to the palm side.
- Optional claws: cut tiny cream felt triangles and glue at fingertips (keep them soft, not pointywolves don’t need sharp felt).
Step 5: Finish the Face (Makeup, Not a Mask)
The simplest wolf face is a black nose, a little shading, and whisker dots. Use kid-safe face paint or makeup, and do a patch test ahead of time.
- Nose: black triangle on the tip of the nose.
- Muzzle: light gray/white around the mouth area.
- Whisker dots: small black dots on cheeks (instant wolf vibes).
- Brows: a little dark shading above eyebrows looks “wolfy” without being scary.
Option 2: The Sew-Simple Hooded Wolf Cape (Warm, Dramatic, Extra Howly)
Want a costume that swishes? A wolf cape adds movement and looks fantastic in photos. It also lets you build “wolf fur” into the garment without covering the face.
Basic Cape Plan (No Fancy Pattern Needed)
- Measure length: from the base of the neck to where you want the cape to end (mid-thigh for running, knee-length for drama).
- Cut the cape body: fold fabric and cut a half-circle. (You can trace a large semicircle using a string-and-pencil method.)
- Cut the neck opening: a small curve at the top centerstart small and test fit.
- Make a hood: cut two hood pieces (like a rounded rectangle with a curved back). Sew together along the curved seam.
- Attach hood to cape: match center seams, pin/clip, then sew.
- Add fur trim: sew faux fur along the hood opening and cape edge (or do a simpler hood-only trim for less bulk).
- Closure: use Velcro or snaps at the chestavoid long ties near the neck for active kids.
Cape Styling Ideas That Scream “Wolf” (In a Cute Way)
- Two-tone lining: gray outside, cream inside for a wolf-belly vibe.
- Shoulder fluff: add a faux fur “mane” strip across shoulders for instant werewolf energy.
- Hood ears: attach felt ears to the hood so the wolf look stays put even if the headband mysteriously disappears at school.
Make It Look More “Real” Without Making It Complicated
Color Trick: Add Depth With Two Grays
Real wolves aren’t one flat shade. Mix a medium gray base with charcoal accents (ears, tail tip, shoulder trim) and a touch of cream on the belly/muzzle. That’s enough contrast to read as “wolf” instantlyno Hollywood makeup team required.
Texture Trick: Brush the Fur the Right Way
After everything is attached, use a wide-tooth comb to brush faux fur downward (with the nap). This makes the costume look plush and intentional, not like it lost a fight with a dryer sheet.
Detail Trick: A Tail Tip
Add a lighter or darker tip to the tail (a small cream faux fur piece or felt accent). It’s a tiny detail that photographs beautifully.
Safety and Comfort Checklist (Because Wolves Need Rules Too)
A DIY Halloween costume should be fun and safe. Before the big night (or the school event), do a quick “wear test” at home.
- Visibility: skip masks that block vision; choose makeup or a hood that leaves the face open.
- Flammability: consider fabrics that are labeled flame-resistant when possible; keep costumes away from candles and open flames.
- Fit: hem or shorten anything that drags to prevent tripping.
- Reflective touches: add reflective tape to the cape hem or sleeves for night visibility.
- Skin safety: patch-test face paint 24–48 hours in advance to check for irritation.
- Tail attachment: secure, but easy to remove if tuggedthink “breakaway,” not “welded on.”
Time and Budget: What to Expect
Time
- No-sew hoodie wolf: 60–120 minutes (less if you keep paws optional)
- Hooded cape version: 2–4 hours depending on sewing comfort and fur trim
Budget
- Low budget: reuse a hoodie + felt ears + felt tail (often under $15–$25)
- Mid-range: add faux fur tail + trim (often $25–$45 depending on fur)
- Extra: cape + more fur for a dramatic, plush look
Wolf Costume Variations Kids Go Wild For
1) The “Big Bad Wolf (But Make It Cozy)”
Add a plaid shirt over the hoodie and carry a little tote labeled “Grandma’s House.” Your kid gets to huff and puff without committing to full villain mode.
2) The Woodland Wolf Pup
Keep everything soft and sweet: rounder ears, shorter tail, and a cream belly patch. This reads as “wolf cub,” which is basically a teddy bear with better PR.
3) The Werewolf Lite
Add faux fur cuffs at wrists and ankles, plus a slightly messier hair look (gel or temporary color spray for older kids). It’s spooky-adjacent without being nightmare fuel.
4) The Whole Pack (Group Costume)
If siblings or friends want to match, vary ear size and tail color so everyone feels unique. Bonus: group photos become instantly legendary.
Cleaning and Storage (So You Can Reuse It for Dress-Up)
- Removable parts: make tail and headband detachable for easy washing.
- Spot clean faux fur: dab with mild soap and water; avoid high heat.
- Brush after drying: comb fur gently to restore fluff.
- Store breathable: hang the cape/hoodie and keep the tail in a cotton bag so it doesn’t get crushed.
Real-World Costume Experiences and Lessons (Extra 500+ Words)
Families who DIY costumes tend to discover the same funny truths every year: kids care most about how it feels and how it moves, while adults care most about how it holds together and how fast it can be fixed. A wolf costume is a perfect example because it invites full-body acting. Wolves don’t stand politely. Wolves prowl. Wolves pounce. Wolves attempt to eat grapes like they’re hunting prey. And that means your design choices matter in very practical ways.
One common “aha” moment is the tail. The first time a kid sits down and the tail jams upward like a confused question mark, you realize placement is everything. Attaching the tail slightly off-center (a little to one side) often makes it more comfortable in car seats and on the couch. It also keeps the tail from being a direct target when your child decides to slide across the floor like a wolf on ice. Another lesson: a tail that’s too heavy becomes a liability. Light stuffing, plus a sturdy attachment tab, gives you the fluff without the sag. And if you’ve ever watched a kid get “helpful” friends at school who want to tug the tail “just to see,” you’ll appreciate a breakaway attachment like Velcro. It’s not surrenderit’s strategy.
Ears create their own mini-drama. Headband ears are adorable until the headband mysteriously migrates into a backpack, disappears under a desk, or becomes a last-minute jump rope. That’s why many parents end up attaching ears directly to the hood for school-day reliability. The hood-ear combo also solves the “windy night” problem when kids run outside and the headband slides backward like it’s trying to escape the scene. If your child loves wearing the hood up, hood ears are a win. If they hate hoods, go headband and keep a couple of bobby pins in your pocket as backup.
Comfort surprises people, too. Faux fur looks amazing, but some kids don’t like fur touching their neck or cheeks. If you’re making a hooded cape, it can help to keep fur trim to the outer edge only, leaving the inside of the hood lined with soft fleece. That way, the costume reads as fluffy without feeling scratchy. Another comfort hack is temperature control. Trick-or-treating can swing from warm to chilly depending on where you live, so a hoodie-based wolf costume is practical: you can layer a T-shirt under it, or remove the cape if the kid is overheating. The best costume is the one your child still wants to wear after the candy rush is over.
The most repeatable “success story” is letting kids participate in the final styling decisions. When a child chooses whether the wolf is a “snow wolf” (more white accents) or a “shadow wolf” (more charcoal), they feel ownershipand they’re more likely to actually wear the paws, keep track of the ears, and treat the costume like something special instead of something itchy that must be negotiated with. Some families even turn it into a mini tradition: every year, the base outfit stays the same (hoodie and sweats), but the animal changes with new ears and a new tail. That’s how a DIY costume becomes a repeatable system instead of a yearly craft emergency.
Finally, there’s the photo factor. A wolf costume shines in pictures when you include one or two intentional details: a contrasting tail tip, a cream belly patch, or a little face makeup. You don’t need a full snout mask to get the vibe. In fact, families often report the opposite: open-face designs lead to better smiles, better visibility, and fewer mid-event meltdowns. If the goal is a happy kid who looks adorable and can safely sprint toward the next house like they’re chasing the moon, this DIY wolf costume checks every boxand then trots off proudly with a pocket full of candy.
Conclusion
The best DIY wolf costume for kids is the one that feels good, stays on, and survives a full night of adventures. Start with the hoodie wolf for a fast win, level up with a hooded cape if you want extra drama, and focus on the big three: ears, tail, and texture. Add a little face detail, do a quick safety check, and you’ll have a costume your kid will actually beg to wear againlong after Halloween is over.