Table of Contents >> Show >> Hide
- What Is a Multimeter, Really?
- Get to Know Your Multimeter
- Multimeter Safety: Don’t Become the Circuit
- How to Use a Multimeter: Step-by-Step
- Real-World Projects: Where a Multimeter Shines
- How to Choose the Right Multimeter for Your Toolbox
- Care, Maintenance, and Common Mistakes
- Extra: Hands-On Experiences with Multimeters
If you’ve ever stared at a dead outlet, a cranky light fixture, or a “mysteriously” dead battery and thought, “I wish this thing could just talk to me,” good news: it can. You just need a multimeter to translate. A multimeter is basically Google Translate for electricity it tells you what’s going on behind the cover plate so you’re not guessing, poking, and hoping for the best.
In this Toolipedia-style guide, we’ll walk through what a multimeter is, how it works, how to use it safely and correctly, and which features matter for DIY homeowners versus pros. By the end, you’ll understand how to test outlets and switches, check batteries, chase down broken wires, and decide which multimeter deserves a permanent spot in your toolbox.
What Is a Multimeter, Really?
A multimeter is a handheld test instrument that combines several tools in one: a voltmeter (for measuring voltage), an ammeter (for measuring current), and an ohmmeter (for measuring resistance). Most modern models also add continuity testing that satisfying little “beep” that tells you a circuit is complete and often extras like diode, frequency, temperature, or capacitance measurements.
In plain English: if electricity flows through it, a multimeter can probably help you figure out whether it’s alive, weak, broken, or wired wrong.
Digital vs. Analog Multimeters
These days, the vast majority of DIYers use digital multimeters (DMMs). They have a digital screen that shows the reading as a number, often with a decimal point and units like V, A, or Ω. They’re easy to read, generally more accurate, and harder to misinterpret than the old-school analog versions with a moving needle.
Analog multimeters still exist and some pros like them for watching trends (for example, a needle slowly drifting upward), but if you’re buying your first meter for home projects, a basic digital multimeter is the way to go.
What a Multimeter Can Measure
- Voltage (V): The “pressure” pushing electrical current. For home projects, that usually means 120V AC at a receptacle or a smaller DC voltage in batteries and electronics.
- Current (A): How much electricity is flowing. This is used less often by casual DIYers but is crucial for diagnosing overloaded circuits or problem devices.
- Resistance (Ω): How much a component resists current flow. Good for checking heating elements, lamp sockets, and many electronic parts.
- Continuity: A quick pass/fail test to see if there’s an unbroken path for electricity. The meter beeps when the circuit is complete perfect for checking cords, switches, and fuses.
Get to Know Your Multimeter
Before you start poking wires, take a minute to understand the basic layout. Most digital multimeters share the same anatomy:
Display
The screen shows the measurement values and sometimes symbols like AC (~), DC (straight line with dots), or a low-battery icon. Many modern meters include a backlight a small feature that feels like magic when you’re contorted in a dark basement staring into a junction box.
Selector Dial (or Buttons)
The big central dial (or selector buttons) sets what you’re measuring: volts, amps, ohms, continuity, etc. On manual-range meters, each setting may have multiple ranges like 2V, 20V, 200V. On auto-ranging meters, you simply choose the type (for example, V for volts) and the meter chooses the appropriate range for you.
Input Ports (Jacks)
At the bottom of the meter, you’ll usually see three or four ports:
- COM (common): The black probe always plugs in here.
- V/Ω/Ω/diode: The red probe goes here for voltage, resistance, and many low-level measurements.
- mA or µA: A special port for measuring small currents.
- 10A (or similar): A high-current port for measuring larger currents briefly.
Getting the probes in the wrong jack when measuring current vs. voltage is one of the most common rookie mistakes and a great way to blow a fuse inside your multimeter. We’ll talk about how to avoid that in a moment.
Multimeter Safety: Don’t Become the Circuit
Multimeters are incredibly useful, but they’re also used around live electricity. A few safety habits go a long way toward keeping you safe and your meter in one piece.
Key Safety Rules
- Inspect before use: Check the case, dial, and especially the probe leads for cracks, exposed wire, or loose plugs.
- Use the right category rating: For household work, look for CAT II or CAT III ratings appropriate for your panel and outlets. The higher the CAT rating, the more robust the meter is for high-energy environments.
- Never measure resistance or continuity on a live circuit: Turn the power off, verify it’s off, and only then measure resistance. Measuring ohms on a live circuit is a fast track to a fried meter.
- Know what you’re measuring: Double-check the dial setting and the probe ports. Measuring voltage with the meter set to current can create a direct short.
- Keep one hand in your pocket: When checking live circuits, many pros keep one hand away from metal surfaces to reduce the chance of a shock traveling across the chest.
- Discharge capacitors: Large capacitors (often found in HVAC units, appliances, or power supplies) can hold a charge even after power is off. Discharge them according to the manufacturer’s instructions before testing.
How to Use a Multimeter: Step-by-Step
Let’s walk through some of the most common tasks you’ll face around the house with your multimeter.
1. Setting Up the Meter
- Plug the black probe into the COM jack.
- Plug the red probe into the V/Ω jack for most basic tests: voltage, resistance, and continuity.
- Turn the dial to the correct function (V for voltage, Ω for resistance, the sound-wave symbol for continuity, etc.).
- If you have a manual-ranging meter, choose a range slightly above what you expect to measure (for example, 200V for a 120V household circuit).
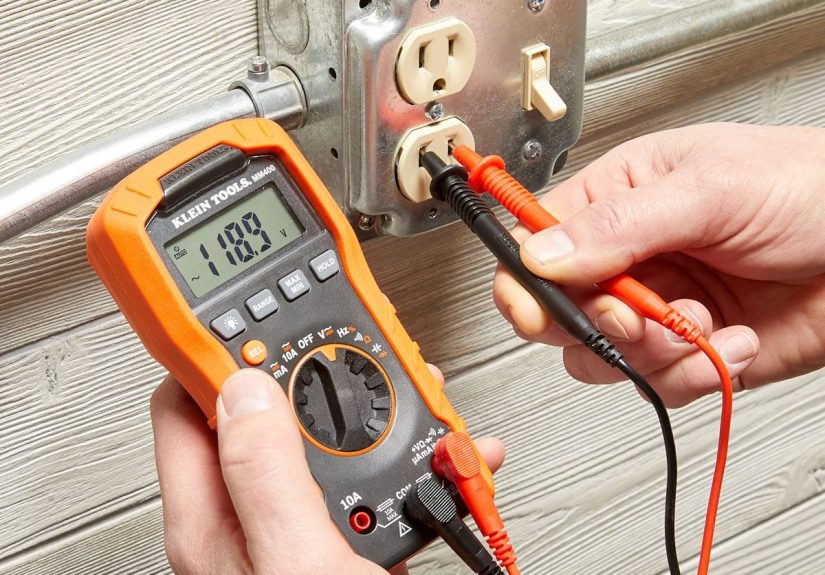
2. Measuring AC Voltage at an Outlet
This is one of the most useful DIY checks. It tells you whether an outlet is live and roughly how healthy your voltage is.
- Set the meter to AC volts (look for the V with a wavy line).
- Insert the black probe into the neutral slot (the larger vertical slot on a standard receptacle).
- Insert the red probe into the hot slot (the smaller vertical slot).
- Read the display. In a typical North American home, you should see something around 120V (often between about 110–125V).
If the reading is zero or very low, you know you’ve got a dead outlet, a tripped breaker, or a wiring issue. If the voltage is extremely high or wildly unstable, that’s a red flag to call in a licensed electrician.
3. Measuring DC Voltage (Batteries and Electronics)
Testing batteries with a multimeter is an easy way to tell “dead” from “just tired.”
- Set the meter to DC volts (V with a straight line and dots underneath).
- Choose a range that fits the battery: for a 1.5V AA battery, a 2V or 20V range is fine.
- Touch the black probe to the battery’s negative terminal and the red probe to the positive terminal.
- Read the displayed voltage. A fresh alkaline AA battery should be close to 1.5V; once it’s down around 1.0V or below under load, it’s usually done.
The same approach works for car batteries (with a higher range) and many low-voltage DC circuits, like doorbells and thermostats.
4. Checking Resistance
Resistance is great for testing components that should have a specific value, like heating elements, lightbulb filaments, or resistors in electronics.
- Turn the power off to the circuit you’re testing and verify it’s off.
- Set the meter to the Ω symbol.
- If using a manual-range meter, choose a range that fits the expected value.
- Touch the probes across the component or portion of the circuit you want to test.
- Compare the reading to the expected resistance. A reading of “OL” or “infinity” usually means an open circuit (broken wire or blown element).
5. Using the Continuity Beeper
The continuity setting is a DIYer’s best friend; it’s basically an electronic yes/no question: “Is there an unbroken path from here to there?” The meter beeps if the answer is yes.
- Power the circuit off.
- Set the dial to the continuity function (often a sound-wave or diode symbol).
- Touch the probes together; you should hear a beep, confirming the setting is working.
- Touch the probes to both ends of the wire, switch, or fuse you’re testing.
- If you hear a beep, you have continuity. If not, that part is open (broken, switched off, or blown).
Continuity testing makes it easy to find which conductor in a bundle goes where, verify that a fuse is still good, or confirm that a switch actually connects when turned on.
6. Measuring Current (With Caution)
Measuring current is more advanced and should be done carefully, as it usually involves breaking the circuit and inserting the meter in series.
- Move the red lead to the appropriate current jack (mA or 10A, depending on expected current).
- Set the dial to the current function (A with AC or DC symbol).
- Open the circuit at the point you want to measure and connect the meter in series so all current flows through the meter.
- Turn the power on briefly and read the current.
If you’re not confident about current measurements, it’s often safer to stick to voltage, resistance, and continuity unless you’ve studied the procedure carefully.
Real-World Projects: Where a Multimeter Shines
So what can you actually do with this tool around the house? Here are some practical multimeter jobs that make you look like the neighborhood wizard of wiring.
- Diagnose a dead outlet: Check if it has proper voltage, if the problem is upstream, or if a GFCI reset will fix it.
- Test a light fixture: Confirm if power is arriving at the fixture before you blame the bulb or socket.
- Sort mystery wires: Use continuity mode to match cables between rooms or identify which conductor belongs to which terminal.
- Check extension cords and power strips: A quick continuity test from one end to the other can tell you if a cord is broken inside its insulation.
- Verify low-voltage systems: Doorbells, thermostats, landscape lighting, and smart-home gadgets all become less mysterious when you can see actual voltages.
- Test fuses: Continuity testing lets you confirm whether a fuse is blown without just eyeballing the filament.
How to Choose the Right Multimeter for Your Toolbox
Walk into a hardware store or search online and you’ll find multimeters ranging from “cheap and cheerful” to “used by NASA.” The right choice depends on what you actually do.
Essential Features for Homeowners
- Auto-ranging: This removes the guesswork of picking exact ranges and speeds up basic testing.
- Backlit display: Great for panel work, basements, and cramped spaces.
- Clear labeling: Simple, intuitive symbols and a logical dial layout make learning much easier.
- Rugged case: A rubber boot or tough housing helps prevent damage if (when) it gets dropped.
- Continuity beep: Once you get used to it, you’ll wonder how you ever lived without it.
Nice-to-Have Features for Frequent DIYers
- Temperature probe for checking HVAC vents, appliance performance, or radiant floors.
- True RMS measurement if you ever work with non-standard or distorted AC waveforms (common with some electronics and inverters).
- Min/max recording to capture fluctuations over time.
- Magnetic hanger or kickstand so you’re not trying to balance the meter on a 2×4.
Budget vs. Pro-Grade Meters
For simple, occasional tasks checking outlets, batteries, and basic continuity an inexpensive, UL-listed multimeter can be perfectly adequate. If you’re working near service panels, doing frequent troubleshooting, or dealing with higher-energy circuits, a better-built meter with a strong safety rating is a smart investment.
Care, Maintenance, and Common Mistakes
Treat your multimeter well and it will quietly serve you for years. Treat it badly and you’ll be shopping for replacement fuses every weekend.
Good Habits
- Store the meter in a dry place with the probes wrapped loosely don’t kink or sharply bend the leads.
- Turn the dial to a safe resting position (often a high AC voltage range or “off,” depending on the model) when not in use.
- Replace the battery as soon as you notice dim displays or erratic readings.
- Check the leads occasionally with a continuity test to ensure they’re still solid inside the insulation.
Common Multimeter Mistakes
- Leaving the leads in the current jack: Then trying to measure voltage. This is how meters get sacrificed.
- Measuring ohms on a live circuit: You’ll often get nonsense readings and possibly damage the meter.
- Holding the metal probe tips on high-voltage circuits: Always grip the insulated parts.
- Guessing the range on a manual meter: Start high and work down to avoid overloads.
Extra: Hands-On Experiences with Multimeters
Ask any electrician or seasoned DIYer and you’ll hear a similar story: there was life before a multimeter, and life after. Before, every electrical problem felt like a puzzle with missing pieces. After, it’s more like a detective story and the multimeter is your favorite magnifying glass.
One common “aha” experience comes when troubleshooting a dead receptacle in an older home. Many people assume the outlet itself is bad and rush to replace it. When you put a multimeter on it, though, you might see that the hot conductor is live, but the neutral is floating. That points you upstream: maybe there’s a loose connection in another box, a back-stabbed receptacle, or a poor wire nut connection further along the same circuit. Instead of randomly swapping parts, you follow the clues provided by the meter.
Another real-world moment: testing extension cords. It’s surprisingly common for a cord to get crushed under furniture or pinched in a garage door. Visually, it looks fine. Plug it into a power strip and it might even work intermittently. With the meter in continuity mode, you can check each conductor end-to-end. No beep? You’ve found the break, and you can retire that cord before it becomes a shock or fire hazard.
DIYers who work on cars and trucks quickly learn to appreciate a good multimeter, too. A battery that “seems fine” based on how the headlights look may be sagging under load. Put your meter on the battery while you crank the engine and you can see in real time whether the voltage plunges into the danger zone. The same tool helps trace bad grounds, corroded connectors, and failing alternators.
Then there’s the quiet confidence boost that comes with being able to verify power is really off before touching a wire. Non-contact voltage testers are handy, but they can sometimes give false positives around bundled cables or sensitive electronics. A multimeter reading of 0V between hot and neutral, plus 0V between hot and ground, provides a much clearer answer. Many homeowners find that once they get comfortable verifying with a meter, they’re much more willing to replace light fixtures, switches, or receptacles on their own instead of calling for help every time.
Multimeters also shine in the “is it the device or the circuit?” question. Picture a bathroom exhaust fan that doesn’t turn on. With the wall switch in the ON position, a quick meter check at the fan’s junction box tells you whether power is getting there. If you read a healthy voltage, the fan motor is probably dead. If you read nothing, the problem lies in the switch, the wiring, or the feed. Either way, you avoid blindly throwing parts at the problem.
One of the underrated perks of owning a multimeter is that it encourages better habits in general. Instead of guessing whether a charger, power brick, or DC adapter is still good, you test it. Instead of wondering if that “12V” supply is quietly putting out 18V and cooking your electronics, you verify it before plugging anything in. Over time, these small checks save money, protect devices, and reduce frustration.
Finally, there’s the simple fun of learning. Once you have a multimeter, you start measuring things just to see what’s going on: the voltage drop across a long run of wire, the resistance of an old heating element, the tiny standby current your TV uses when “off.” It turns your home into a hands-on classroom, and every reading teaches you a little more about how your electrical system behaves.
That’s really the spirit of a Toolipedia-style approach to multimeters: they’re not just mysterious instruments for pros; they’re approachable, practical, and incredibly empowering. With a bit of knowledge and a few safe habits, your multimeter becomes one of the most valuable tools in your entire Family Handyman toolkit.