Table of Contents >> Show >> Hide
- What “Using a Spring as a Capacitive Touch Button” Actually Means
- Why a Spring Can Work So Well
- How Capacitive Touch Works in This Setup
- Best Design Practices for a Spring Touch Button
- Common Problems and How to Fix Them
- When a Spring Is Smarter Than a Flat PCB Pad
- When Not to Use a Spring
- A Practical Design Recipe
- Hands-On Experience: What Building One Actually Feels Like
- Final Thoughts
- SEO Tags
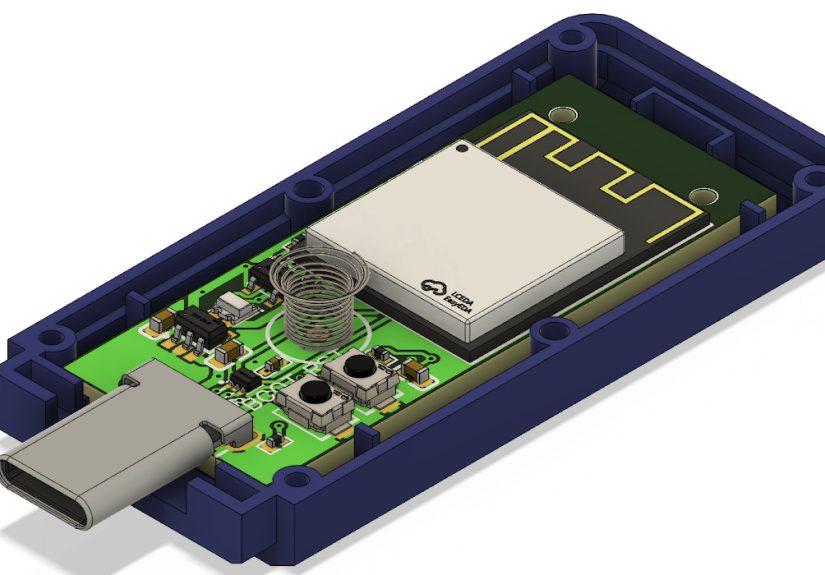
There is something delightfully sneaky about a capacitive touch button. It looks like there is no button at all, yet a fingertip strolls by and the device wakes up like it has been waiting for applause. Now add a spring to the mix, and the design gets even cleverer. Instead of a flat copper pad sitting directly under a panel, the spring becomes the sensing electrode or the little electrical bridge that reaches up toward the user-facing surface. It is a small mechanical part doing a very modern electronic job, which is exactly the kind of engineering crossover that makes hardware people grin into their coffee.
If you are designing a sealed product, working with a tight enclosure, or trying to avoid the usual hole-in-the-case approach, using a spring as a capacitive touch button can be a smart move. The trick is understanding what the spring is really doing, what can go wrong, and how to make the whole setup reliable instead of “works great on my desk, fails spectacularly in humidity.” In this guide, we will break down how it works, why it works, and how to keep your spring-powered touch button from becoming a ghost-touch generator with trust issues.
What “Using a Spring as a Capacitive Touch Button” Actually Means
A capacitive touch button detects a change in capacitance when a finger approaches or touches a sensing area. Your finger, the sensor electrode, the overlay material, the nearby ground, and the surrounding electric field all join the party. The controller measures tiny changes in that electrical relationship and decides whether a real touch happened.
In a typical design, the sensor electrode is a copper pad on a PCB. In a spring-based design, the spring can serve one of two roles:
- The spring is the electrode itself. The controller senses the spring directly.
- The spring is a conductive extension of the PCB electrode. It reaches from the board to the inside of the product’s top surface, bringing the electric field closer to the user.
That second approach is especially handy when the board sits lower than the enclosure lid. A small spring can bridge the gap without forcing you to redesign the entire mechanical stack. In plain English, the spring lets the electrical sensing point meet the human finger halfway. It is like a tiny metal giraffe stretching its neck toward better usability.
Why a Spring Can Work So Well
It plays nicely with sealed designs
Mechanical buttons need an opening, a dome, a plunger, or some other bit of hardware that invites wear, grime, and moisture to move in rent-free. A capacitive touch button can sit behind plastic, acrylic, or glass. When a spring is used to bring the sensor closer to the panel, you get a clean external surface with fewer moving parts and better resistance to dirt and splashes.
It solves awkward enclosure geometry
Not every product gives you the luxury of placing the PCB directly behind the touch zone. If the board is several millimeters below the panel, the field can weaken. A spring makes up that distance without a complicated bracket or a custom pogo-pin assembly. That makes it attractive for compact gadgets, retrofits, and small consumer electronics where every millimeter behaves like premium real estate.
It adds compliance
Unlike a rigid metal post, a spring compresses. That helps absorb manufacturing tolerances and keeps contact pressure more forgiving. In real products, “perfect alignment” is often a fairy tale told by CAD renders. A spring gives you a little grace.
How Capacitive Touch Works in This Setup
Capacitive sensing lives on changes in an electric field. When a conductive object such as a finger gets near the sensor, the effective capacitance changes. A controller chip or a touch-capable microcontroller measures that change against a baseline value. If the delta is large enough and stable enough, it counts as a touch.
With a spring, the sensing behavior is shaped by three big factors:
- Electrode area and shape: More usable sensing area generally improves sensitivity, but too much area can also increase parasitic capacitance and make the sensor more vulnerable to nearby hands, noise, or “why did it trigger when I waved?” moments.
- Distance to the user: The thicker the overlay and the farther the electrode sits from the finger, the weaker the signal. A spring helps by reducing that gap.
- Parasitic capacitance: Nearby ground planes, long traces, metal enclosures, and noisy circuitry can steal field strength and reduce sensitivity.
The spring does not create magical touch powers on its own. It simply becomes part of the conductive structure that shapes the field. Think of it less as a button and more as a three-dimensional electrode with bounce in its résumé.
Best Design Practices for a Spring Touch Button
1. Pick the right spring geometry
A larger conductive structure often produces a stronger response, but bigger is not always better. If the spring is too large, too tall, or too exposed to surrounding metal, the baseline capacitance can climb and the sensor can become harder to tune. A compact spring with repeatable contact and a predictable position is usually the sweet spot.
Compression springs commonly work well because they are easy to mount and can touch a PCB pad on one end and approach the inside of an overlay on the other. Keep the design mechanically stable. If the spring wiggles around like it drank too much espresso, your readings may wander too.
2. Minimize the air gap
Air is not your best friend here. The coupling between the electrode and the user improves when the gap is smaller and the dielectric material between them is well controlled. If the spring sits under a plastic cap or front panel, keep it close to that surface. If the cap flexes, bond or support it so the distance does not change wildly under touch. A floating panel can cause inconsistent activation and neighboring false touches.
3. Respect the overlay material
Glass and acrylic are common covers for capacitive interfaces. Thicker overlays reduce signal strength. Air pockets between the spring and the enclosure interior can also hurt performance. So can mechanical looseness. A polished industrial design is lovely, but the touch system still cares about physics more than your mood board.
If your enclosure material is thick, consider whether the spring should lightly approach the back side of the panel or connect to a small metal pad attached to the interior surface. That can create a more stable sensing shape than relying on the bare spring tip alone.
4. Control parasitic capacitance
This is the big one. Capacitive touch sensors are basically drama magnets for nearby conductive stuff. Ground planes, neighboring traces, LEDs, battery cans, shields, and metal cases can all siphon electric field away from the finger-facing side. That lowers sensitivity and can wreck detection distance.
Route the sensing path carefully. Keep it short. Keep it away from noisy switching traces. Avoid surrounding the sensor with heavy ground unless you really need it. If you do need shielding, use it thoughtfully. In some designs, driven shields or carefully spaced ground patterns can reduce interference without murdering sensitivity. In others, an overenthusiastic ground plane becomes the electrical equivalent of a blackout curtain.
5. Debounce and calibrate like a grown-up
Touch sensing is not just about hardware. Good firmware matters. A spring sensor may see tiny shifts caused by movement, temperature, humidity, or slow environmental drift. Use a proper baseline, active threshold, inactive threshold, and debounce strategy. Calibration is not optional unless your product goal is “surprising behavior.”
Many modern touch controllers and capacitive-sensing MCUs already include filtering, drift compensation, and threshold logic. That makes life much easier than rolling your own from scratch with a heroic amount of optimism.
Common Problems and How to Fix Them
False triggers
If the button fires when nobody touched it, start by checking noise, grounding, shielding, and thresholds. Power supply noise and nearby digital activity are frequent troublemakers. So are long sensor connections that act like little antennas. Add filtering, shorten the path, move noisy circuits away, and increase debounce if needed.
Weak sensitivity
If users have to press like they are trying to argue with the product, the sensor is probably too far from the overlay, too heavily loaded by nearby ground, or too small for the panel thickness. Move the spring closer to the touch surface, reduce unnecessary shielding, or increase the effective sensing area.
Humidity and moisture issues
Water changes the game because it has a very high dielectric constant and can influence capacitance in messy ways. Moisture on the surface may look like a touch event, especially in self-capacitance systems. That is one reason wet-environment designs need careful tuning, threshold management, and sometimes sensor architecture choices that tolerate water better. A sealed front panel helps, but it does not automatically make your design moisture-proof in the electrical sense.
Inconsistent performance across units
If one prototype behaves beautifully and the next one acts haunted, inspect mechanical tolerances. Spring height, panel gap, enclosure wall thickness, and grounding differences can all shift the baseline. A spring touch button is simple, but it is not immune to manufacturing reality. Design for repeatability, not just first-prototype glory.
When a Spring Is Smarter Than a Flat PCB Pad
A spring-based approach shines when the board cannot sit directly behind the interface surface, when the enclosure must stay sealed, or when you want a fast, low-cost way to bridge a vertical gap without adding a custom assembly. It can be especially useful in compact gadgets, hidden controls, wearable projects, consumer electronics, and maker builds where the industrial design wants the button to disappear.
It is also handy when you want the touch point to sit under a decorative or non-planar surface. A spring can conform to a slightly curved internal geometry better than a rigid spacer. That gives you mechanical flexibility without turning the BOM into a sad poem.
When Not to Use a Spring
A spring is not automatically the best option. If your environment is extremely noisy, heavily metallic, or exposed to lots of water, a more deliberate electrode design may be easier to control. Likewise, if your product needs a perfectly repeatable sensor shape for multi-zone gestures or precision sliders, a spring can be too variable. In those cases, a dedicated copper electrode, a metal-backed touch area, or a purpose-built sensor assembly may be the better choice.
Also remember that a spring is still a mechanical part. It may not be a clickable switch, but it can shift, fatigue, oxidize, or lose alignment if the design is sloppy. “No moving parts” becomes “well, fewer important moving parts” once a spring enters the chat.
A Practical Design Recipe
If you want a clean starting point, here is a simple recipe:
- Use a touch-capable MCU or dedicated touch controller.
- Start with a compact spring that creates a stable conductive path from the PCB to near the inside of the panel.
- Add a small metal landing pad or conductive target under the panel if you need a more predictable electrode shape.
- Keep the sensing trace short and away from noisy power or data lines.
- Avoid aggressive ground directly around or behind the sensor unless shielding is necessary.
- Calibrate the baseline during startup and enable drift compensation.
- Tune thresholds and debounce using real-world conditions, not just a quiet lab bench.
- Test with dry fingers, cold fingers, humid air, nearby metal, chargers plugged in, and the worst user behavior you can imagine.
That last point matters more than most people expect. Capacitive sensing can look perfect until a USB cable, a sweaty thumb, and a cheap wall adapter arrive together like a tiny chaos committee.
Hands-On Experience: What Building One Actually Feels Like
The first time you build a spring-based capacitive touch button, it can feel suspiciously easy. You place a spring on a pad, line it up under a plastic lid, run the signal into a touch-capable pin, and suddenly the thing responds. You will probably have a brief moment of genius. Enjoy it. Then start testing, because that is when the spring button introduces its personality.
In practice, the earliest lesson is that mechanical placement matters almost as much as the electronics. Move the spring just a little too far from the enclosure wall and the button becomes shy. Move it too close and the baseline climbs, sensitivity shifts, and the firmware starts making dramatic decisions. Add a finger from the side of the case and you may discover that your beautifully hidden top button also thinks palms, knuckles, and nearby humanity count as valid input. Hardware is nothing if not creative.
Another common experience is discovering that the spring itself is only half the story. What really determines success is the total sensing structure. A spring touching a tiny copper pad may work, but a spring feeding into a small metal sticker or internal electrode under the panel often works better because the field becomes more consistent. That makes tuning easier. It also reduces the feeling that each assembled unit has developed its own independent worldview.
Noise is the next lesson. On the bench, with a clean power source and a calm environment, the button behaves like a polite demo. Put it into a real enclosure next to a battery charger, switching regulator, LED driver, or long cable, and the sensor may start acting like it heard a ghost story. This is where shielding, layout discipline, filtering, and debounce stop being boring theory and become the difference between a product and a science-fair surprise.
Humidity also has a way of humbling engineers. A spring touch button that behaves wonderfully on a dry afternoon can become oversensitive in muggy weather or after repeated touches from a slightly damp hand. That does not mean the concept is flawed. It means the thresholds and compensation need to reflect reality. Touch interfaces are not judged by how they behave in ideal air; they are judged by how they behave near kitchens, pockets, chargers, and humans who just washed their hands.
One of the nicest things about the spring approach is how quickly it lets you prototype. You do not need a heroic mechanical redesign to test the idea. A spring can bridge a gap, prove the concept, and tell you whether a hidden touch interface is viable before you commit to more tooling. That makes it excellent for iteration. You learn fast, and fast learning is worth a lot.
The biggest practical takeaway is simple: treat the spring as part electrical component, part mechanical interface, and part environmental negotiator. When those three jobs are balanced well, the result feels almost magical. The user touches a smooth surface, the device responds instantly, and nobody thinks about the tiny coil inside doing the work. That is good interface design. The best hardware often disappears, leaving behind only the feeling that the product somehow knew what the user wanted.
Final Thoughts
Using a spring as a capacitive touch button is not a gimmick. It is a practical design technique that can simplify enclosure design, eliminate exposed mechanical buttons, and improve the look and durability of a product. The spring acts as a compliant conductive extension that helps place the sensing field where it needs to be. Done well, it creates a clean, sealed, modern interface. Done poorly, it creates a moody little antenna with confidence issues.
The difference comes down to fundamentals: control the geometry, minimize parasitic capacitance, respect the overlay, tune the firmware, and test under ugly real-world conditions. If you do that, a humble spring can become one of the neatest invisible buttons in your toolbox.