Table of Contents >> Show >> Hide
- Why Wood Wall Art Works in Nearly Every Room
- Popular Wood and Wall Art Styles (Pick Your Personality)
- Materials: What to Use (and What to Avoid)
- Design Rules That Keep DIY Art From Looking “Accidentally Homemade”
- DIY Project: Simple Geometric Wood Panel That Looks High-End
- Finishing Tips: Make It Look Store-Bought (Without Smelling Like a Hardware Store for a Week)
- How to Hang Wood Wall Art Securely (So Gravity Doesn’t Win)
- Gallery Wall Ideas Using Wood Pieces (Without the Chaos)
- Budget and Sourcing: Get the Look Without Paying “Gallery Price”
- Care and Maintenance
- Experiences and Lessons from Real-World Wood Wall Art Projects (500+ Words)
Wood wall art is the design world’s best “nice to meet you” handshake: warm, textured, and instantly more interesting than a blank wall that’s just… existing. And if you’ve ever wandered through Remodelaholic-style DIY inspiration, you already know the vibesmart projects, approachable instructions, and that satisfying “I made that” moment that makes you stand in your hallway an extra 12 seconds for no reason.
This guide pulls together the most practical, real-world tips for planning, building, finishing, and hanging wood and wall art that looks intentional (not “I panicked at the craft store”). You’ll get style ideas, material recommendations, a beginner-friendly step-by-step project, finishing guidance, and mounting strategies that keep your masterpiece on the wallwhere it belongs.
Why Wood Wall Art Works in Nearly Every Room
Wood is a rare decorating “ingredient” that plays well with almost any style: farmhouse, modern, Scandinavian, boho, traditional, industrialyou name it. Here’s why it keeps showing up in Remodelaholic-style spaces:
- It adds texture without making a room feel busy.
- It warms up hard surfaces like drywall, tile, glass, and metal.
- It photographs beautifully (hello, depth and shadows).
- It scales up affordablybig wall impact without big gallery prices.
- It’s customizable: stain it, paint it, carve it, layer it, burn it, letter it… you get the idea.
Popular Wood and Wall Art Styles (Pick Your Personality)
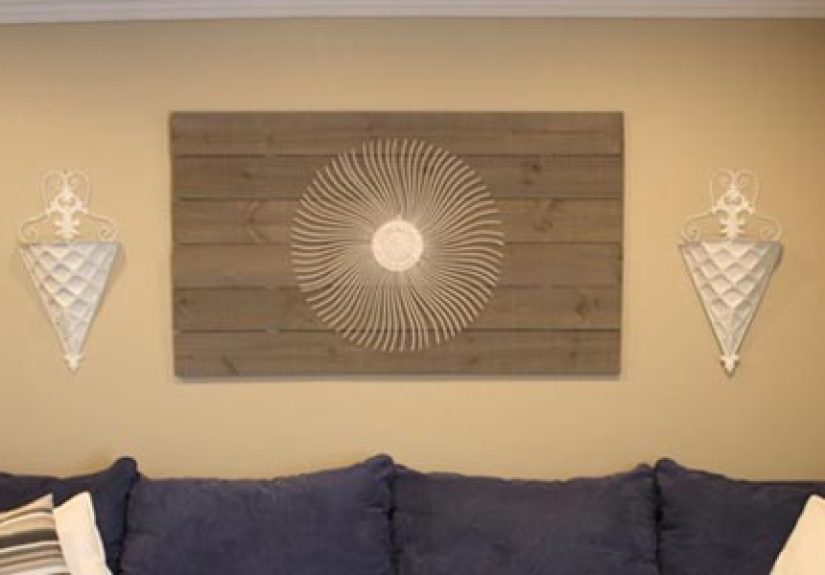
1) Geometric Wood Art
Geometric pieces are perfect when you want “modern” without going full spaceship. Think triangles, chevrons, hexagons, angled slats, and layered panels. A fun trick is to combine different thicknesses of wood strips so your art casts shadows that change throughout the day.
2) Planked Signs and Typography Art
Wood signs can be charming… or they can be the reason your friends stage an intervention. The difference is usually scale, restraint, and font choice. Keep text short, give it breathing room, and pair it with a clean finish. If you love words, go for a statement that feels personal (family name, coordinates, a quote that doesn’t sound like a throw pillow became sentient).
3) 3D Layered Wood Wall Art
Layered wood is where DIY starts looking expensive. Stacked squares, stepped patterns, “carved” effects made from strips, or sculptural panels can look like boutique wall decorespecially if you keep the palette simple: natural wood + black, walnut + white, or all-neutral stains.
4) Wood Slice and Organic Texture Art
Wood slices bring that nature-inspired, cabin-meets-gallery mood. Use slices as a mosaic, arrange them in a gradient, or create a single bold circle piece. If you’re using real slices, plan for sanding and sealing so the surface stays smooth and splinter-free.
5) Mixed-Media Wood Art
Wood doesn’t need to be the whole bandit can be the bassline. Add metal accents, a mirror strip, woven rope, fabric, or even a painted canvas insert. Mixed media is also great for tying your art to other room finishes (hardware, lighting, or a nearby console table).
Materials: What to Use (and What to Avoid)
The best material depends on your goal: rustic charm, crisp modern lines, or something in between.
Beginner-friendly options
- Pine boards: affordable, easy to cut, easy to find. Great for stained or painted projects.
- Plywood (cabinet-grade if possible): stable and excellent as a backing panel for geometric designs.
- MDF: smooth for paint and routed designs, but heavy and hates moisture (keep it indoors and sealed).
Upgraded options
- Poplar: paints nicely and stays relatively stable.
- Oak, maple, walnut: beautiful grain and durabilitybest when you want a stained “furniture finish” look.
Reclaimed wood (use the “smart rustic” approach)
Reclaimed wood looks amazing, but it deserves a quick safety moment. If reclaimed pieces come from older painted trim, windows, or doors, there’s a chance of lead-based paint if the original surface was painted long ago. If you suspect old paint, don’t dry-sand it and turn your living room into a dust festival. Use lead-safe practices, contain dust, and consider professional testing or safer alternatives. Also ventilate well when using finishes or adhesives that may release VOCs.
Design Rules That Keep DIY Art From Looking “Accidentally Homemade”
- Pick one hero element: bold pattern, bold color, or bold texture. Not all three at once.
- Repeat something from the room: match a stain tone, echo a shape (arches, circles), or mirror a metal finish.
- Scale matters: on a large wall, tiny art looks like it’s lost. Go bigger or group pieces.
- Limit your palette: 2–4 tones usually reads “designer,” while 9 reads “clearance aisle battle royale.”
- Use negative space: leaving areas plain makes the intentional parts feel more intentional.
DIY Project: Simple Geometric Wood Panel That Looks High-End
This is a Remodelaholic-style crowd-pleaser: a clean, modern panel that uses basic cuts, simple assembly, and finishing tricks that make it look polished.
What you’ll need
- 1 piece of plywood (about 24″ x 36″ is a great starter size)
- Wood strips (1x2s or ripped-down strips; you can mix widths)
- Wood glue + brad nails (or a nailer) or clamps + glue if you prefer no nails
- Sandpaper (120 and 220 grit)
- Finish: stain, paint, or a combo
- Hanging hardware (D-rings or a French cleat for larger/heavier pieces)
Step-by-step
- Plan the pattern. Sketch triangles, angled lines, or a repeating “mountain” motif. Keep the design simple enough to execute cleanly.
- Cut the strips. Cut your wood strips to length and angle. If you’re doing diagonals, cut slightly long first and fine-tune the fit (your future self will send you a thank-you card).
- Dry-fit everything. Lay it out on the plywood backing. Adjust spacing so your pattern looks balanced.
- Attach the strips. Glue each strip down. If using brads, tack lightly; if not, clamp in sections and work patiently.
- Fill and sand. Fill nail holes if you want a seamless finish. Sand lightlyespecially on edgesto avoid splinters and to soften the look.
- Finish it. Try a two-tone approach: stain the strips and paint the background, or paint the strips and leave the backing natural. Seal when dry.
- Add hardware. If the piece is large or heavy, use a secure system like a cleat and mount properly to studs or rated anchors.
Specific example finish combos
- Modern: matte black background + natural oak-toned strips
- Coastal: whitewash strips + soft gray backing
- Warm minimalist: all-natural stain tones (light, medium, dark) arranged in a gradient
Finishing Tips: Make It Look Store-Bought (Without Smelling Like a Hardware Store for a Week)
The finish is where DIY wall art becomes “wow” instead of “well, that’s… definitely wood.” Choose based on durability, color goals, and indoor comfort:
Paint
Paint is forgiving and great for crisp modern looks. Use a quality primer when needed, and keep coats thin. If you want an ultra-clean edge between colors, painter’s tape plus a light pass of the base color over the tape edge can help “seal” it before the second color.
Stain
Stain highlights grain and makes even budget boards look richer. If pine stains blotchy, consider a conditioner, a gel stain, or a toned sealer approach.
Clear coats (polyurethane, polycrylic, or shellac)
Clear finishes protect and unify sheen. Water-based options usually stay clearer and dry faster; oil-based finishes often add warmth and can take longer to cure. Shellac is famous for drying quickly and working as a versatile sealer under many finishesexcellent for wall art where you want speed and a smooth build.
Indoor air quality tip
Ventilate well when finishing. Open windows, use exhaust airflow when possible, and don’t store open finish containers indoors. Your lungs deserve better than “Eau de Garage.”
How to Hang Wood Wall Art Securely (So Gravity Doesn’t Win)
Wood art can be heavier than canvas, especially with backing panels or layered elements. Before you hang anything, do two quick checks: weight and wall type (drywall, plaster, brick, etc.).
The “57-inch rule” (a helpful baseline)
Many designers use a gallery-style guideline: place the center of your artwork around 57 inches from the floor. It’s a baseline, not a law. If your ceilings are tall or the art sits above furniture, adjust to fit the room.
Above furniture: the “float” rule
When hanging art above a sofa, console, or bed, a common approach is to leave roughly 6–12 inches between the furniture top and the bottom of the art. This keeps the piece visually connected to what’s below it.
Hardware options (choose based on weight)
- Lightweight pieces: picture hooks, small nails, or removable strips (if the piece is truly light).
- Medium weight: rated drywall anchors or screws into studs.
- Heavy or oversized wood art: a French cleat or multi-point mounting system for stability.
Quick safety note
If you’re drilling, be mindful of what’s inside the wall. Use a stud finder where possible, drill pilot holes for anchors, and avoid areas with wiring or plumbing. “I hung art” is a fun story. “I found the wiring” is less fun.
Gallery Wall Ideas Using Wood Pieces (Without the Chaos)
A gallery wall doesn’t have to be a puzzle that ruins your weekend. A few simple planning steps can make it feel cohesive:
- Plan on the floor first. Lay everything out and take a photoyour future wall will thank you.
- Keep spacing consistent. Many stylists recommend a consistent gap (often a few inches) between frames or pieces for a cleaner look.
- Mix shapes thoughtfully. Combine wood art panels with framed prints, mirrors, or small shelvesjust repeat at least one element (color, material, or frame style).
- Create a focal point. Anchor the arrangement with one larger piece, then build around it.
Budget and Sourcing: Get the Look Without Paying “Gallery Price”
Wood wall art is one of the easiest places to stretch a budget because the value is in design, not necessarily rare materials.
- Look for off-cuts and scrap bundles at lumber yards or home centers.
- Use plywood as a base and add thin stripsbig impact with small material costs.
- Mix species strategically: use inexpensive wood for structure and a nicer wood for visible accents.
- Choose one “premium” detail (a walnut strip, a metal inlay, a clean floating frame) and keep the rest simple.
Care and Maintenance
Most indoor wood wall art is low-maintenance, but a little care keeps it looking fresh:
- Dust with a soft cloth or microfiber; avoid soaking wood.
- Keep it away from direct moisture sources (bathroom splash zones) unless sealed appropriately.
- If your home swings humid-to-dry with seasons, stable backings and sealed surfaces help reduce movement and warping.
Experiences and Lessons from Real-World Wood Wall Art Projects (500+ Words)
Ask a group of DIYers about wood wall art and you’ll hear a familiar chorus: “It looked easy online,” followed by a meaningful pause, followed by laughter. The good news is that most of the “oops” moments are predictableand totally avoidable once you know what tends to happen in the real world.
Lesson #1: The wood you bring home is not always ready for your wall. A lot of people pick up boards, cut immediately, glue immediately, and then wonder why their finished piece looks slightly… wavy. Wood responds to the environment, and boards can shift as they acclimate. The common experience is that letting boards rest indoors for a bit (especially if they came from a very different temperature/humidity situation) saves frustration later. DIYers who build a quick panel the same day often say it looked perfect at night and “mysteriously” developed a little twist laterlike the art got bored and stretched.
Lesson #2: “Rustic” is not the same thing as “splintery.” Many folks love reclaimed wood because it has character, but the first time someone brushes past a sharp edge and leaves with a tiny souvenir splinter, the romance fades fast. In practice, the best reclaimed-wood projects are usually the ones that keep the original texture while still sanding edges and sealing surfaces. That way you get the weathered look without turning your hallway into an obstacle course.
Lesson #3: Two tones look intentionalfive tones look like a leftover-stain buffet. People often start with a bold “I’ll do a gradient!” idea and then realize halfway through that their stains don’t harmonize. DIYers who feel happiest with the final result usually limit themselves to a small set of tones: maybe one stain and one paint, or three related stain shades that clearly belong to the same family. It’s one of those “less is more” truths that hits hardest when you’re standing over a board wondering why it suddenly looks like it belongs in a middle school science fair display called Tree Colors of the World.
Lesson #4: Hanging is where confidence goes to be humbled. Making the art can feel like the hard partuntil you’re holding a heavy wood piece near a wall and trying to mark holes while also keeping it level, centered, and not directly above your favorite lamp. Many people end up re-hanging once because they eyeballed the height and realized the piece drifted too high (a common complaint designers mention). A practical trick DIYers love is creating a simple paper template or using painter’s tape outlines so you can “see” the placement before committing to holes.
Lesson #5: Big art needs big-boy hardware. There’s a near-universal experience of someone thinking, “This hanger says it holds 30 pounds. My art is probably 30 pounds.” Spoiler: it’s usually not. Wood panels, especially layered 3D designs, can get heavy fast. The happiest stories usually involve people choosing a secure mounting method (often a cleat or multi-point mount), spreading load across studs or properly rated anchors, and sleeping peacefully without the tiny voice in their brain whispering, “What if it falls at 2 a.m.?”
Lesson #6: The best projects are the ones that match how you actually live. If you have kids, pets, or a high-traffic hallway, the most satisfying wood wall art tends to be sealed, durable, and mounted securely. If you’re a frequent re-decorator, lighter pieces or systems that make swapping easier can be the difference between “fun refresh” and “I guess that hole is part of the aesthetic now.” In short: the best Remodelaholic-style wood wall art doesn’t just look good in a photoit survives real life, fingerprints, and the occasional shoulder bump.
When you plan for these real-world momentswood movement, comfortable finishes, clean palettes, and secure hangingyour project goes from “DIY attempt” to “wait, you MADE that?” And honestly, that’s the whole point.